
If you’re looking for Christmas crafts for kids that are easy, affordable, and genuinely enjoyable, you’re in the right place!
We’ve put together 20 creative Christmas crafts for kids that parents, preschool teachers, and caregivers can enjoy with children of different ages. These activities use everyday supplies like construction paper, popsicle sticks, paper plates, cotton balls, cardboard rolls, and washable paint.
Whether you’re planning a cozy afternoon at home, a preschool Christmas party, or some creative activities for winter break, these Christmas crafts offer something for everyone.
The best part? Children don’t need to make everything perfectly. The fun is in choosing colors, cutting shapes, sticking decorations, and proudly showing off their finished creations.
Let’s make this Christmas season a little more creative!
Supplies You’ll Need for Christmas Crafts
Before starting these Christmas crafts for kids, gather a few basic supplies. You don’t need to purchase an expensive craft kit. Most of these materials are inexpensive and can be found at home, in a classroom, or at a local craft store.
🧺 Christmas Craft Supply Checklist
Gather these everyday supplies before your little crafters begin.
Construction paper, cardstock, washable paints, markers and crayons.
Glue sticks, child-safe scissors, pencils and rulers.
Cotton balls, pom-poms, googly eyes and felt.
Ribbon, yarn, stickers, glitter and decorative paper.
Popsicle sticks, paper plates, paper cups and cardboard rolls.
Clean pine cones, cardboard and other safe recycled materials.
20 Easy Christmas Crafts for Kids
1. Paper Christmas Tree Craft
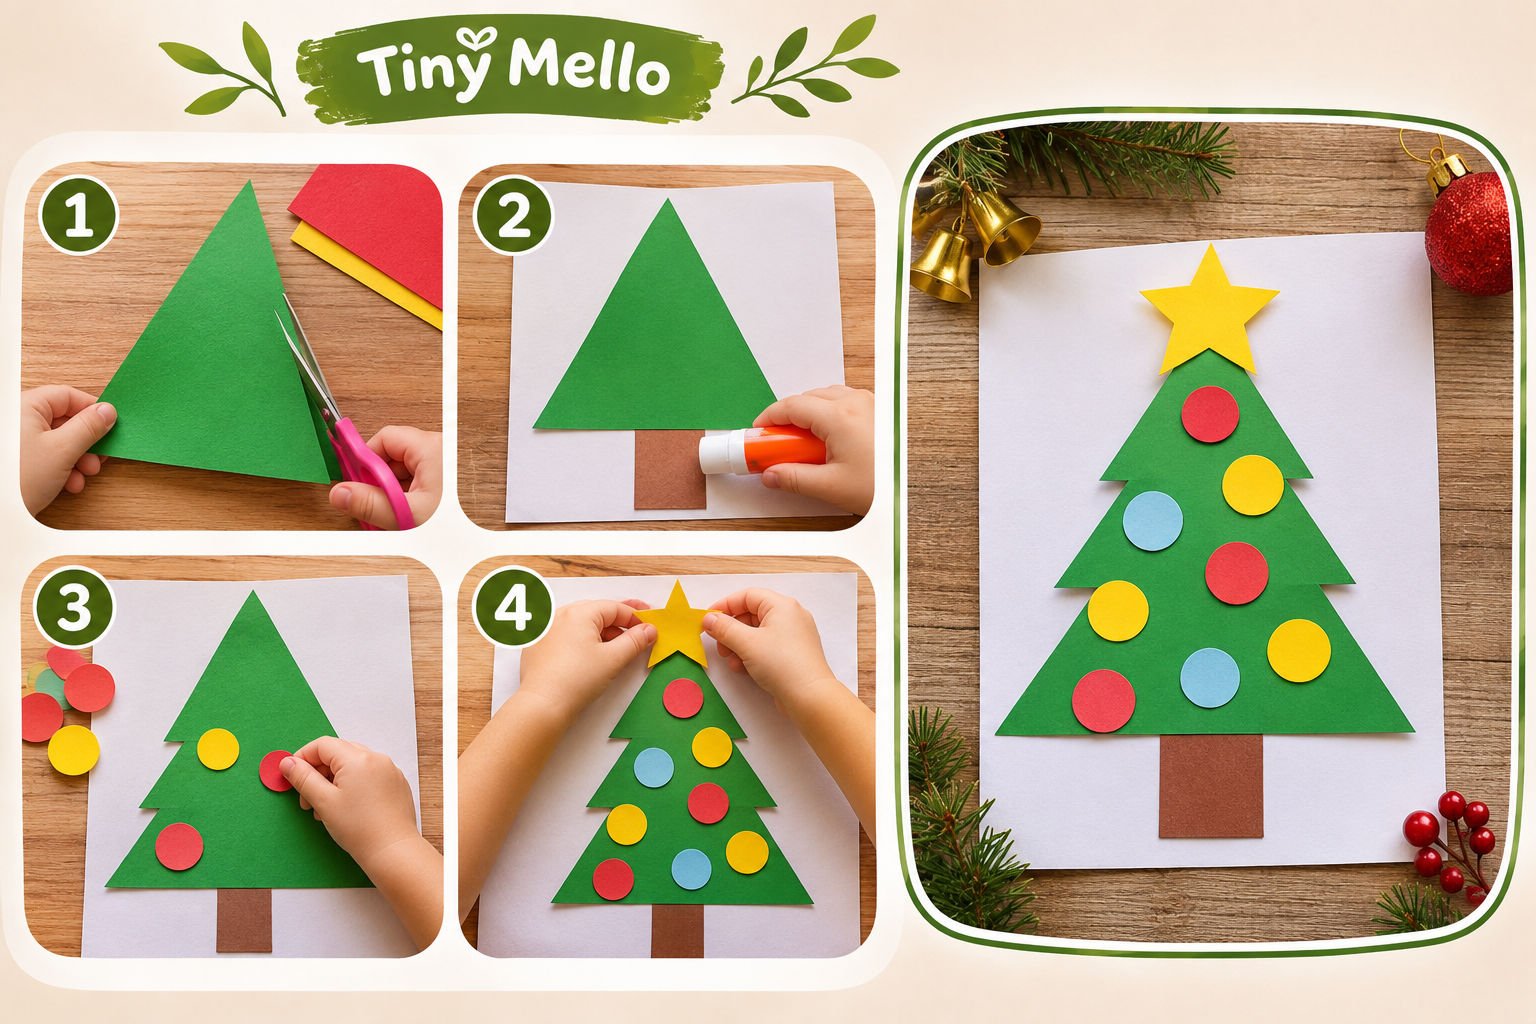
A Christmas tree is one of the most recognizable symbols of the holiday season. Children will love creating their own little tree and decorating it with colorful ornaments.
Materials Needed
🎄 What You’ll Need
How to Make It
Draw a large triangle on green paper and cut it out.
Cut a small brown rectangle and glue it below the triangle.
Add colorful paper circles, stickers, or little pom-poms.
Glue a yellow star at the top and display your finished tree.
Make It More Fun: Ask your child to design a rainbow Christmas tree or use a different color for every ornament.
2. Popsicle Stick Snowflake
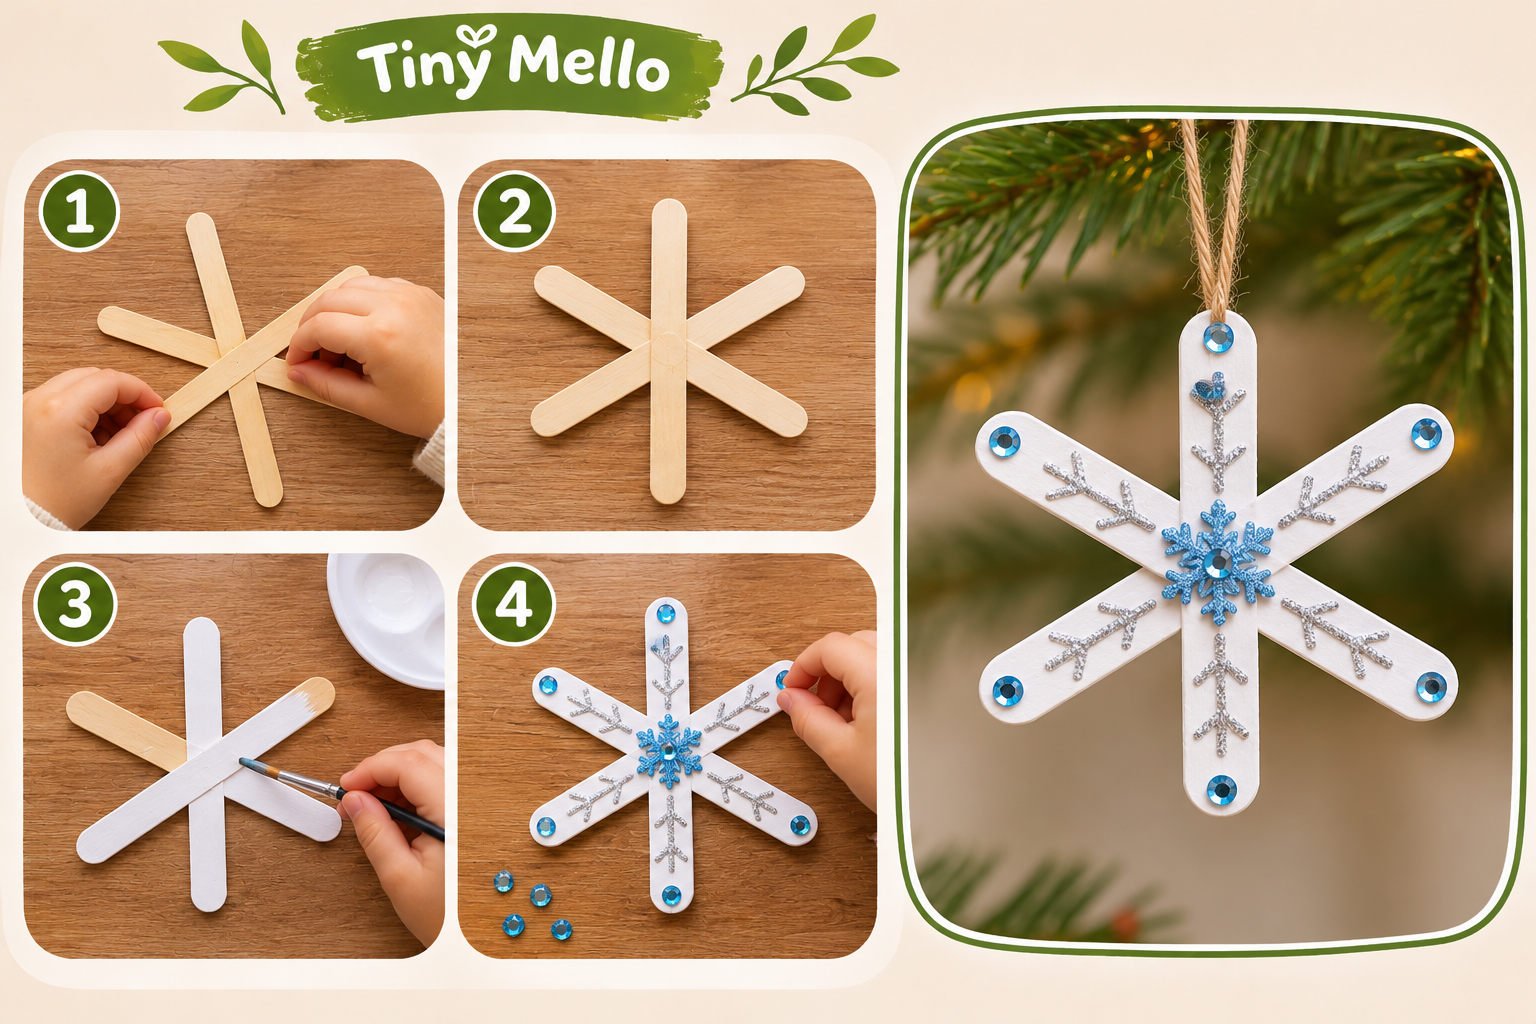
Bring a little winter magic to your craft table with these pretty popsicle stick snowflakes. Children can paint, decorate, and turn their creations into homemade Christmas tree ornaments.
Materials Needed
- 3–4 popsicle sticks
- White or light-blue paint
- Craft glue
- Glitter or small stickers
- Ribbon or yarn
How to Make It
Arrange the Sticks
Cross three or four popsicle sticks to create a snowflake shape.
Glue Together
Have an adult glue the center and allow it to dry.
Paint Your Snowflake
Paint the sticks white or light blue.
Add Decorations
Add glitter and a ribbon loop once the paint has dried.
Make It More Fun: Ask children to create different snowflake patterns. No two designs need to look alike!
3. Paper Plate Santa Claus
Ho, ho, ho! Let’s bring Santa Claus to life with a simple paper plate craft. This cheerful project is perfect for preschool Christmas parties and cozy afternoons at home.
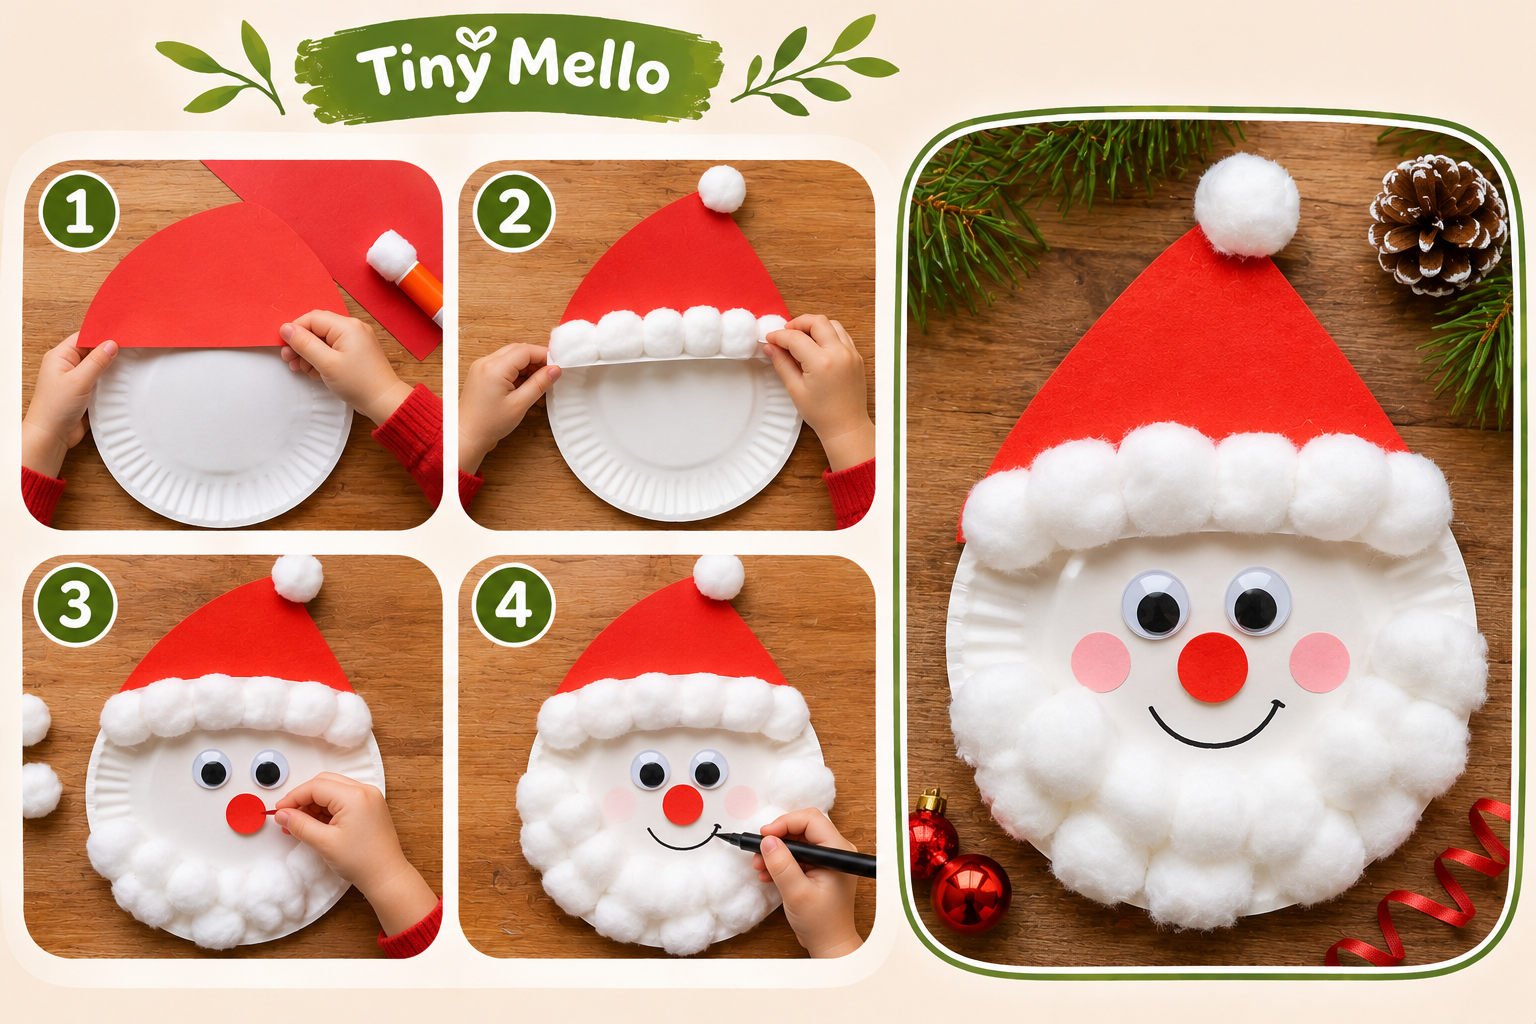
Materials Needed
- One white paper plate
- Red construction paper
- Cotton balls
- Googly eyes
- Pink and black markers
- Glue
- Child-safe scissors
How to Make It
- Cut a large red triangle for Santa’s hat.
- Glue the hat to the top of the paper plate.
- Add cotton balls along the bottom of the hat.
- Glue two googly eyes onto the plate.
- Add a small red paper circle for Santa’s nose.
- Cover the lower half with cotton balls to make a fluffy beard.
- Draw a happy smile.
Make It More Fun: Ask children what they would like to tell Santa this Christmas. Write their answers on the back of the plate.
4. Cotton Ball Snowman Craft
You don’t need real snow to make a snowman! This fluffy cotton ball snowman is a wonderful indoor winter activity for younger children.
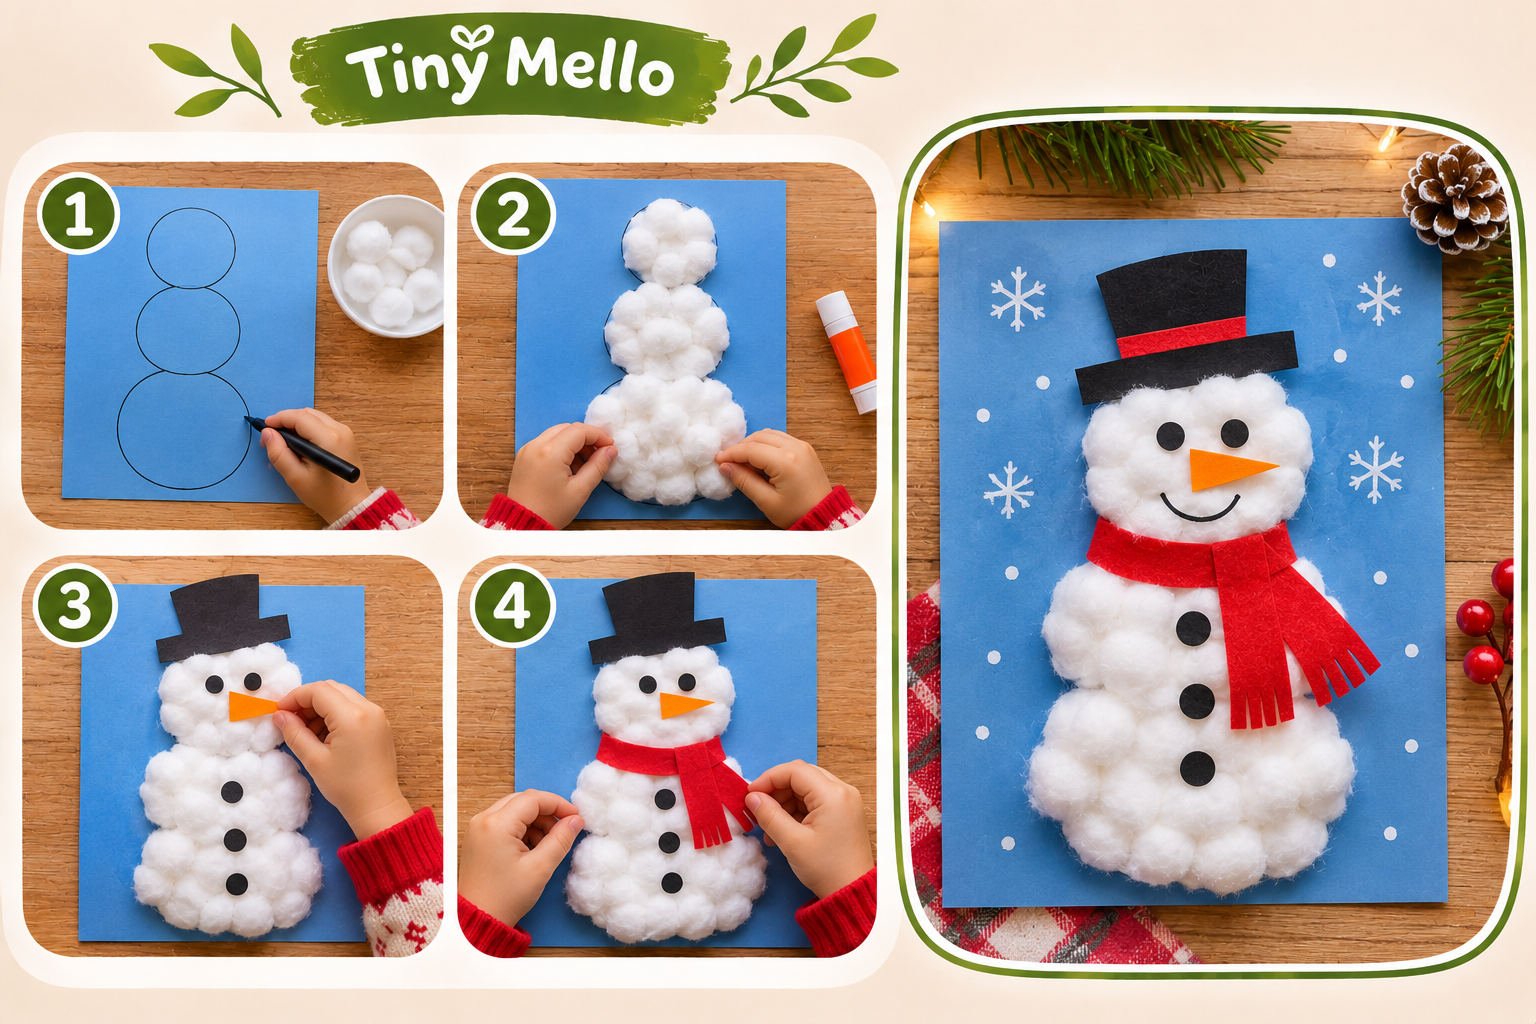
Materials Needed
- Blue construction paper
- Cotton balls
- Glue
- Orange paper
- Black paper
- Colored paper or ribbon for a scarf
How to Make It
- Draw three circles of different sizes on blue paper.
- Apply glue inside each circle.
- Let your child fill the circles with cotton balls.
- Cut an orange triangle for the carrot nose.
- Add black paper circles for the eyes and buttons.
- Make a colorful scarf using paper or ribbon.
- Draw little snowflakes around the snowman.
Make It More Fun: Ask your child to count the cotton balls and identify the biggest and smallest circles.
5. Handprint Reindeer Craft
Turn those tiny hands into an adorable Christmas keepsake! This handprint reindeer craft is a sweet way to celebrate the holidays and create something parents will want to save.
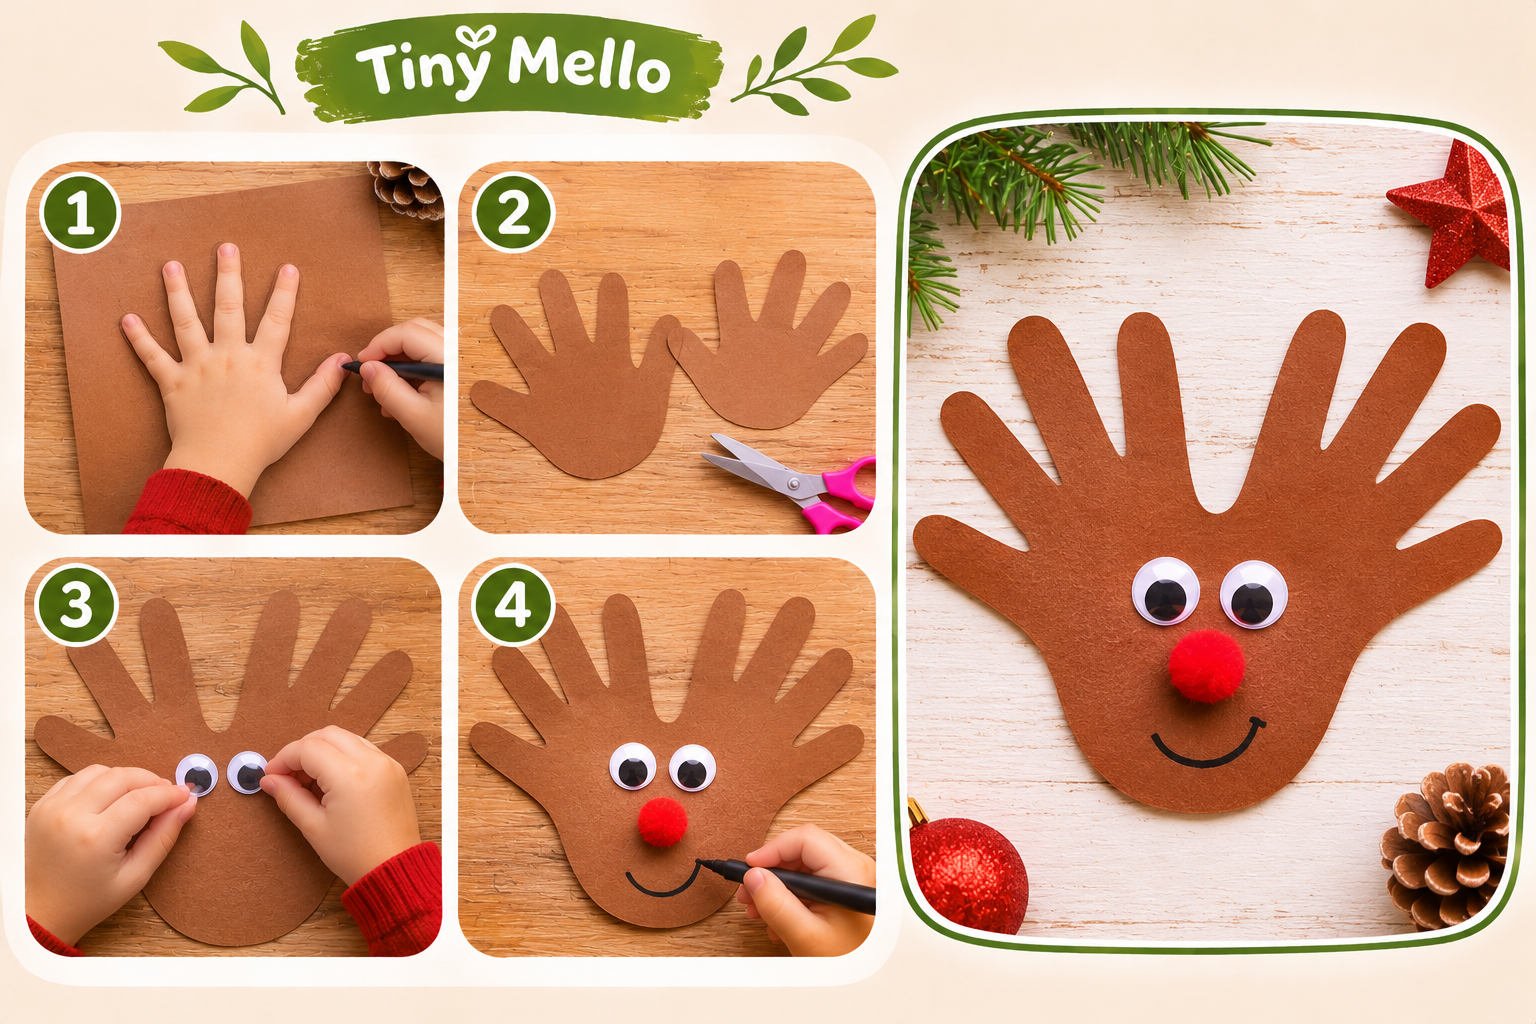
Materials Needed
- Brown construction paper
- Red pom-pom
- Googly eyes
- Glue
- Child-safe scissors
- Black marker
How to Make It
- Place your child’s hand on brown construction paper.
- Trace around the hand using a pencil.
- Cut out the handprint.
- Turn it upside down so the fingers look like reindeer antlers.
- Glue two googly eyes near the thumb area.
- Add a red pom-pom nose.
- Draw a little smile.
Make It More Fun: Write your child’s name and the year on the back. Make a new one every Christmas to see how much those little hands grow!
6. Christmas Paper Wreath
A homemade Christmas wreath is a lovely way for kids to help decorate the house. Instead of buying a ready-made decoration, children can create their own colorful wreath using simple paper strips.
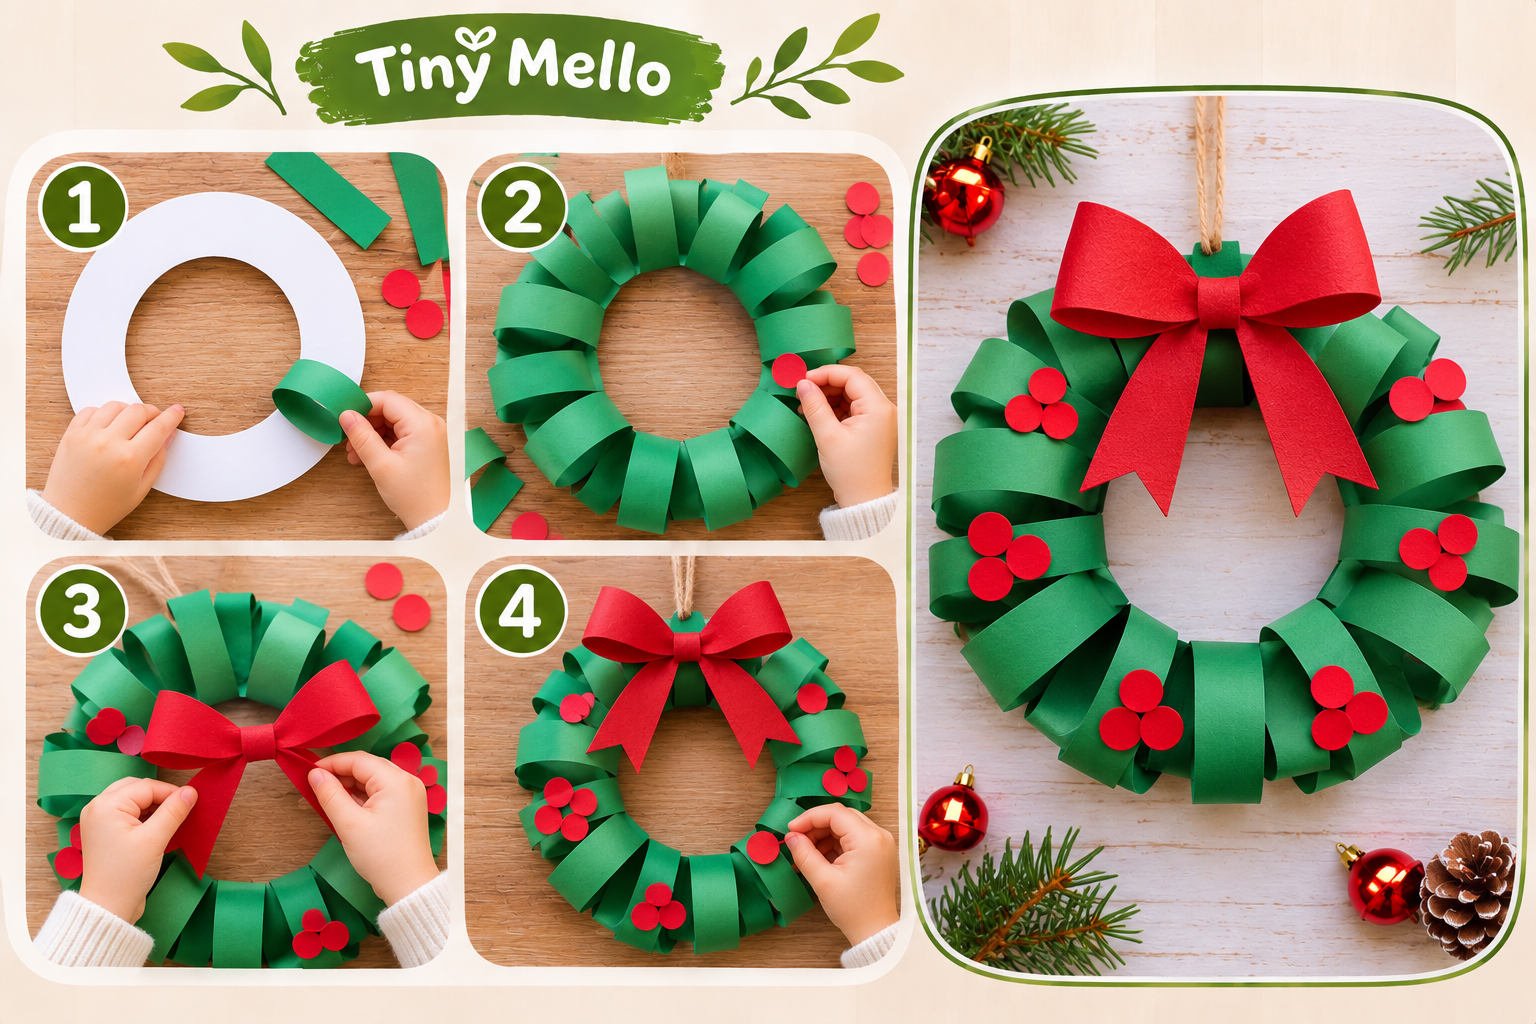
Materials Needed
- Green construction paper
- Red construction paper
- Cardstock or paper plate
- Glue stick
- Child-safe scissors
- Ribbon
🎄 What You’ll Need
How to Make It
Prepare the Base
Cut a large ring from cardstock or a paper plate. An adult can help with the center.
Cut Paper Strips
Cut green construction paper into small, equal-sized strips.
Create Green Loops
Curl each strip into a loop and glue the ends together.
Decorate Your Wreath
Attach the loops around the ring. Add red berries and a ribbon bow.
Make It More Fun: Let children choose different shades of green and add colorful paper berries to create their own wreath designs.
7. Toilet Paper Roll Santa Claus
Have some empty cardboard toilet paper rolls at home? Don’t throw them away just yet! Turn them into adorable little Santa figures with this fun recycled Christmas craft.
Children will enjoy creating their own Santa characters while learning that everyday household materials can be reused in creative ways.
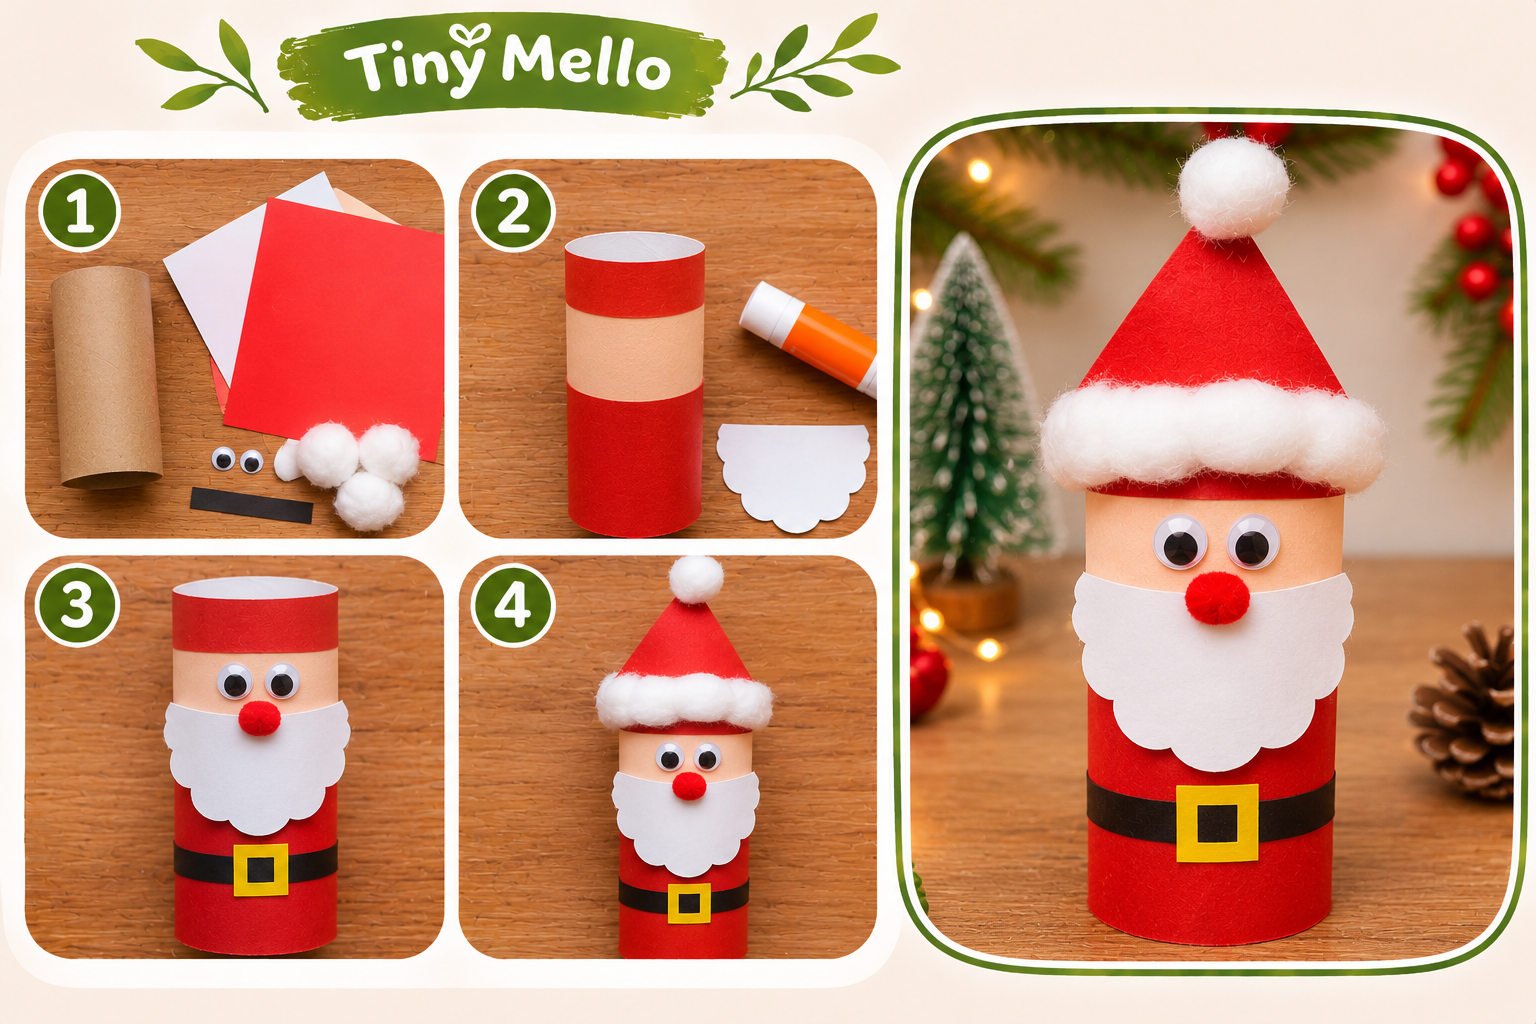
Materials Needed
- Empty cardboard toilet paper roll
- Red construction paper
- White cotton balls
- Black paper
- Skin-tone paper
- Glue
- Markers
How to Make It
- Wrap the cardboard roll with red construction paper.
- Cut a small circle from skin-tone paper for Santa’s face.
- Glue the face near the top of the roll.
- Attach cotton balls around the face to create Santa’s beard.
- Make a small red triangle hat with white cotton trim.
- Cut a black paper strip for Santa’s belt.
- Draw two eyes and a happy expression.
Make It More Fun: Create a whole Christmas character family with Santa, a snowman, a reindeer, and an elf.
8. Paper Cup Christmas Tree
Looking for a Christmas decoration that can stand on a table or shelf? This little paper cup Christmas tree is a fun project that children can proudly display in their rooms.
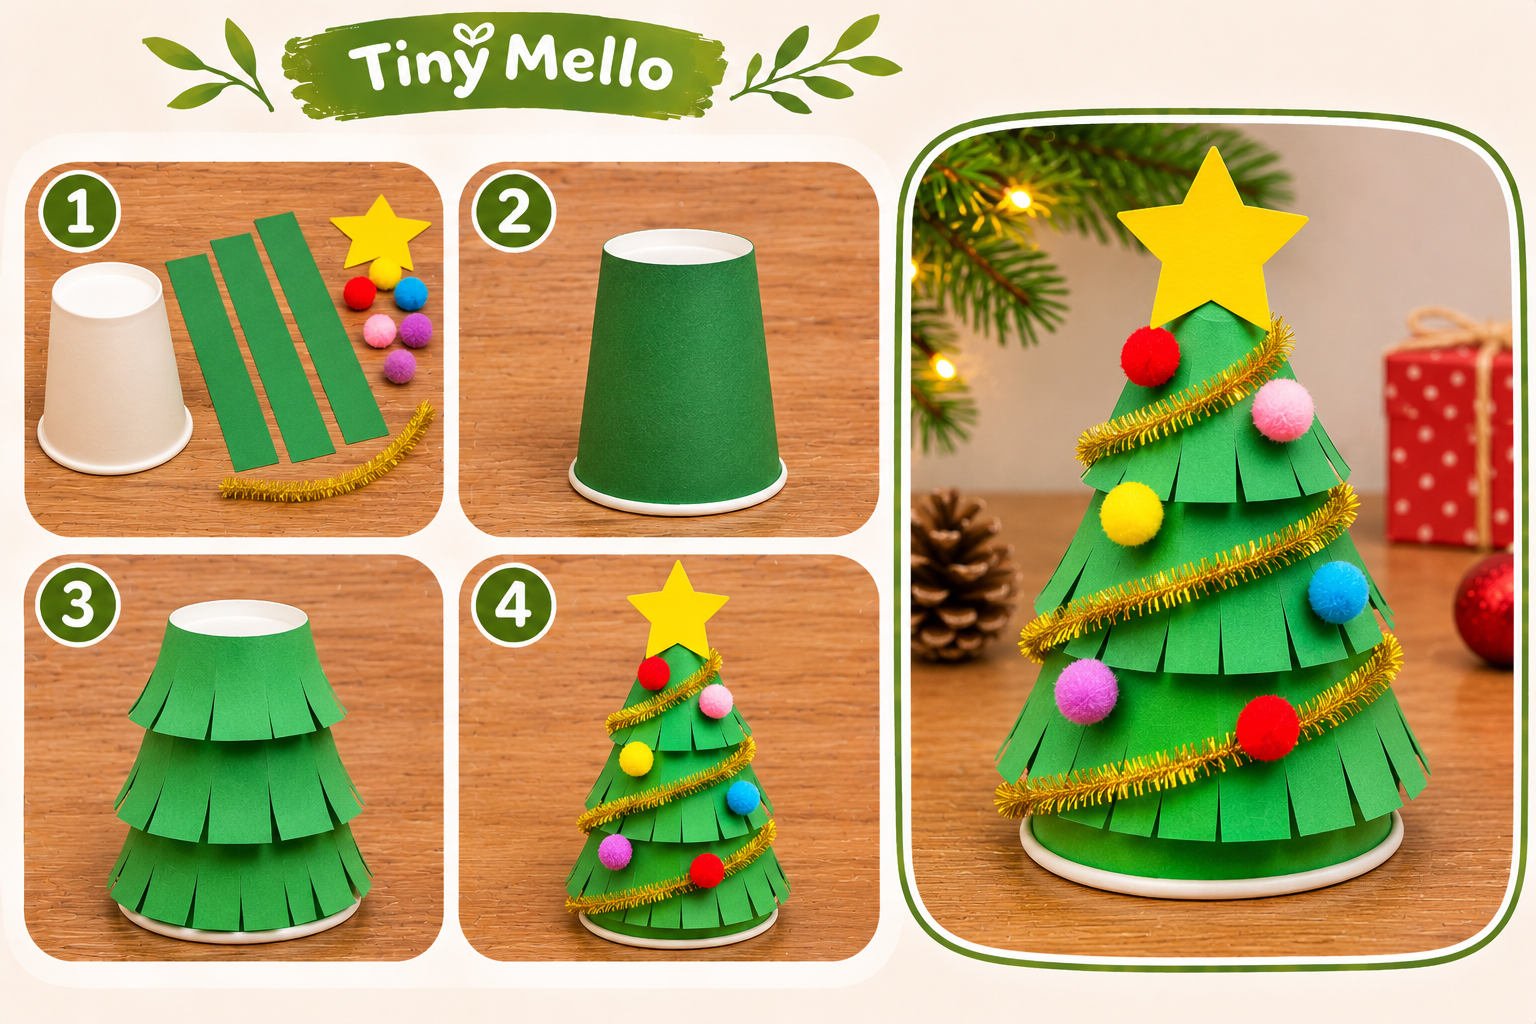
Materials Needed
- Green paper cup
- Green construction paper
- Yellow paper
- Small pom-poms
- Glue
- Stickers
- Child-safe scissors
How to Make It
- Turn the paper cup upside down.
- Cut green construction paper into small triangular pieces.
- Glue the pieces around the cup to create a leafy tree effect.
- Add colorful pom-poms as Christmas ornaments.
- Cut a small yellow star and attach it to the top.
- Place the finished tree on a flat surface.
Make It More Fun: Use different-sized pom-poms and ask children to sort them by color before decorating their trees.
9. Salt Dough Christmas Ornaments
Some Christmas crafts are fun for an afternoon, while others become special decorations that families bring out year after year.
Salt dough ornaments are perfect for creating those little holiday memories. Children can make stars, Christmas trees, hearts, and other festive shapes to decorate the Christmas tree.
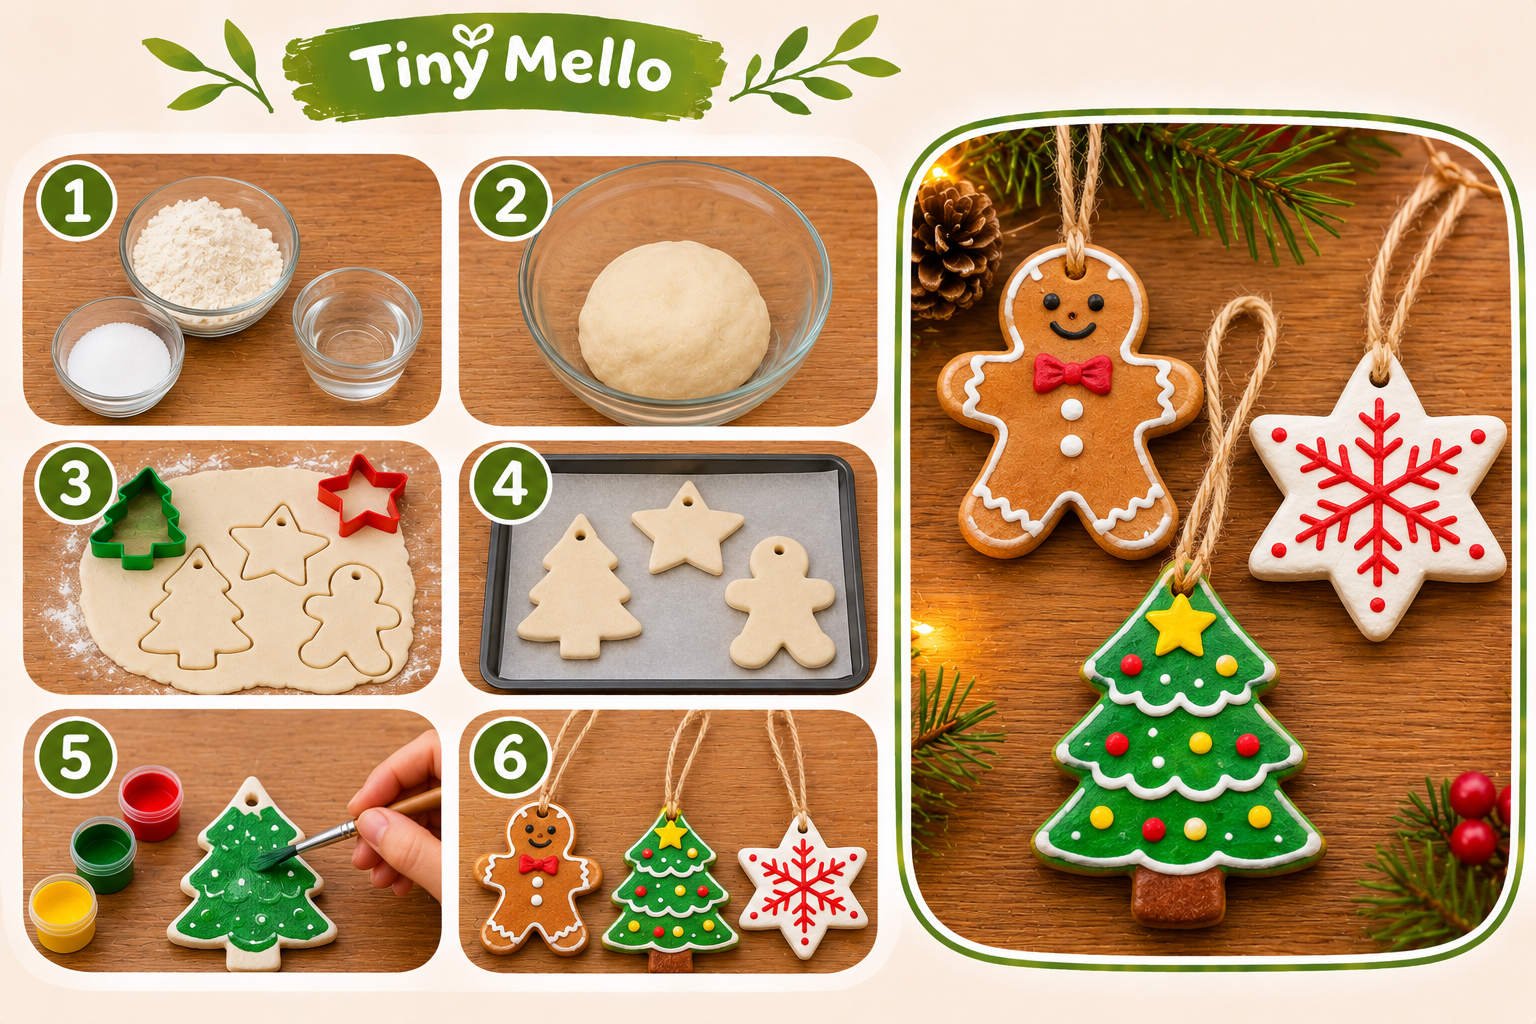
Materials Needed
🥣 Easy Salt Dough Recipe
Makes a basic batch for homemade ornaments.
Cups flour
Cup salt
Cup water
How to Make It
Mix the Ingredients
Combine flour and salt in a bowl. Gradually add water until a firm dough forms.
Roll the Dough
Knead until smooth and roll it out to about ¼ inch thick.
Cut Christmas Shapes
Use cookie cutters to make stars, trees, and other holiday shapes. Make a hole for the ribbon.
Dry and Decorate
Have an adult bake at approximately 200°F until completely dry. Cool fully, then decorate with paint.
Make It More Fun: Write your child’s name and the year on the back of each ornament.
10. Christmas Paper Chain Garland
Remember making paper chains as a child? Bring that simple activity back this Christmas!
This paper chain garland is one of the easiest Christmas crafts for kids. It’s inexpensive, colorful, and perfect for decorating bedrooms, classrooms, or a family Christmas tree.
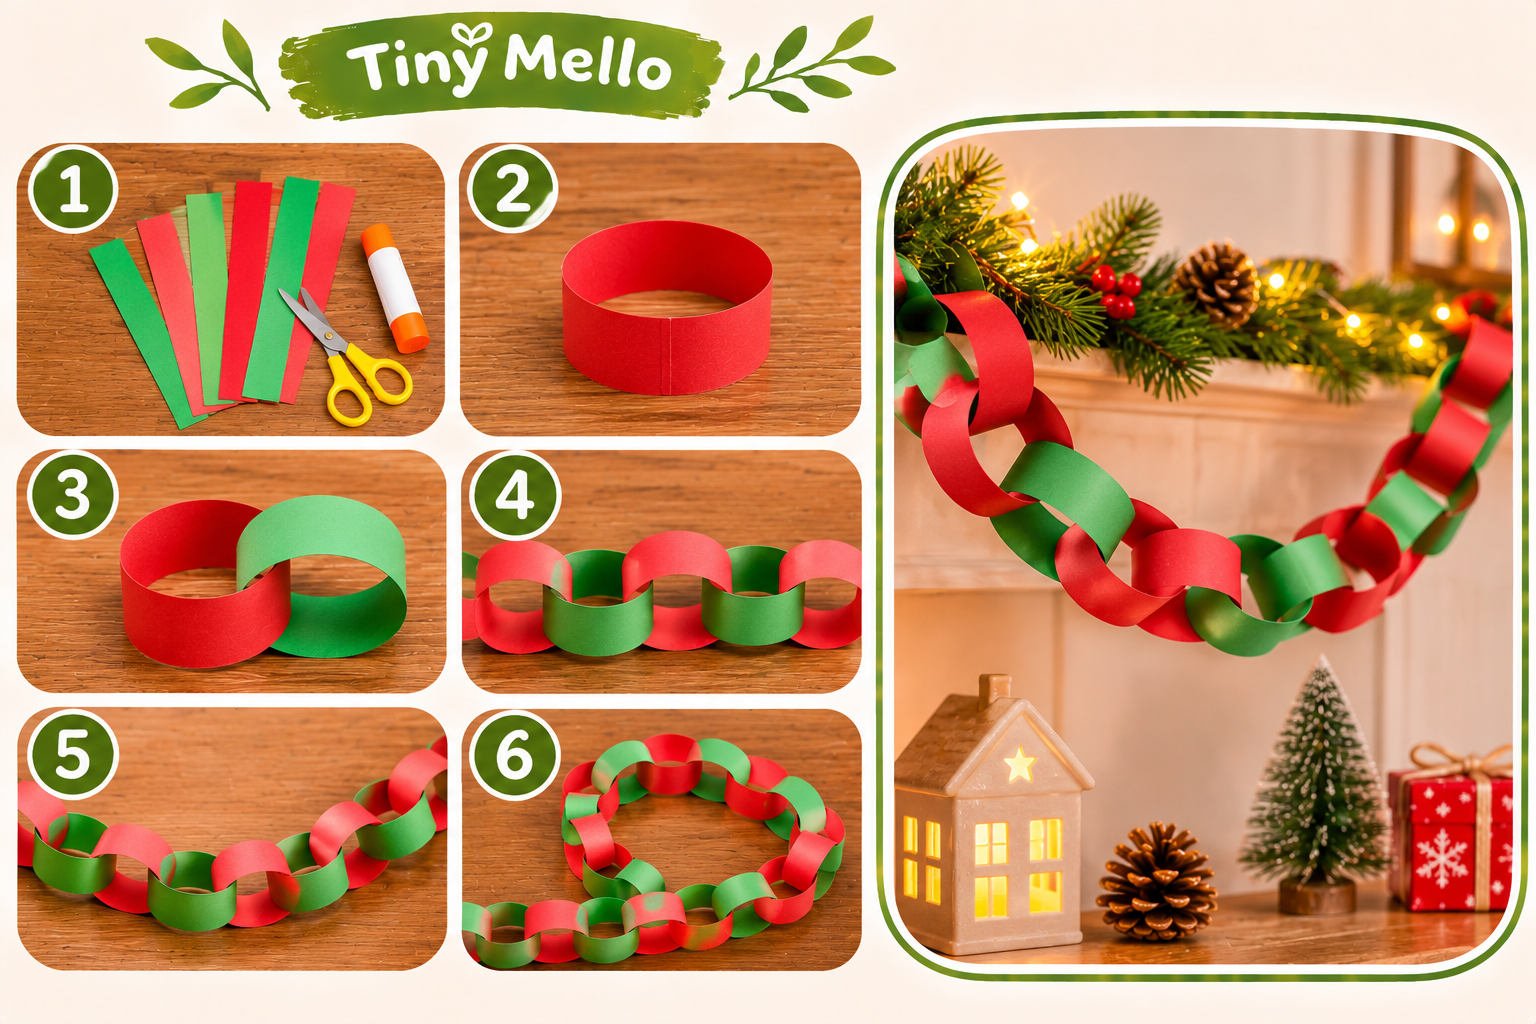
Materials Needed
- Red construction paper
- Green construction paper
- White construction paper
- Child-safe scissors
- Glue stick or tape
- Ruler
How to Make It
- Cut construction paper into long strips of equal width.
- Take one strip and form a circle.
- Glue or tape the ends together.
- Thread a second strip through the first circle.
- Join the ends to create another loop.
- Continue alternating red, green, and white strips.
- Make the garland as long as you like!
Make It More Fun: Encourage children to create repeating patterns such as red-green-red-green or red-white-green.
11. Pine Cone Christmas Tree
Bring a little nature into your Christmas decorations! A simple pine cone can become a miniature Christmas tree with some green paint and colorful decorations.
This activity is especially fun for children who enjoy nature walks and collecting interesting natural materials.
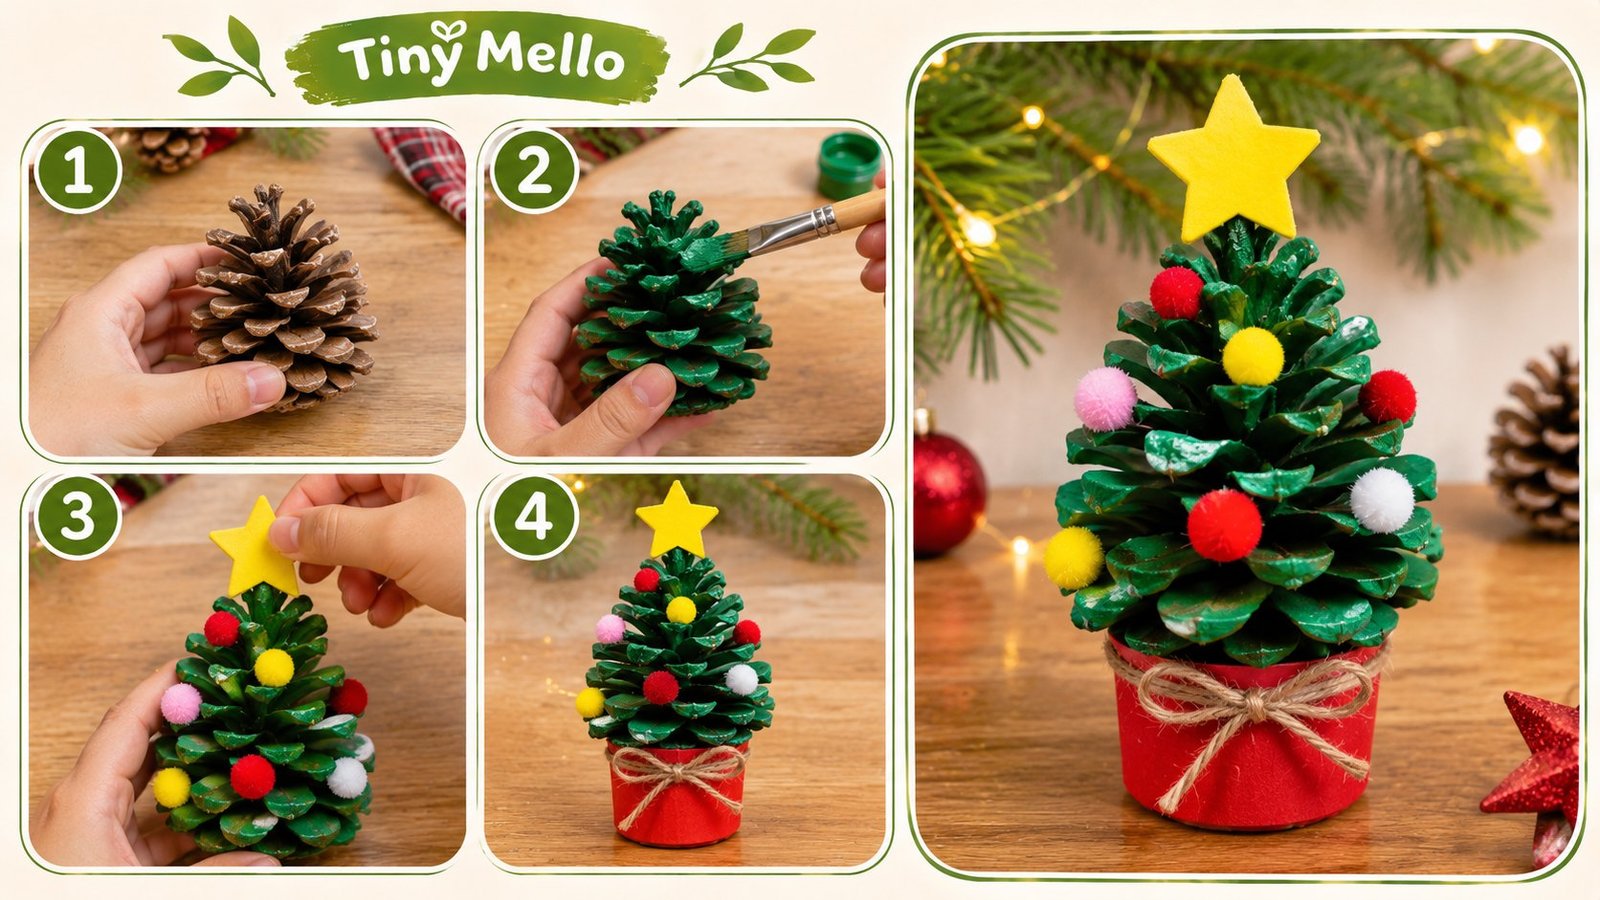
Materials Needed
- Clean, dry pine cones
- Green washable paint
- Small pom-poms
- Yellow construction paper
- Glue
- Cardboard circle for the base
How to Make It
- Place a clean, dry pine cone on a covered work surface.
- Let children gently paint it green.
- Allow the paint to dry completely.
- Glue small pom-poms between the pine cone scales.
- Cut a tiny yellow star and attach it to the top.
- Glue the bottom of the pine cone to a cardboard base.
Make It More Fun: Make a mini Christmas forest using pine cones of different sizes.
12. Reindeer Paper Bag Puppet
Why just make a Christmas decoration when you can make a toy, too?
This reindeer paper bag puppet is a playful Christmas craft that children can use for storytelling, pretend play, and little puppet shows.
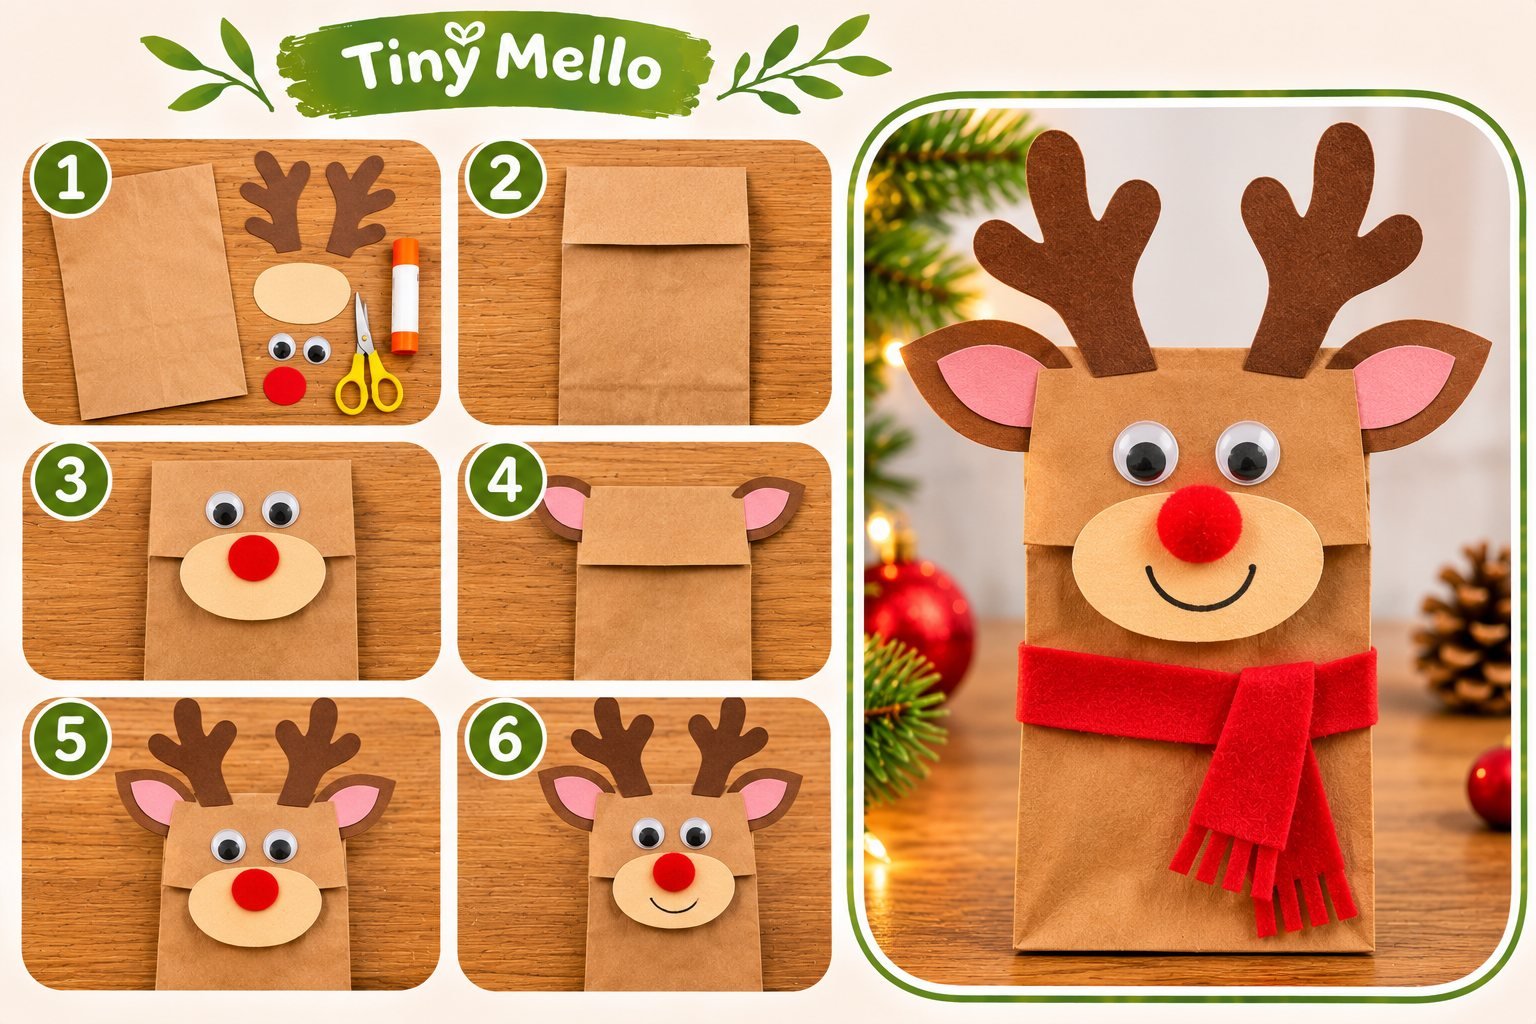
Materials Needed
- Brown paper lunch bag
- Brown construction paper
- Red pom-pom
- Googly eyes
- Glue
- Scissors
- Black marker
How to Make It
- Place the paper bag with its folded flap facing upward.
- Cut two antler shapes from brown construction paper.
- Glue the antlers behind the top flap.
- Attach two googly eyes to the flap.
- Add a red pom-pom nose.
- Draw a cheerful smile.
- Let everything dry before placing your hand inside the bag.
Make It More Fun: Encourage children to invent a Christmas adventure for their reindeer and perform a puppet show.
13. Christmas Star Ornament
Every Christmas tree needs a few beautiful stars! This paper star ornament is a simple project that older preschoolers and elementary-age children can decorate in their own style.
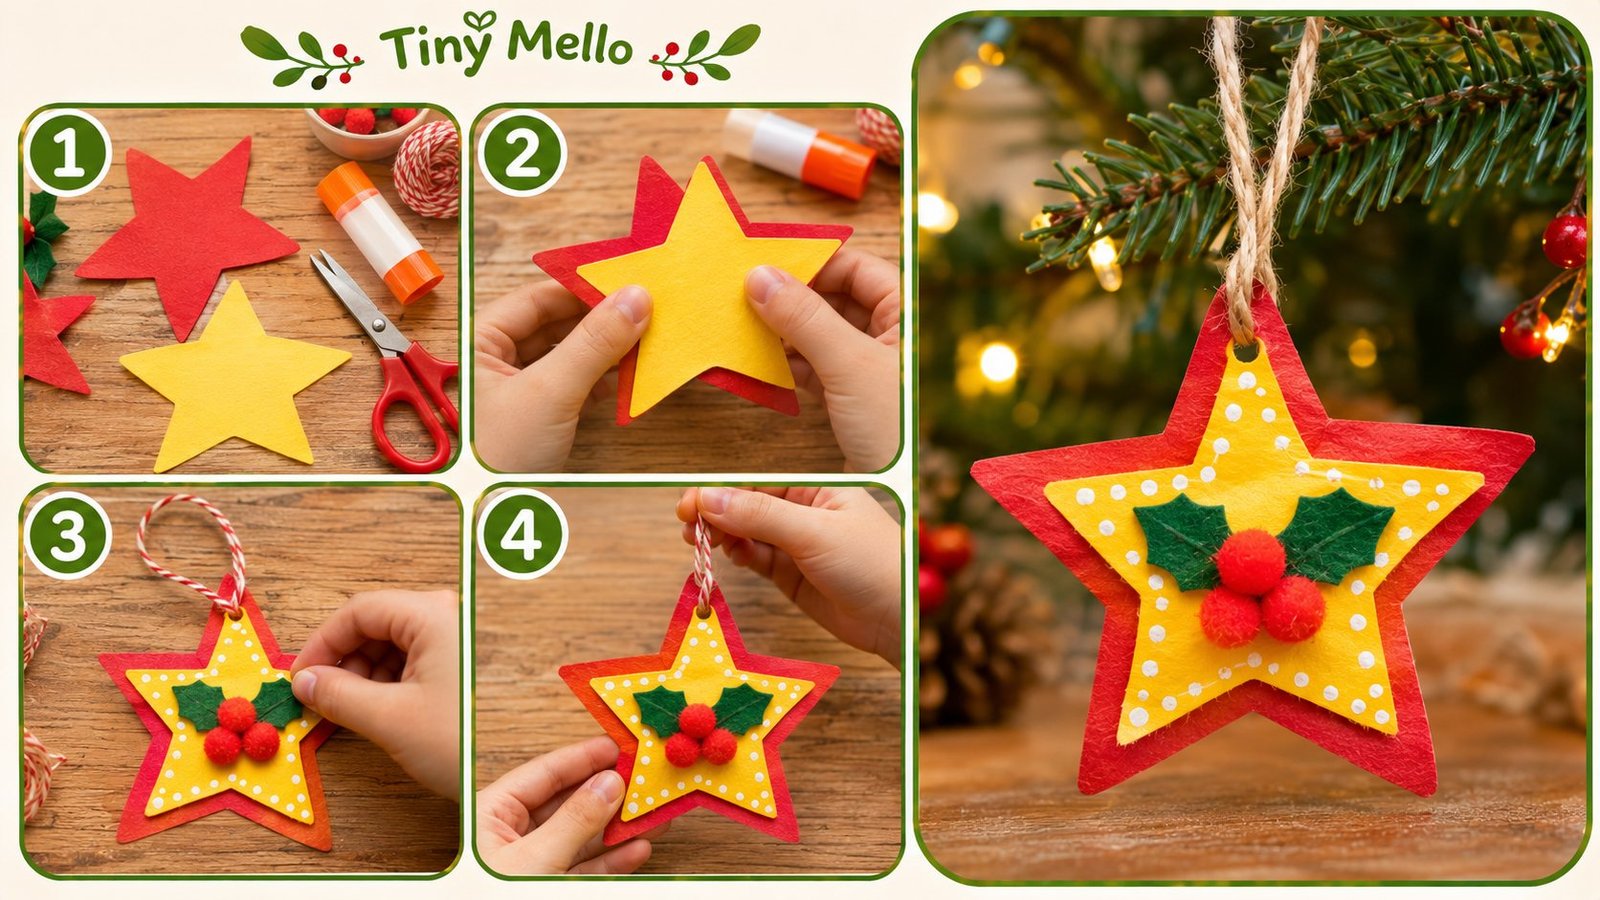
Materials Needed
- Yellow or gold cardstock
- Red and green decorative paper
- Glue
- Scissors
- Ribbon
- Star template
How to Make It
- Draw or print a large star shape on cardstock.
- Cut out the star.
- Cut smaller decorative shapes from colored paper.
- Glue the smaller shapes onto the star.
- Add dots, lines, or patterns using markers.
- Attach a ribbon loop to the top.
Make It More Fun: Ask children to design a star using only three colors.
14. Paper Plate Christmas Wreath
A Christmas wreath is a classic holiday decoration, and making one with a paper plate is easy enough for young children.
This project is especially useful for preschool classrooms because teachers can prepare the paper plate rings ahead of time.
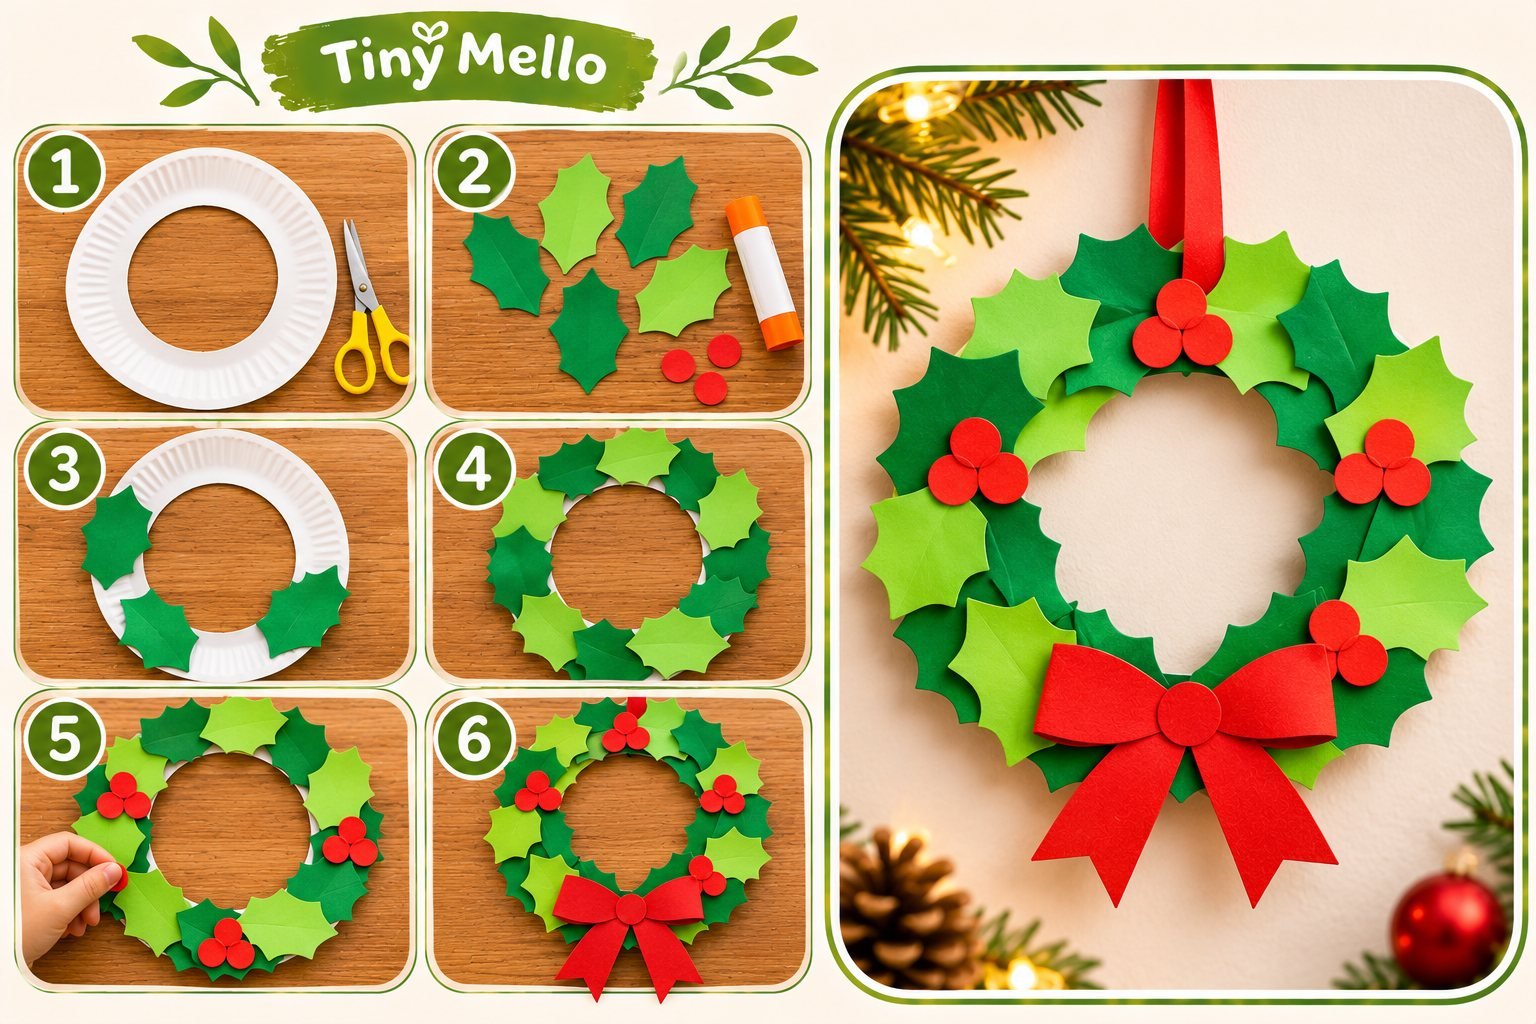
Materials Needed
- Paper plate
- Green washable paint
- Red pom-poms or paper circles
- Red ribbon
- Glue
- Scissors
How to Make It
- Ask an adult to cut out the center of the paper plate.
- Paint the remaining ring green.
- Allow it to dry.
- Glue red pom-poms or paper circles around the ring.
- Make a bow using red ribbon or paper.
- Attach the bow to the bottom.
- Add a ribbon loop to hang it on a door.
Make It More Fun: Let children add their own decorations, such as little paper stars, snowflakes, or colorful stickers.
15. Popsicle Stick Reindeer
These tiny reindeer are full of personality! Popsicle sticks are easy to work with and can be transformed into adorable Christmas decorations.
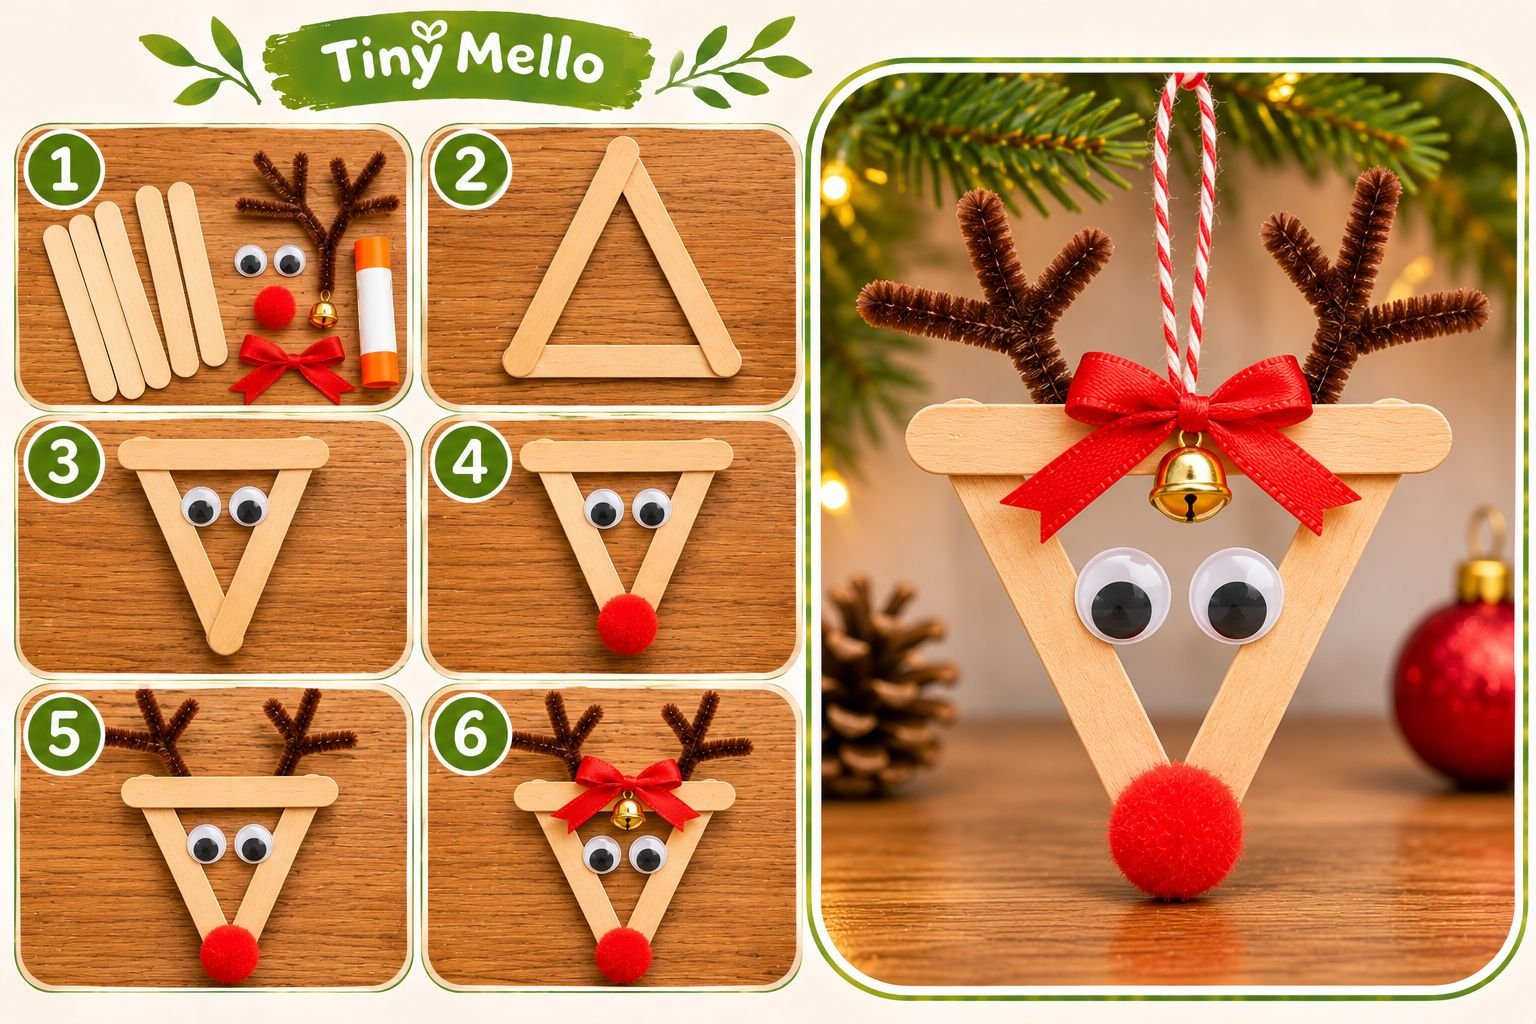
Materials Needed
- Three popsicle sticks
- Brown paint
- Red pom-pom
- Googly eyes
- Brown construction paper
- Glue
- Ribbon
How to Make It
- Arrange three popsicle sticks into a triangle.
- Ask an adult to glue the corners together.
- Paint the triangle brown and allow it to dry.
- Cut two antlers from brown construction paper.
- Attach the antlers to the top.
- Glue on two googly eyes.
- Add a red pom-pom nose.
- Attach a ribbon loop if you want to hang it on the Christmas tree.
Make It More Fun: Create several reindeer with different expressions and give each one a name.
16. Christmas Tree Finger Painting
Not every Christmas craft needs scissors and complicated instructions. Sometimes all children need is paper, paint, and permission to get a little messy!
This finger-painting activity is especially suitable for toddlers and younger preschoolers.
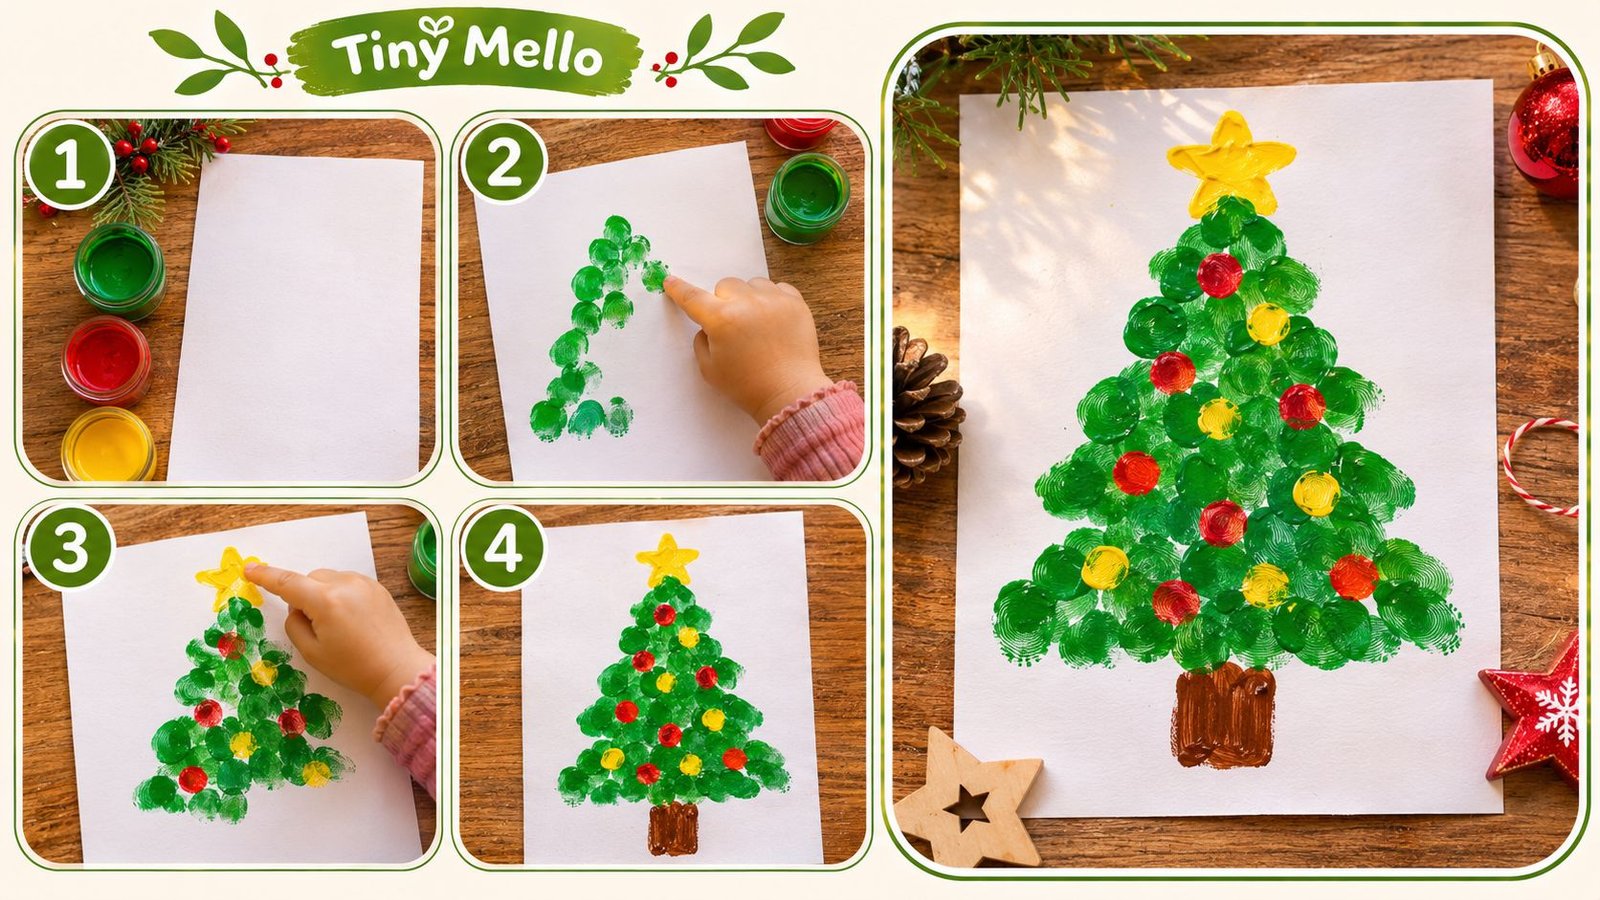
Materials Needed
- White cardstock
- Green washable finger paint
- Red, yellow, and blue washable paint
- Brown marker or paper
- Paint tray
How to Make It
- Draw a simple Christmas tree outline on white cardstock.
- Pour a little green paint onto a washable tray.
- Let children dip their fingertips into the paint.
- Press their fingerprints inside the tree outline.
- Use different colors to create Christmas ornaments.
- Add a brown trunk and a yellow star.
- Allow the artwork to dry.
Make It More Fun: Count the colorful fingerprint ornaments together and talk about the different colors.
17. Paper Snowflake Art
Want to add a little winter magic to your windows? Paper snowflakes are an inexpensive and beautiful craft that older preschoolers and school-age children will enjoy.
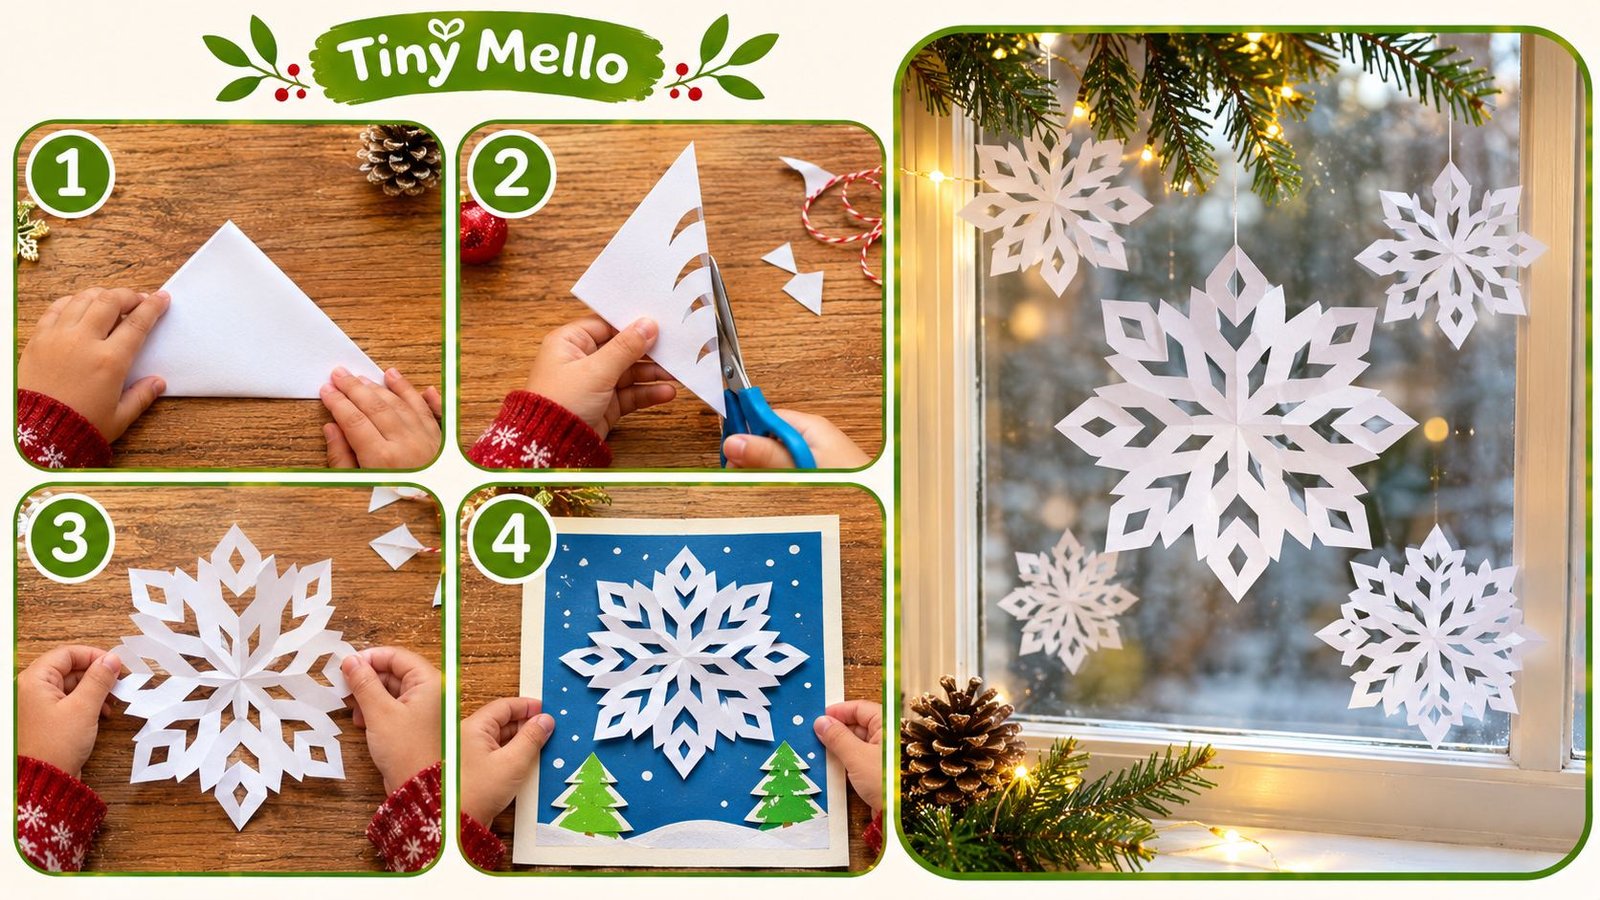
Materials Needed
- White paper
- Child-safe scissors
- Pencil
- Blue cardstock or window
- Tape
How to Make It
- Start with a square sheet of paper.
- Fold it in half diagonally to form a triangle.
- Fold it again into a smaller triangle.
- With adult guidance, cut small shapes along the folded edges.
- Carefully unfold the paper.
- Open it fully to reveal the snowflake pattern.
- Display it against a window or blue background.
Make It More Fun: Make snowflakes in different sizes and create a winter wonderland display.
18. DIY Christmas Gift Box Craft
Children love giving gifts, especially when they’ve made something themselves. These little paper gift boxes can hold tiny notes, stickers, or small treats.
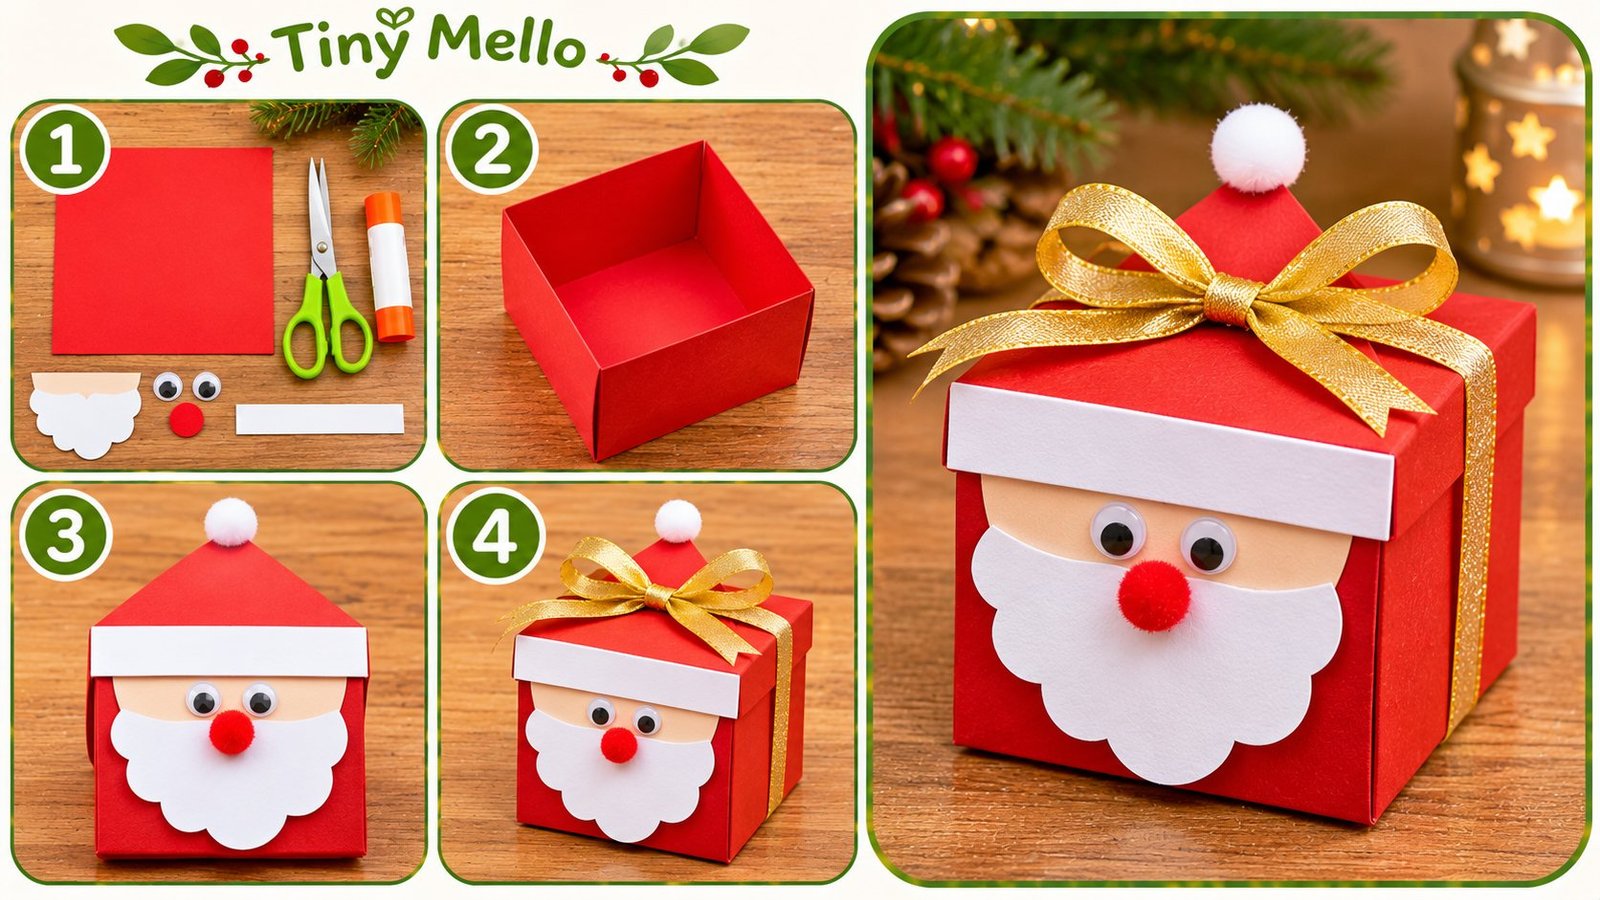
Materials Needed
- Colored cardstock
- Ruler
- Pencil
- Child-safe scissors
- Glue or double-sided tape
- Ribbon and stickers
How to Make It
- Draw a simple gift-box template on cardstock.
- Mark the folding lines with a ruler.
- Cut around the outer edges.
- Fold along the marked lines.
- Glue the tabs to assemble the box.
- Decorate with ribbon, paper bows, and stickers.
- Add a little handwritten Christmas message inside.
Make It More Fun: Let children make a small gift box for someone special in the family.
19. Candy Cane Paper Craft
Candy canes are a familiar Christmas favorite, and children can make their own colorful versions using nothing more than paper strips.
This is a simple activity for younger kids who are learning to recognize colors and patterns.
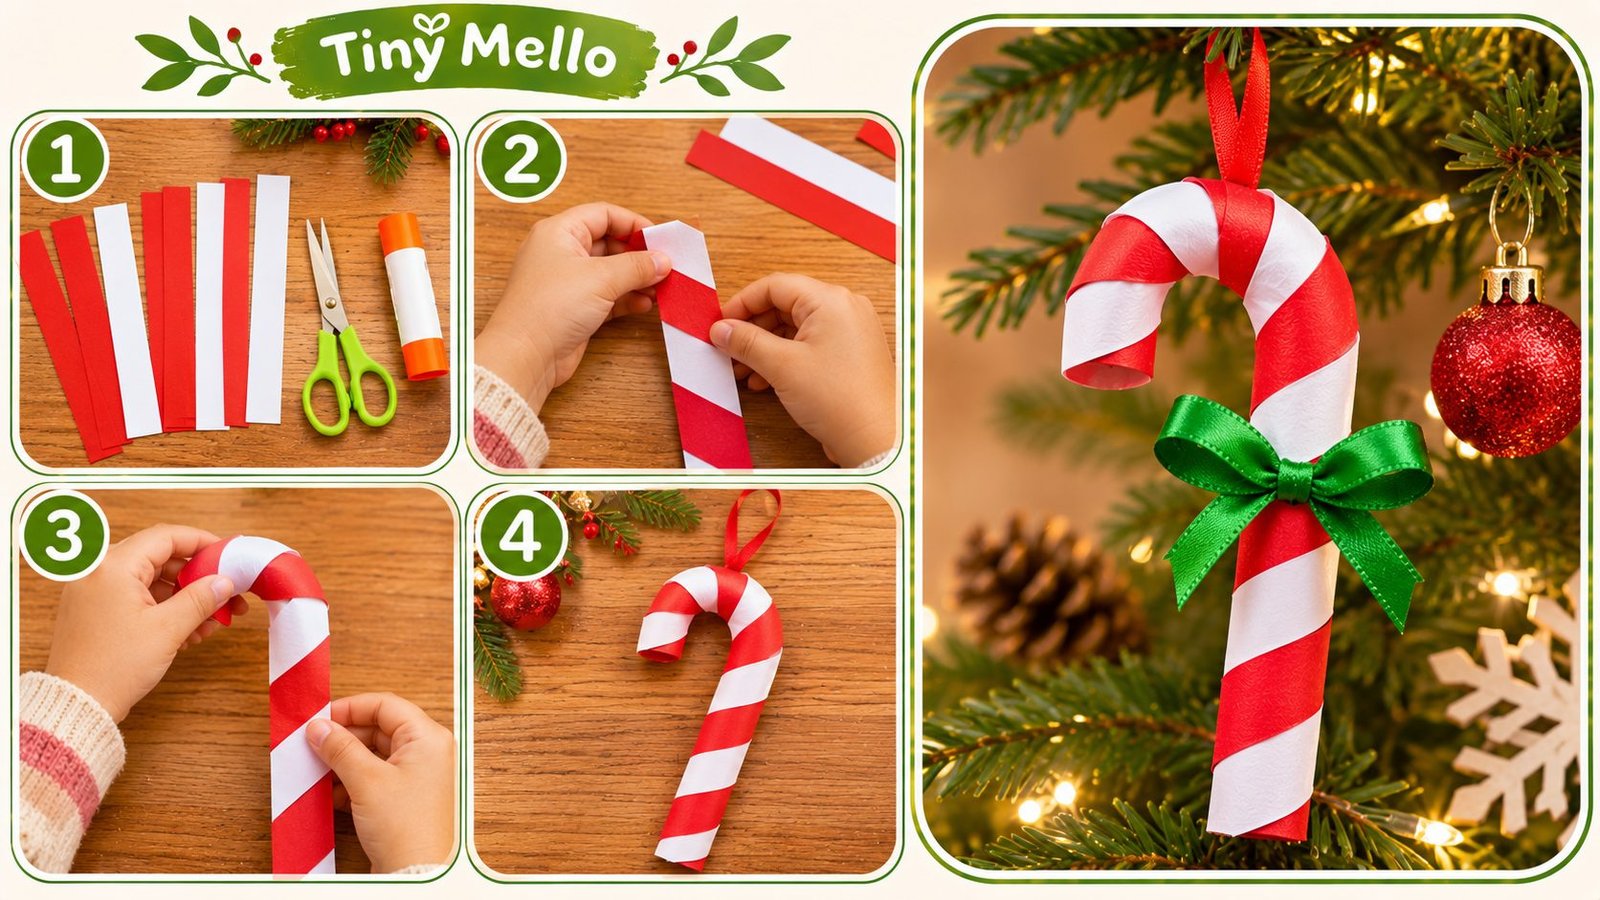
Materials Needed
- Red construction paper
- White construction paper
- Glue stick
- Scissors
- Pencil
How to Make It
- Draw a large candy cane outline on white cardstock.
- Cut thin red paper strips.
- Glue the strips across the candy cane at an angle.
- Leave a small white gap between each red strip.
- Trim away extra paper around the outline.
- Let the glue dry completely.
Make It More Fun: Ask children to identify the repeating red-and-white pattern and create their own colorful candy cane designs.
20. DIY Christmas Greeting Card
Let’s finish our Christmas crafts with something meaningful!
A handmade Christmas card is a sweet way for children to share holiday wishes with grandparents, friends, teachers, and family members.
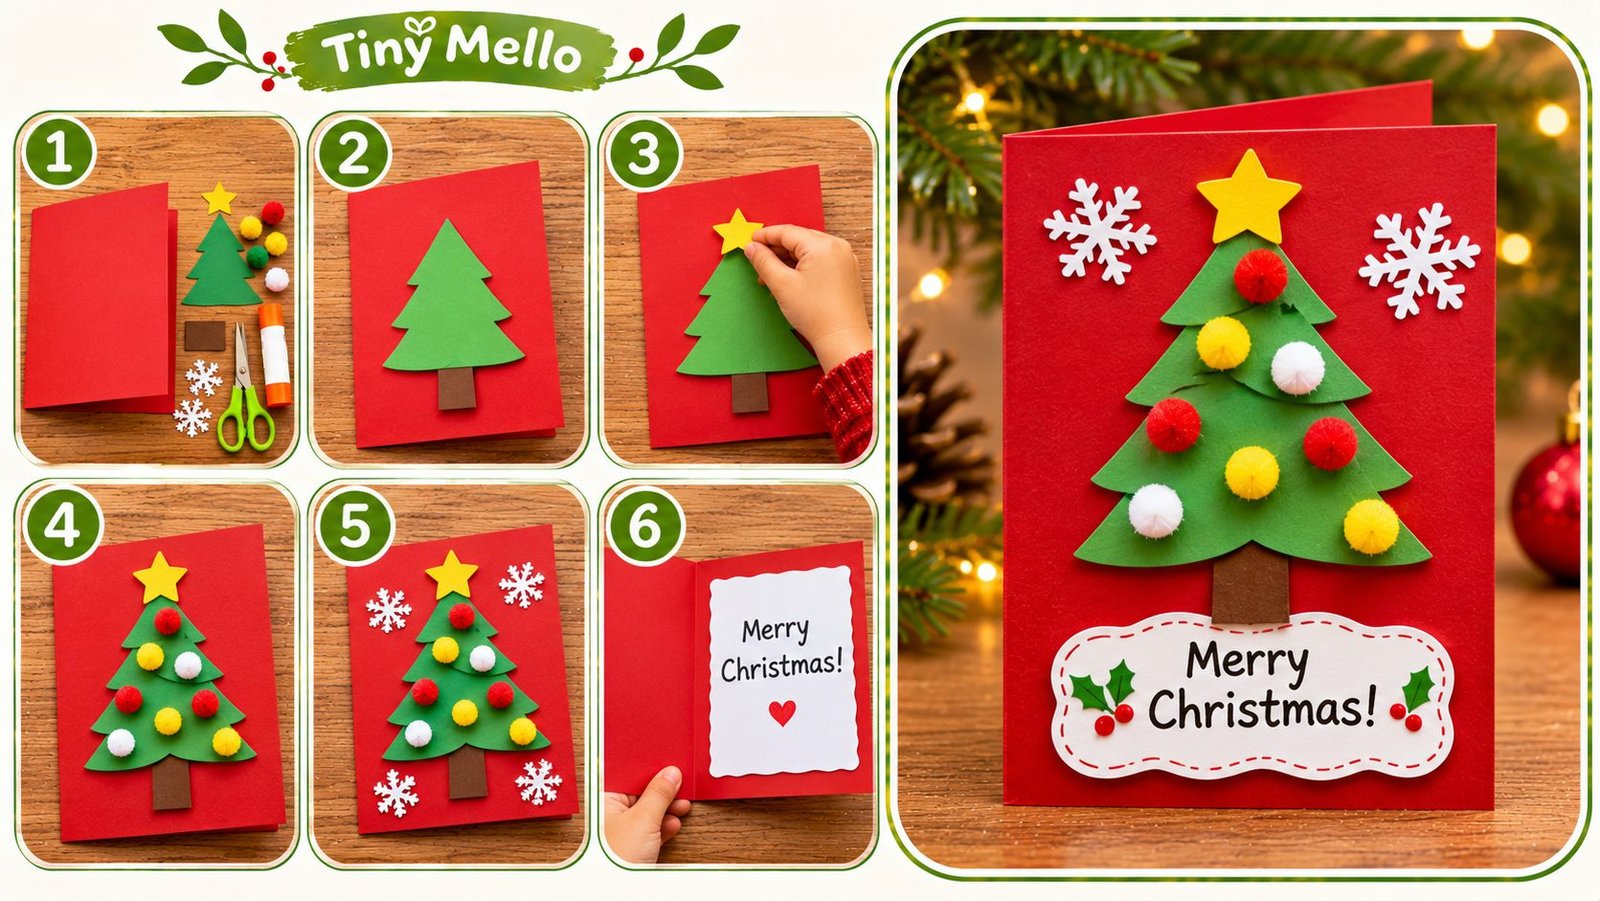
Materials Needed
- White or colored cardstock
- Markers and crayons
- Washable paint
- Stickers
- Glue
- Ribbon or decorative paper
How to Make It
- Fold a sheet of cardstock in half.
- Draw a Christmas tree, snowman, or Santa on the front.
- Let children decorate using crayons, stickers, or fingerprints.
- Add a Christmas message such as “Merry Christmas!” or “Happy Holidays!”
- Inside, help children write a little message or draw a picture.
- Allow the card to dry before giving it away.
Make It More Fun: Ask your child to make one card for someone they want to thank this Christmas.
A Simple 5-Day Christmas Craft Planner
If you don’t want to make all 20 Christmas crafts in one day, try spreading the activities across a week.
This little planner is also useful for preschool teachers who want to organize a Christmas craft week in the classroom.
📅 Our Little Christmas Craft Week
Classroom idea: Display the finished projects on a Christmas bulletin board and let every child share their favorite creation.
These 20 Christmas crafts for kids offer plenty of ways to enjoy the holiday season at home or in the classroom. From simple paper decorations for preschoolers to creative ornaments for older children, there’s something for every little crafter.
So, choose a favorite, gather your supplies, and enjoy a little creative Christmas magic with your kids!