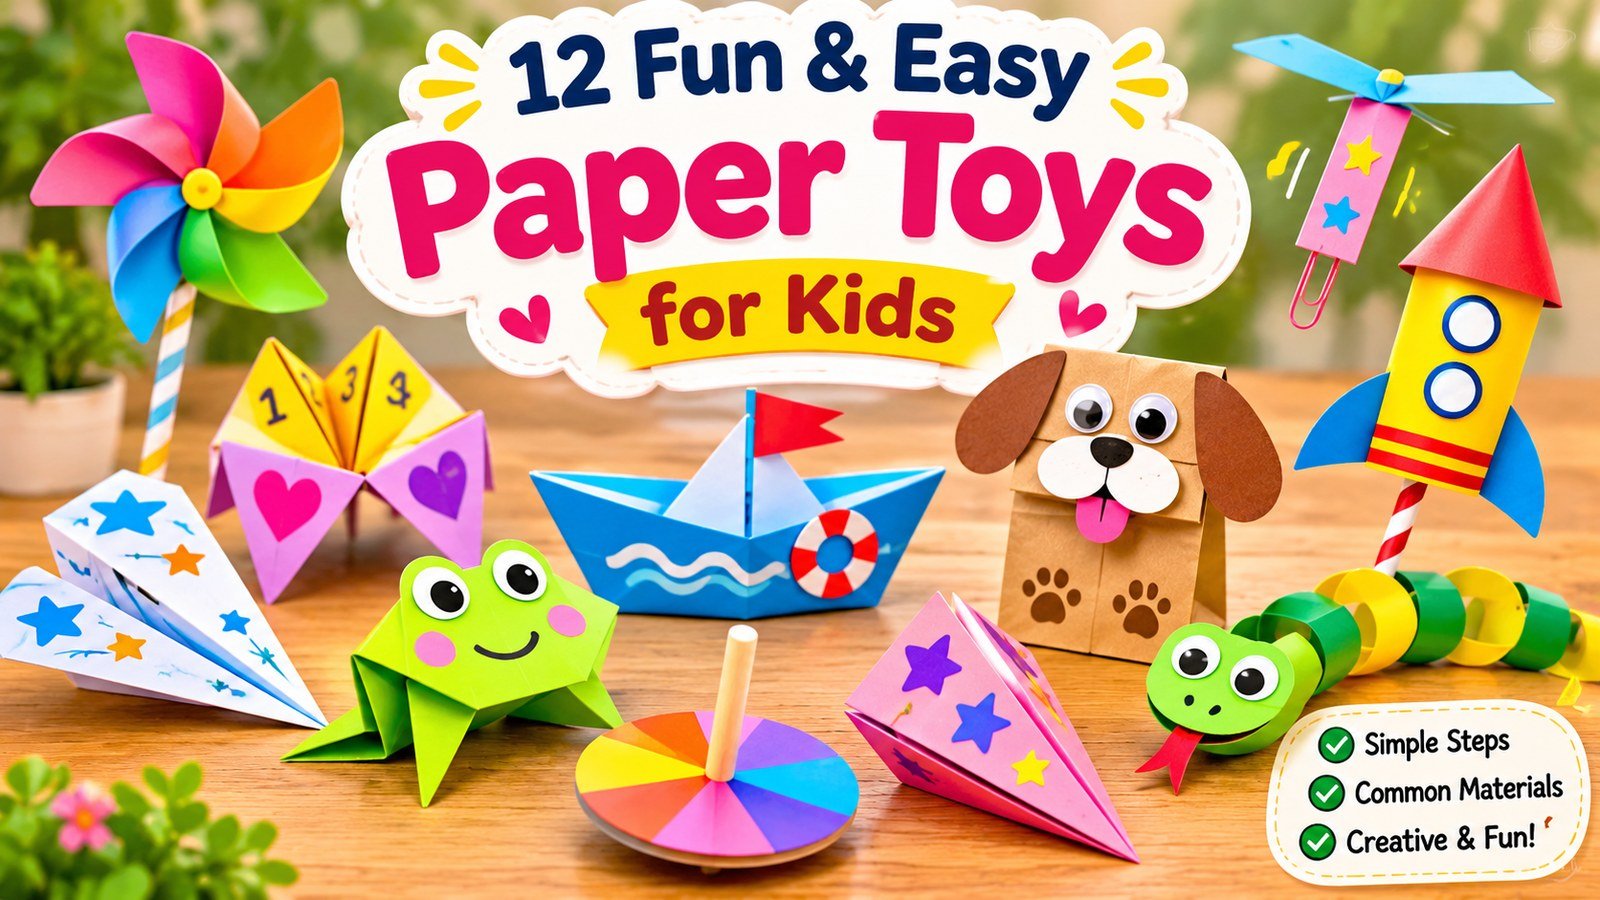
Looking for a fun and creative way to keep your kids entertained without screens? Bring out the colorful paper, scissors, and glue! These DIY paper toys are a wonderful way to turn simple household supplies into hours of creative fun.
From flying paper airplanes and jumping frogs to adorable animal puppets and colorful pinwheels, these paper toys are easy to make and exciting to play with.
The best part? You don’t need expensive craft supplies or special equipment. Most of these paper toys can be made using things you probably already have at home.
Whether you’re planning a rainy-day activity, a weekend craft session, a playdate, or a quiet afternoon at home, these 12 paper toys will give your kids plenty of opportunities to create, experiment, and play.
Let’s get those little hands busy!
Craft Supplies You’ll Need
Before starting these paper toys, gather a few basic supplies. You probably have most of them in your craft drawer already!
✂️ Your Little Craft Supply Checklist
Parent tip: Keep your supplies together in a small craft basket for easy access.
1. Easy Paper Airplane
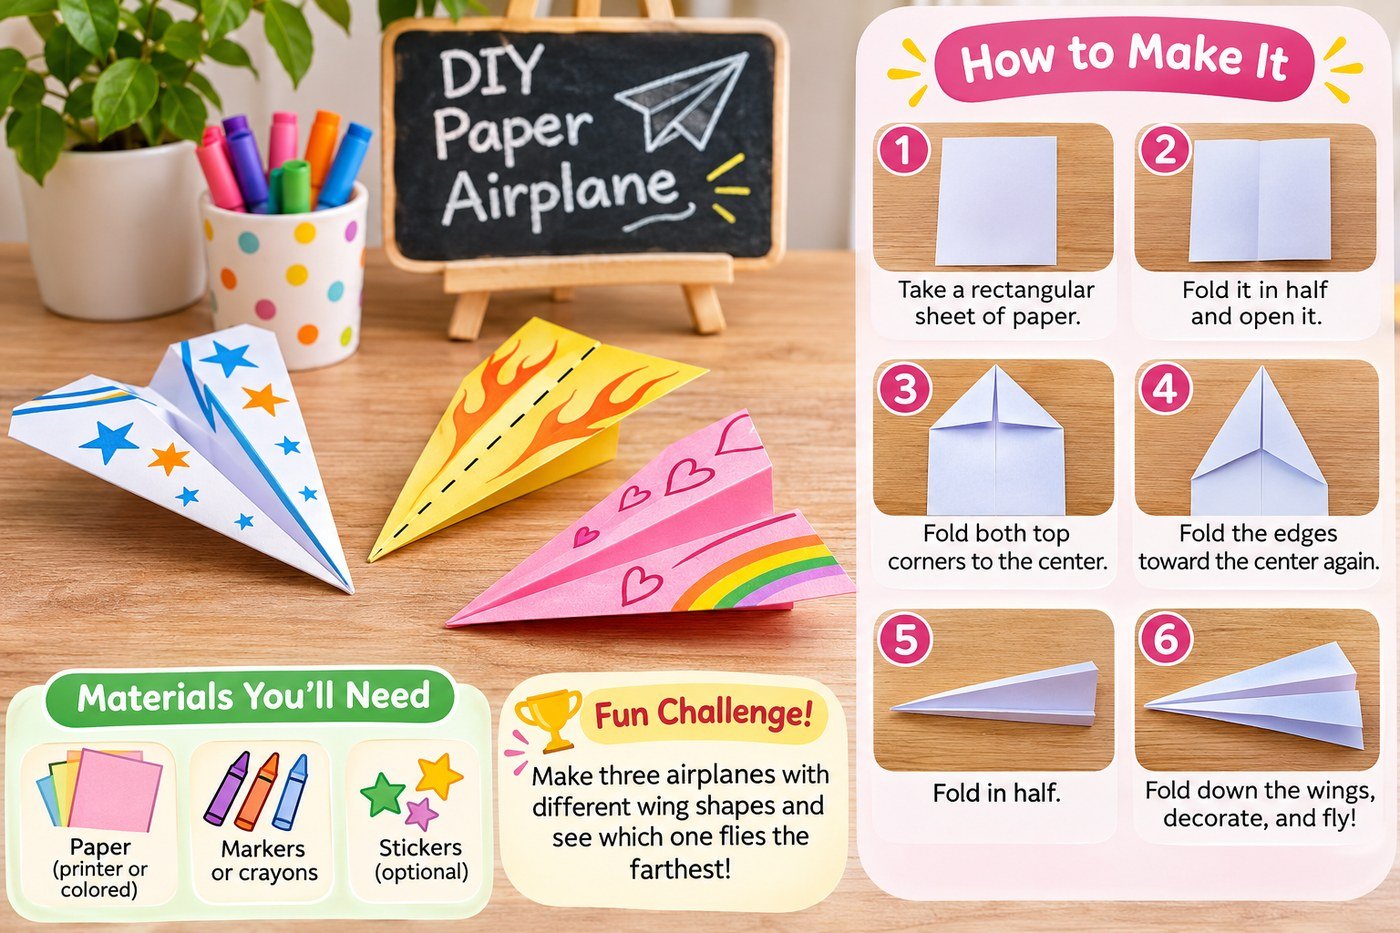
Paper airplanes are one of the most loved paper toys for kids. Children can fold their own airplanes, decorate the wings, and see how far their creations can fly.
Materials You’ll Need
- One rectangular sheet of printer paper
- Markers or crayons
- Stickers (optional)
✂️ Gather Your Supplies
Time: 5–10 minutes | Best for: Ages 4+
How to Make a Paper Airplane
- Place your paper vertically on a flat surface.
- Fold it in half lengthwise and open it again.
- Fold the two top corners toward the center crease.
- Fold the sloping edges toward the center again.
- Fold the airplane in half along the original crease.
- Fold both sides downward to create wings.
- Open the wings and decorate your airplane.
✈️ Your Airplane Folding Guide
Take a rectangular sheet of paper.
Fold both top corners inward.
Fold down both sides.
Decorate and test your airplane.
Make It More Fun!
Try making three airplanes with different wing shapes. Create a landing area using masking tape and see which airplane flies the farthest.
2. Colorful Paper Boat
Turn an ordinary sheet of paper into a little boat! Kids can make a colorful fleet and imagine sailing across a big ocean.
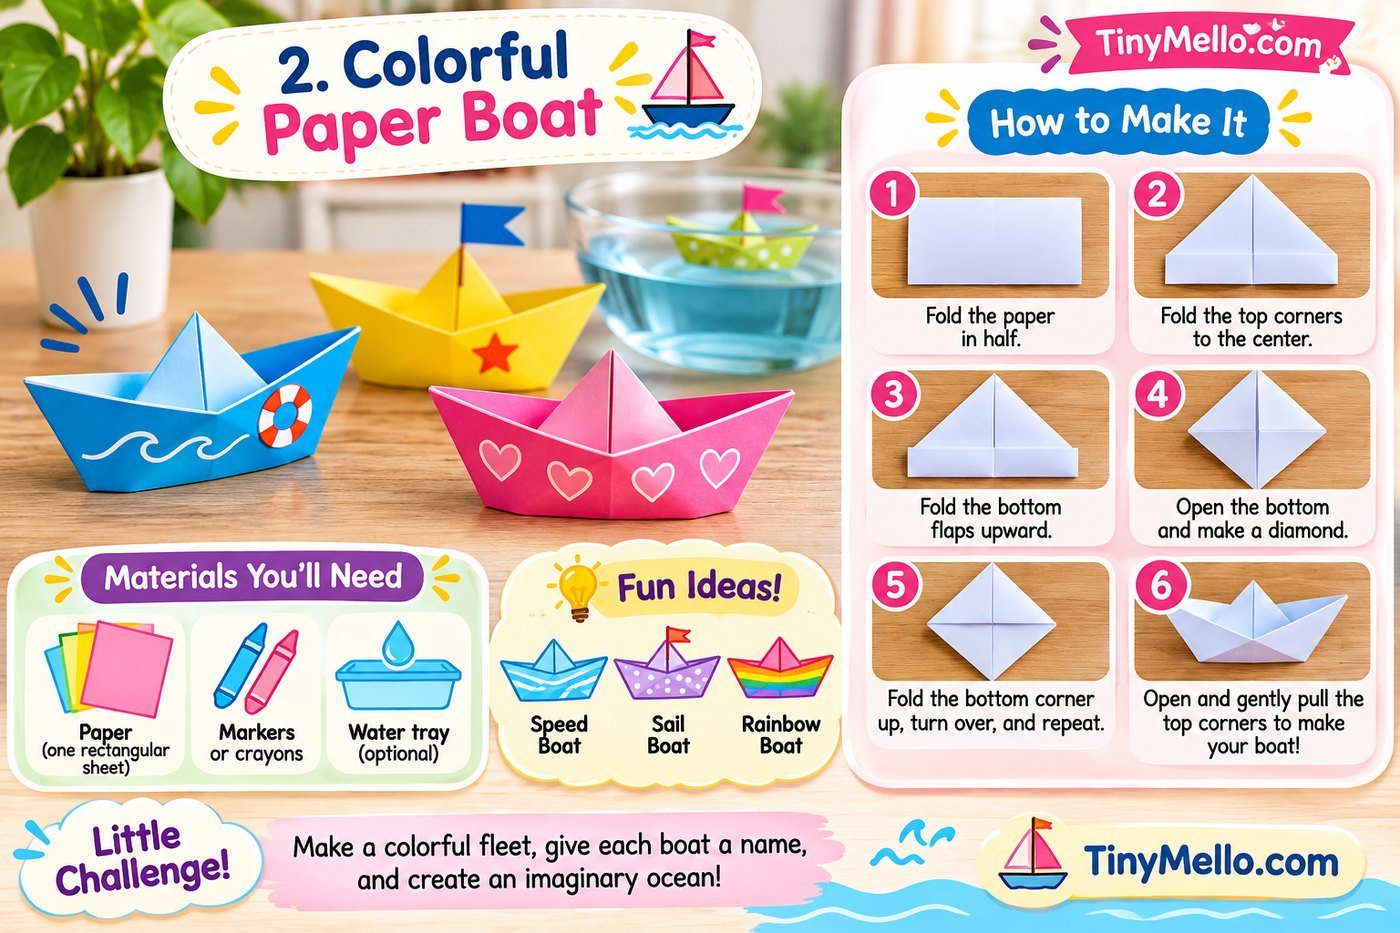
Materials You’ll Need
- One rectangular sheet of paper
- Crayons or markers
- A shallow water tray (optional)
How to Make It
- Fold the paper in half from top to bottom.
- Fold the two top corners toward the center.
- Fold the bottom strips upward on both sides.
- Open the bottom and bring the opposite corners together to make a diamond.
- Fold the bottom corner upward, turn it over, and repeat.
- Open the bottom again to form a smaller diamond.
- Gently pull the top corners apart to reveal your boat
⛵ Let’s Create a Little Fleet!
Add racing stripes.
Add a little flag.
Use colorful paper.
Make It More Fun!
Create an imaginary ocean using blue construction paper. Give each boat a name and let children make up their own sailing adventure.
3. Paper Fortune Teller (Cootie Catcher)
Remember those little folded paper fortune tellers from childhood? This classic paper toy is still a favorite for playdates and family game time.
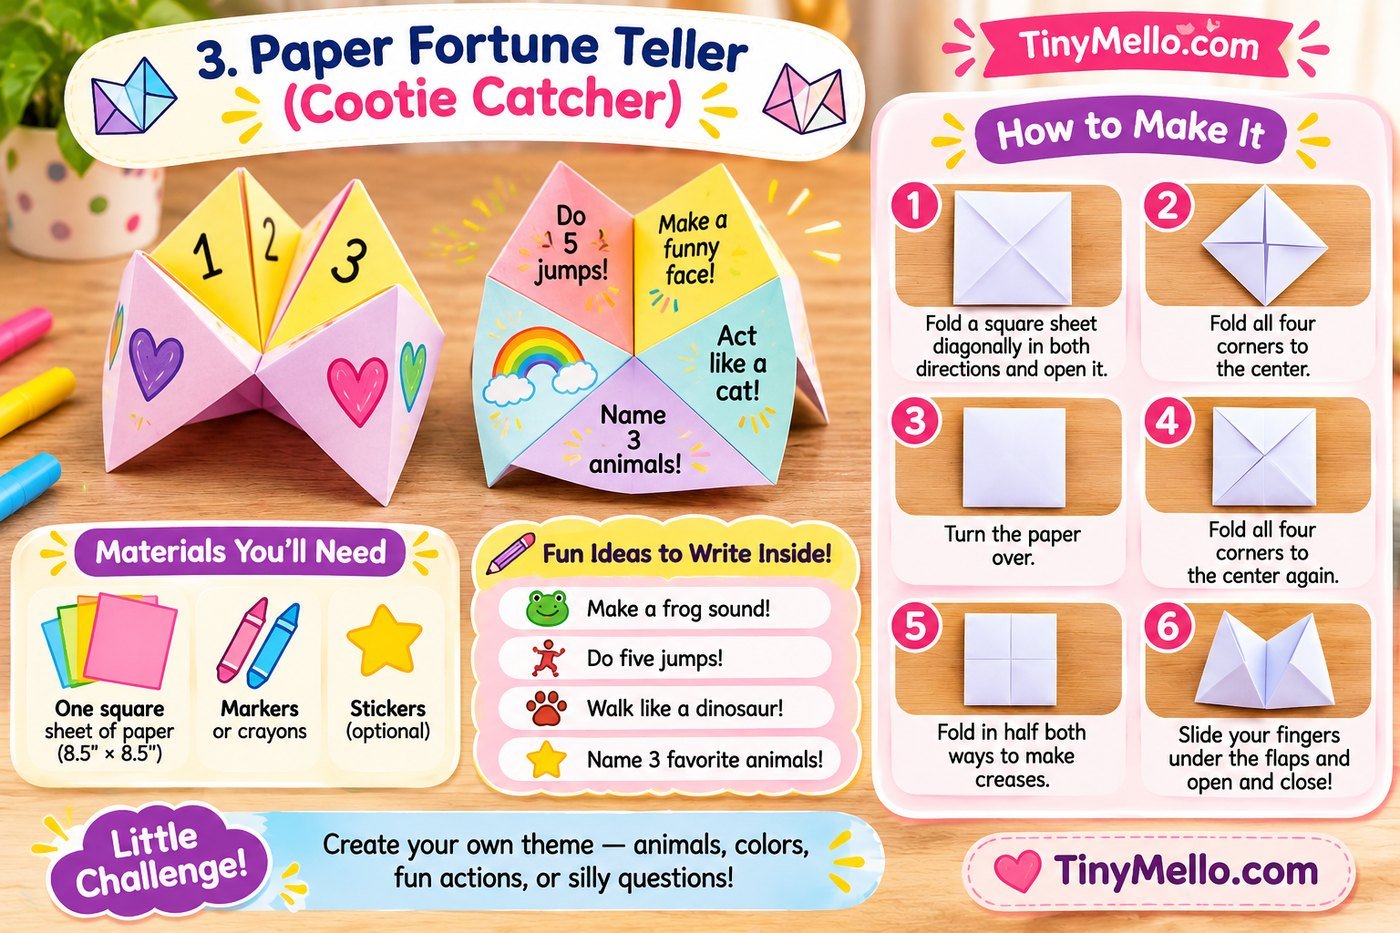
Materials You’ll Need
- One square sheet of paper
- Markers or colored pencils
How to Make It
- Fold a square sheet diagonally in both directions.
- Open it and fold all four corners toward the center.
- Turn the paper over.
- Fold all four new corners toward the center.
- Fold in half in both directions to create flexible creases.
- Slide your fingers underneath the flaps.
- Open and close your fortune teller.
🎲 Fill Your Fortune Teller!
Write a silly challenge under each flap.
Make It More Fun!
Choose a theme such as animals, superheroes, colors, or funny challenges. Let every child create their own fortune teller.
4. Cute Paper Finger Puppets
These adorable paper toys turn little fingers into tiny characters! Kids can make bunnies, cats, puppies, bears, or even silly monsters.
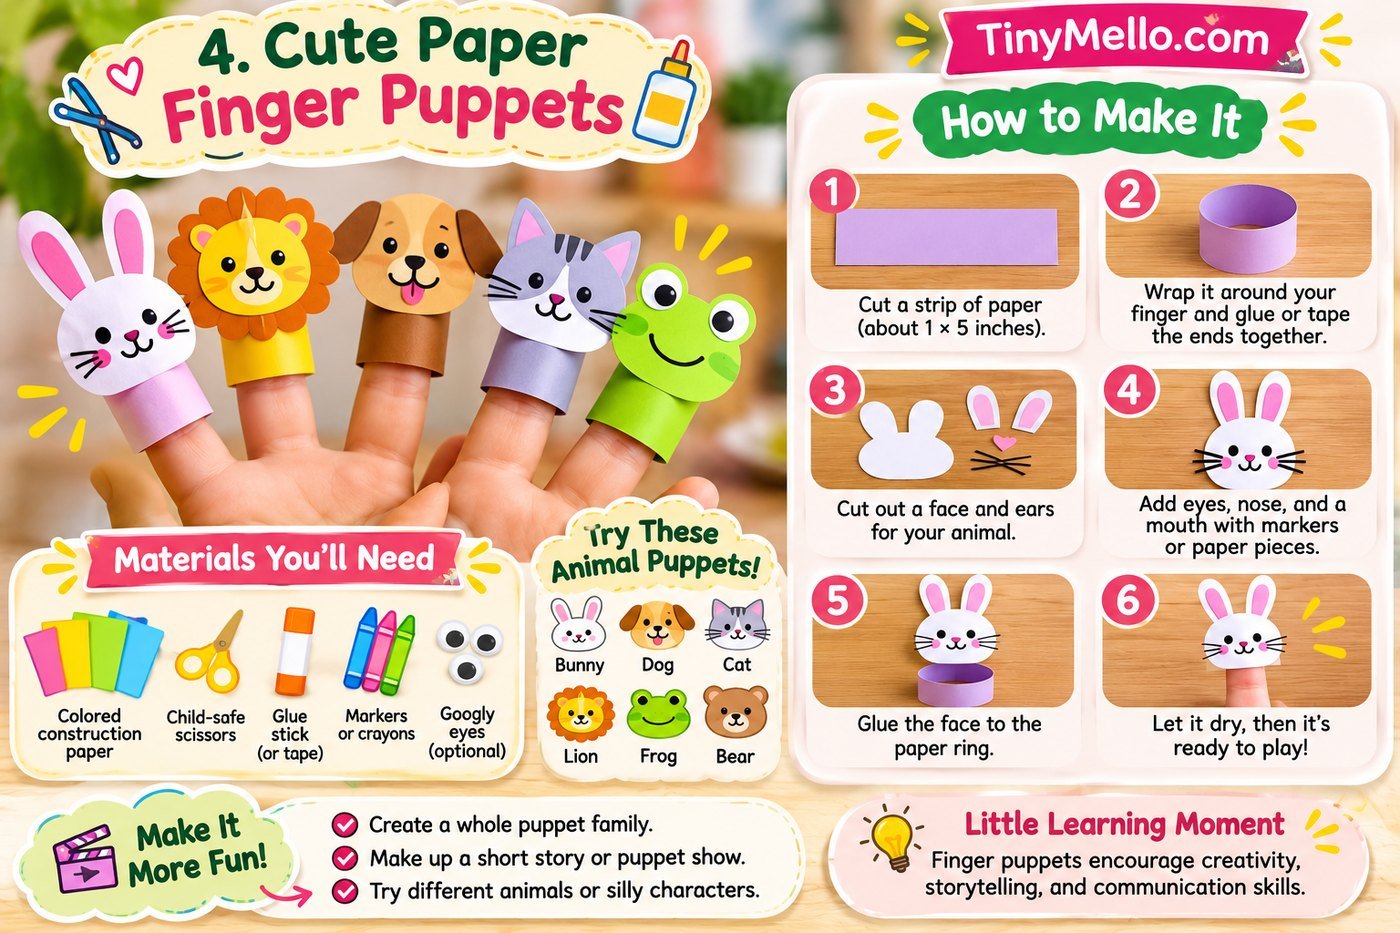
Materials You’ll Need
- Colorful construction paper
- Child-safe scissors
- Glue stick
- Markers
- Googly eyes (optional)
How to Make It
- Cut a strip of construction paper.
- Wrap it loosely around a finger to check the size.
- Glue or tape the ends together to create a paper ring.
- Cut out an animal face and ears.
- Add eyes, a nose, and a mouth.
- Attach the face to the paper ring.
- Let the glue dry before playing.
🐾 Pick Your Puppet Character!
Bunny
Long floppy ears
Kitty
Pointy ears and whiskers
Puppy
Floppy ears and a nose
Lion
A colorful paper mane
Make It More Fun!
Create a little puppet family and put on a mini puppet show. Ask your child to give each character a name and personality.
5. DIY Paper Spinning Top
Want a paper toy that actually spins? This colorful spinning top is a fun way to explore patterns, balance, and movement.
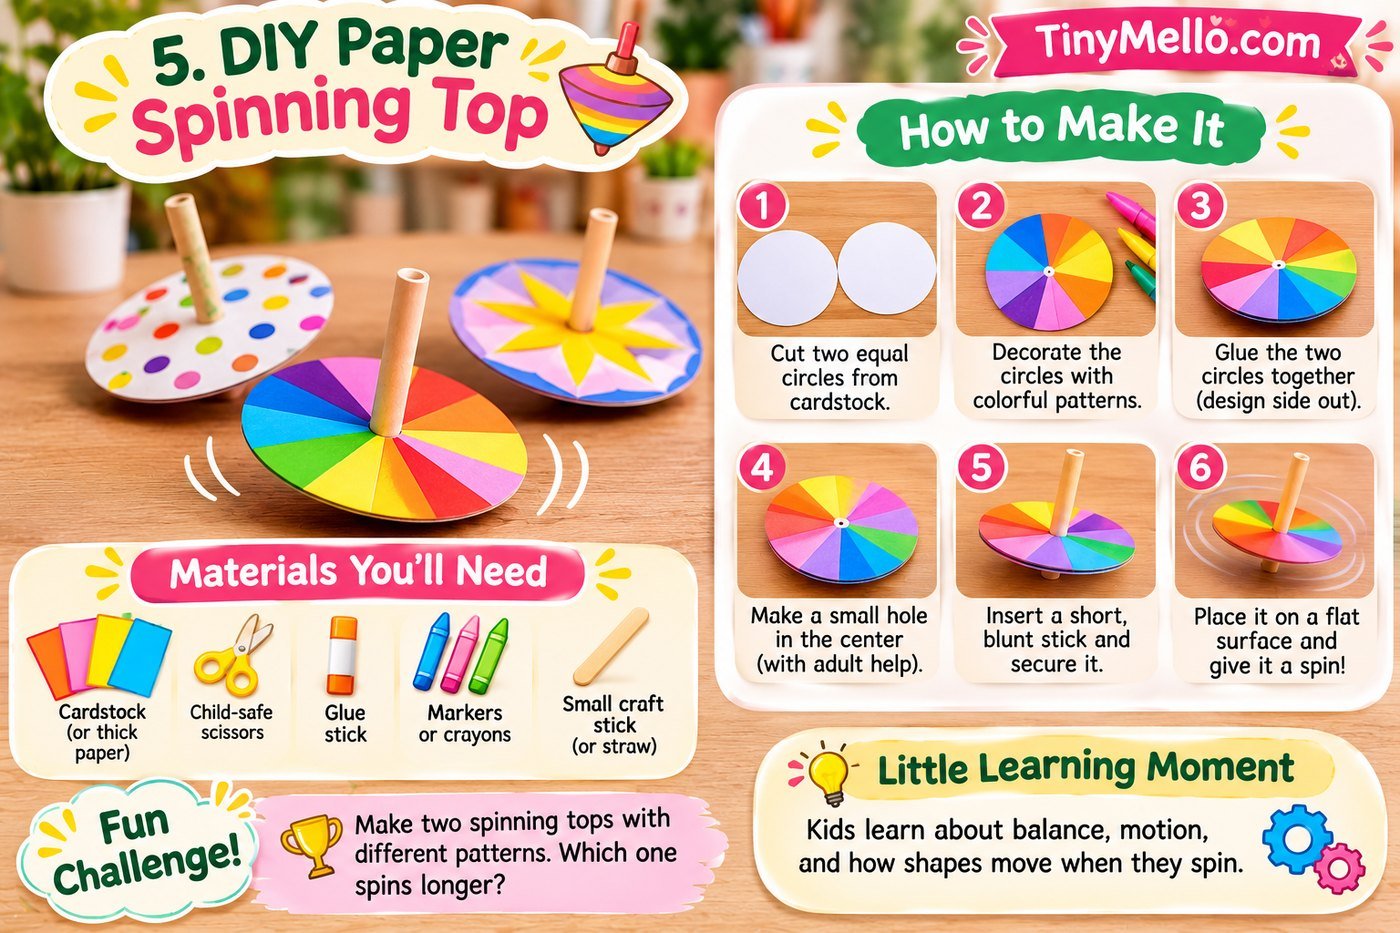
Materials You’ll Need
- Two equal circles of cardstock
- Markers or crayons
- Glue
- A short blunt craft-stick handle
- Adult assistance for making the center opening
How to Make It
- Cut two equal circles from cardstock.
- Decorate both circles with colorful patterns.
- Glue them together.
- Ask an adult to make a small center opening.
- Secure a short blunt handle through the center.
- Check that the assembly is secure.
- Give the top a gentle spin on a flat surface.
🌈 Design Your Own Spinning Top
Which pattern would you like to try?
Make It More Fun!
Make two different designs and compare how they look when spinning.
6. Jumping Paper Frog
A little frog that jumps when you press its back? Kids will love this playful paper toy!
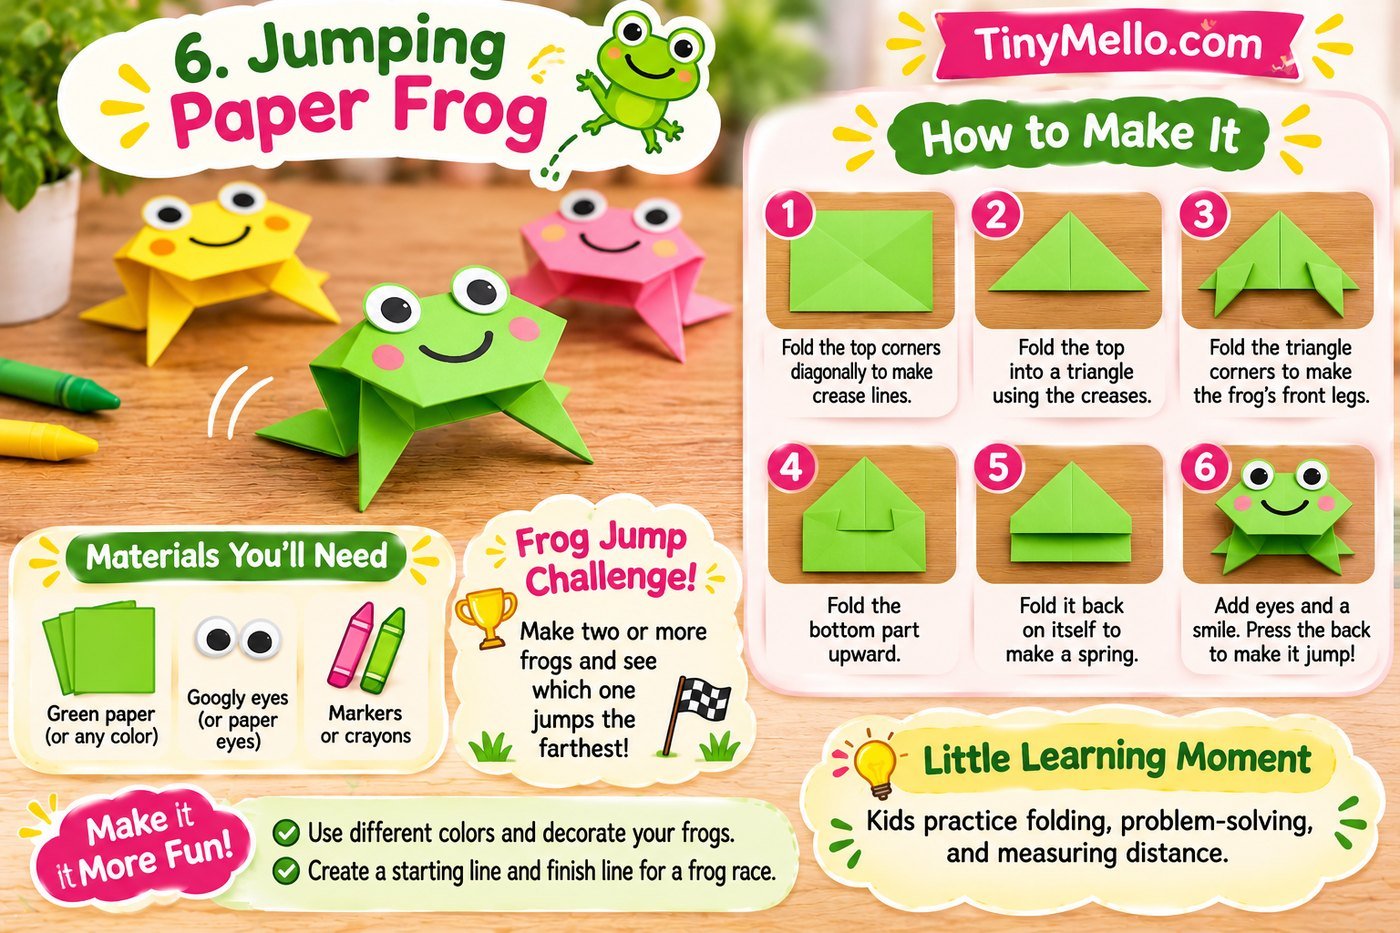
Materials You’ll Need
- One rectangular sheet of green paper
- Markers
- Small paper circles for eyes
How to Make It
- Fold the top corners diagonally to create guide creases.
- Use the creases to fold the top section into a triangle.
- Fold the triangle’s corners to create the front legs.
- Fold the lower section upward.
- Fold it back on itself to make a spring-like fold.
- Add eyes and a smile.
- Press the back gently to make the frog jump.
🐸 Frog Jump Challenge!
Fold your frog.
Press its back.
Check the distance.
________ inches
Make It More Fun!
Create a starting line and a finish line. Make different colored frogs and see which one jumps the farthest.
7. Colorful Paper Pinwheel
A paper pinwheel is a cheerful craft that spins in a gentle breeze. Kids can decorate it with rainbow colors and take it outside for a little wind experiment.
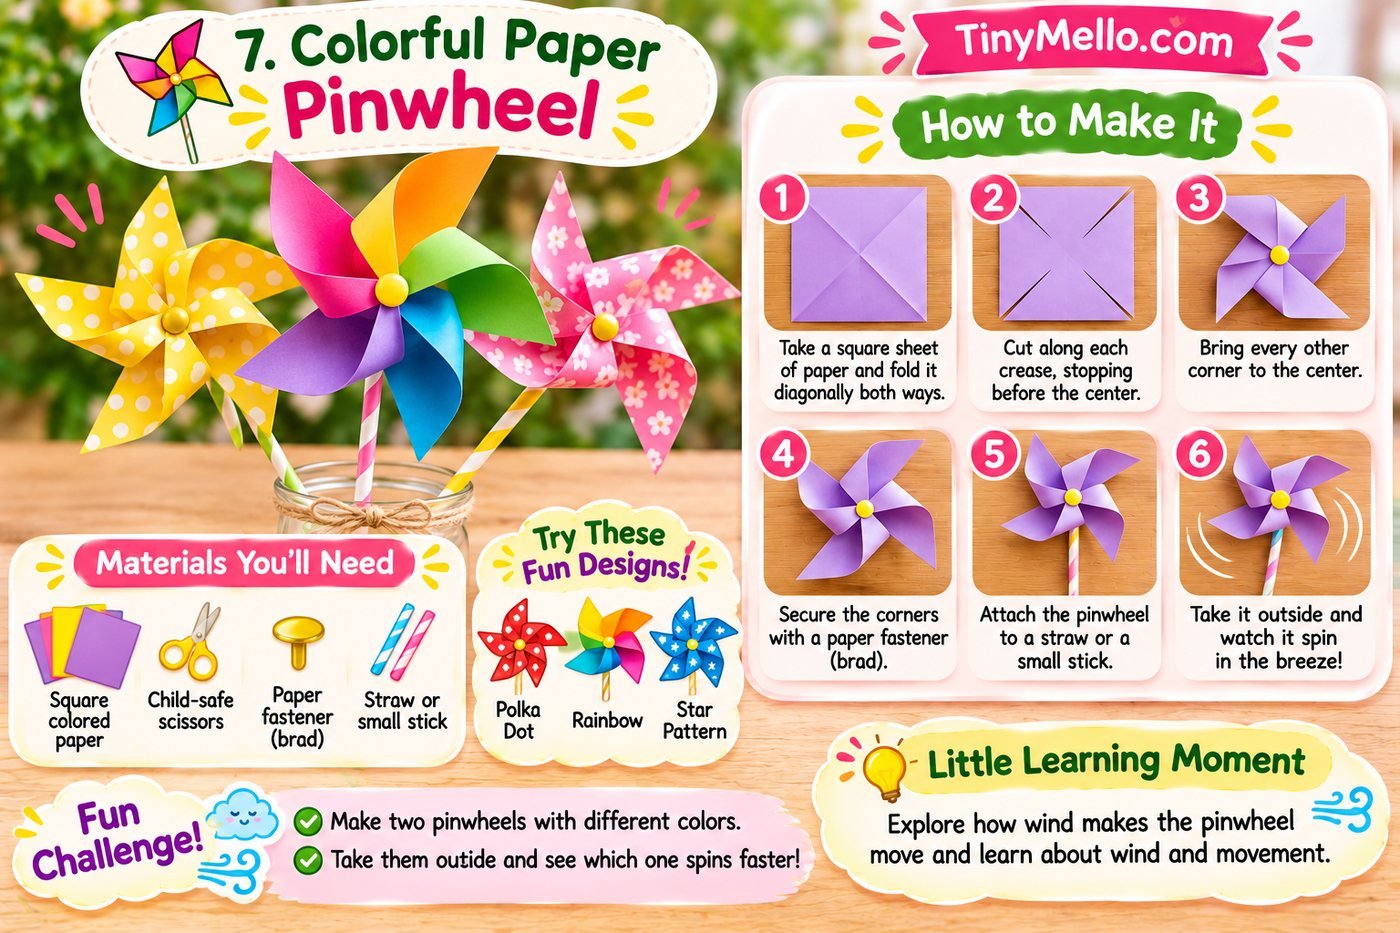
Materials You’ll Need
- One square sheet of paper
- Child-safe scissors
- Paper fastener
- Short dowel or sturdy straw
- Adult assistance for assembly
How to Make It
- Fold the paper diagonally in both directions.
- Open it and cut along each diagonal, stopping before the center.
- Bring every other corner toward the center.
- Ask an adult to secure the center with a paper fastener.
- Attach the center to a suitable handle using a safe assembly method.
- Check that the blades turn freely.
🌬️ Let’s Explore the Wind!
Try a gentle breeze.
Watch it spin.
What makes it move?
Make It More Fun!
Make two pinwheels with different colors and compare their appearance in a gentle breeze.
8. Paper Chain Snake
This is one of the easiest paper toys for younger children. A few colorful paper strips can turn into a long, wiggly snake!
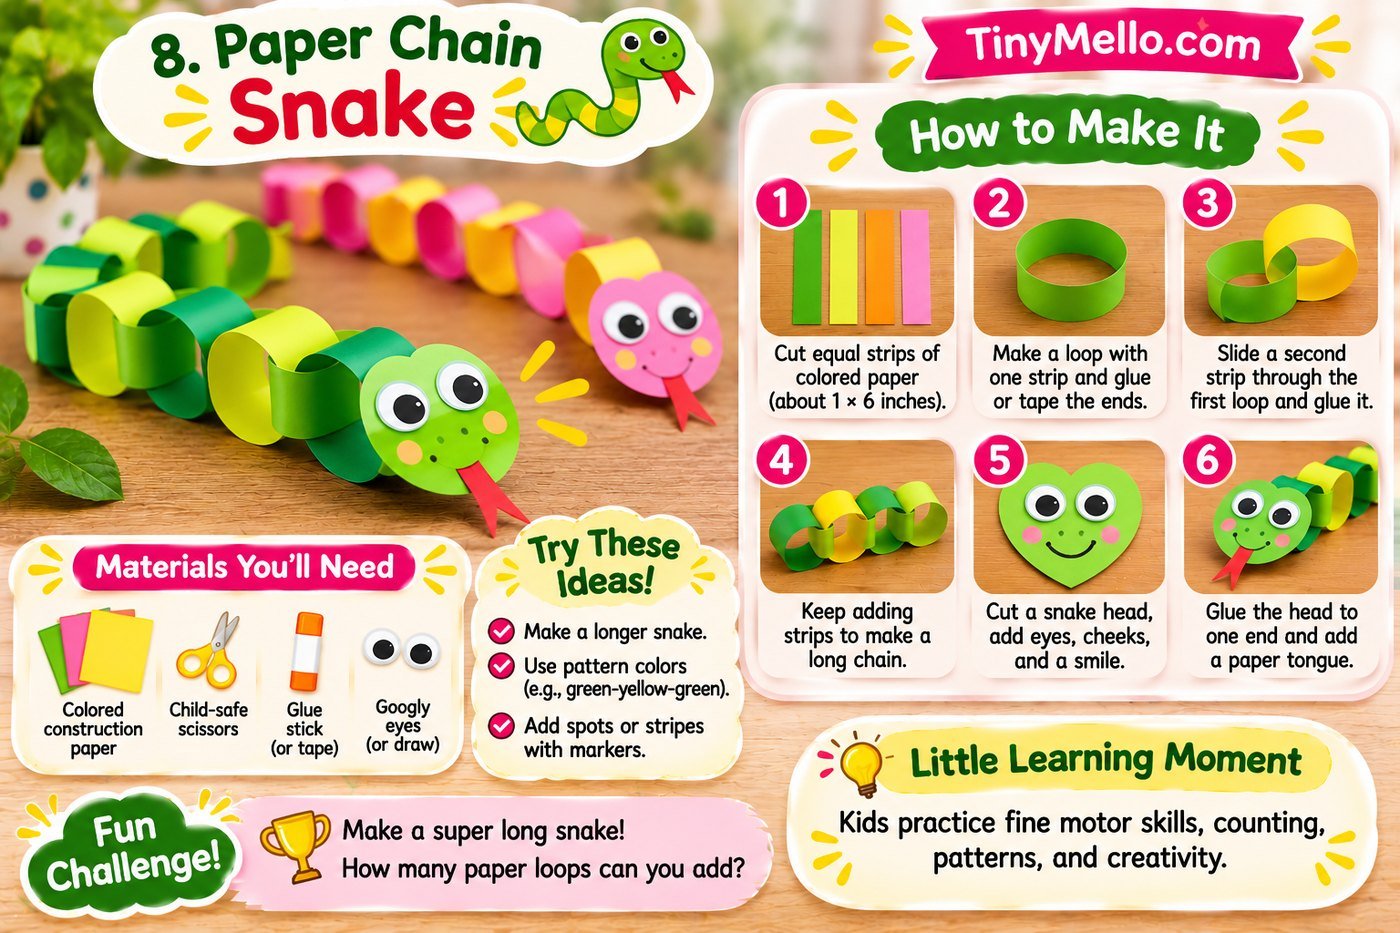
Materials You’ll Need
- Colored construction paper
- Child-safe scissors
- Glue stick or tape
- Markers
- Paper eyes
How to Make It
- Cut the paper into equal strips.
- Make the first strip into a loop.
- Secure the ends with glue or tape.
- Thread the next strip through the first loop.
- Make another loop and secure it.
- Continue adding strips.
- Cut out a snake head and attach it to one end.
- Add eyes and a smile.
🐍 Create a Colorful Snake!
Try these fun paper-strip patterns.
🔴 🟡 🔵 🟢 🟣
🔵 🟡 🔵 🟡 🔵
Ask your child to continue the pattern!
Make It More Fun!
See how long your paper snake can grow. Count all the loops and give your snake a funny name.
9. Paper Bag Animal Puppet
Have an empty paper lunch bag? Give it a new personality by turning it into an adorable animal puppet!
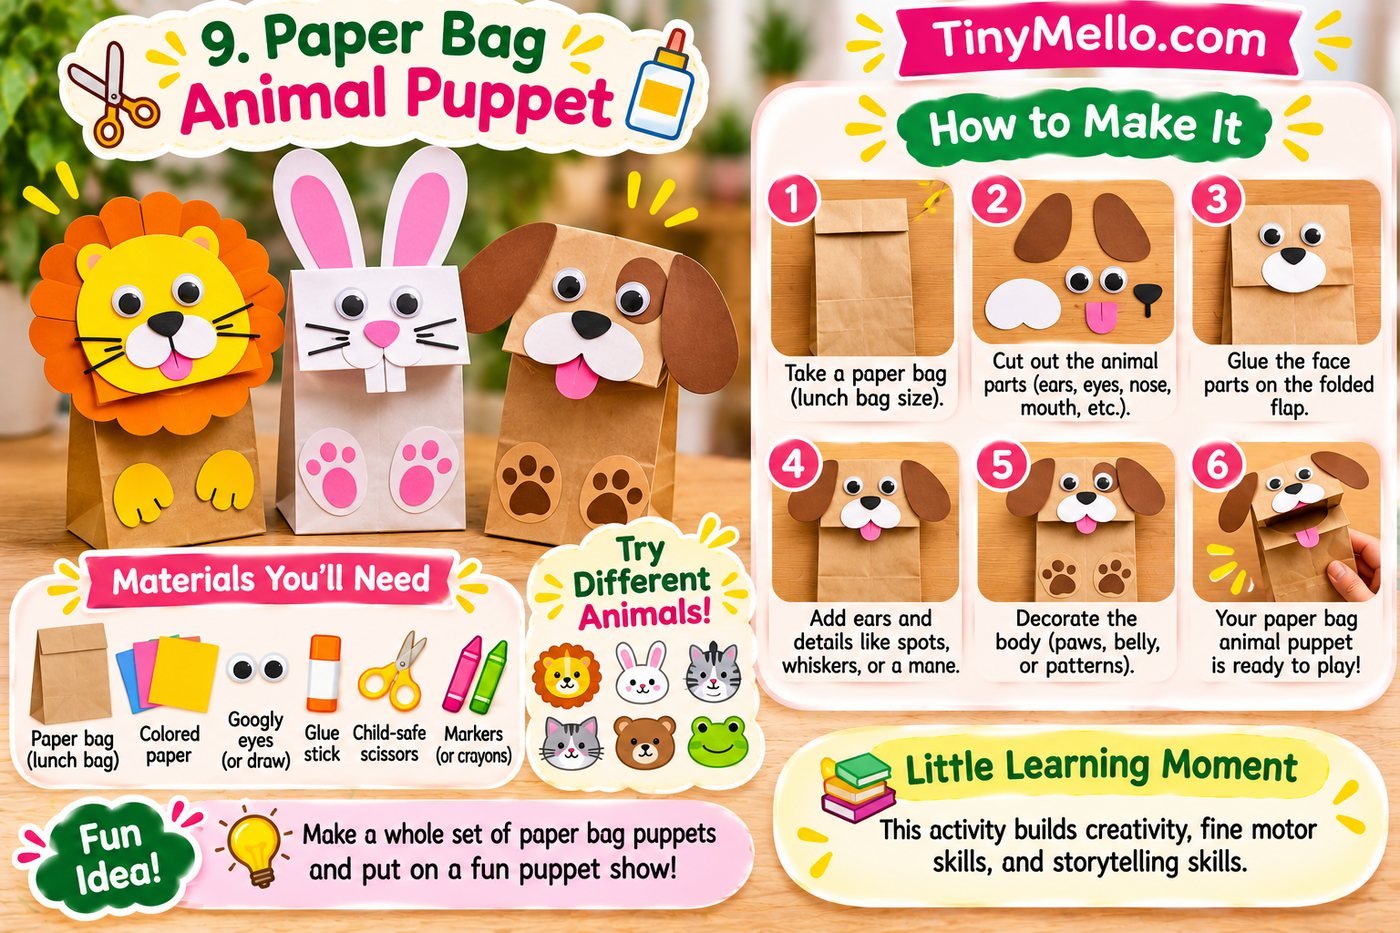
Materials You’ll Need
- One small brown paper lunch bag
- Colored construction paper
- Glue stick
- Markers
- Child-safe scissors
How to Make It
- Place the bag flat with its folded bottom flap facing upward.
- Choose an animal character.
- Cut out its ears, eyes, and nose.
- Glue the features onto the folded flap.
- Draw a mouth, whiskers, or spots.
- Let the glue dry.
- Place your hand inside and move the flap to make your puppet talk.
🎭 It’s Puppet Show Time!
Tell a story about a lost toy.
Plan a garden adventure.
Explore the jungle.
Find a pond to play in.
Make It More Fun!
Invite siblings or friends to make different characters and perform a little puppet show.
10. Flying Paper Helicopter
Here’s another paper toy that brings a little science into craft time! A paper helicopter spins as it falls through the air.
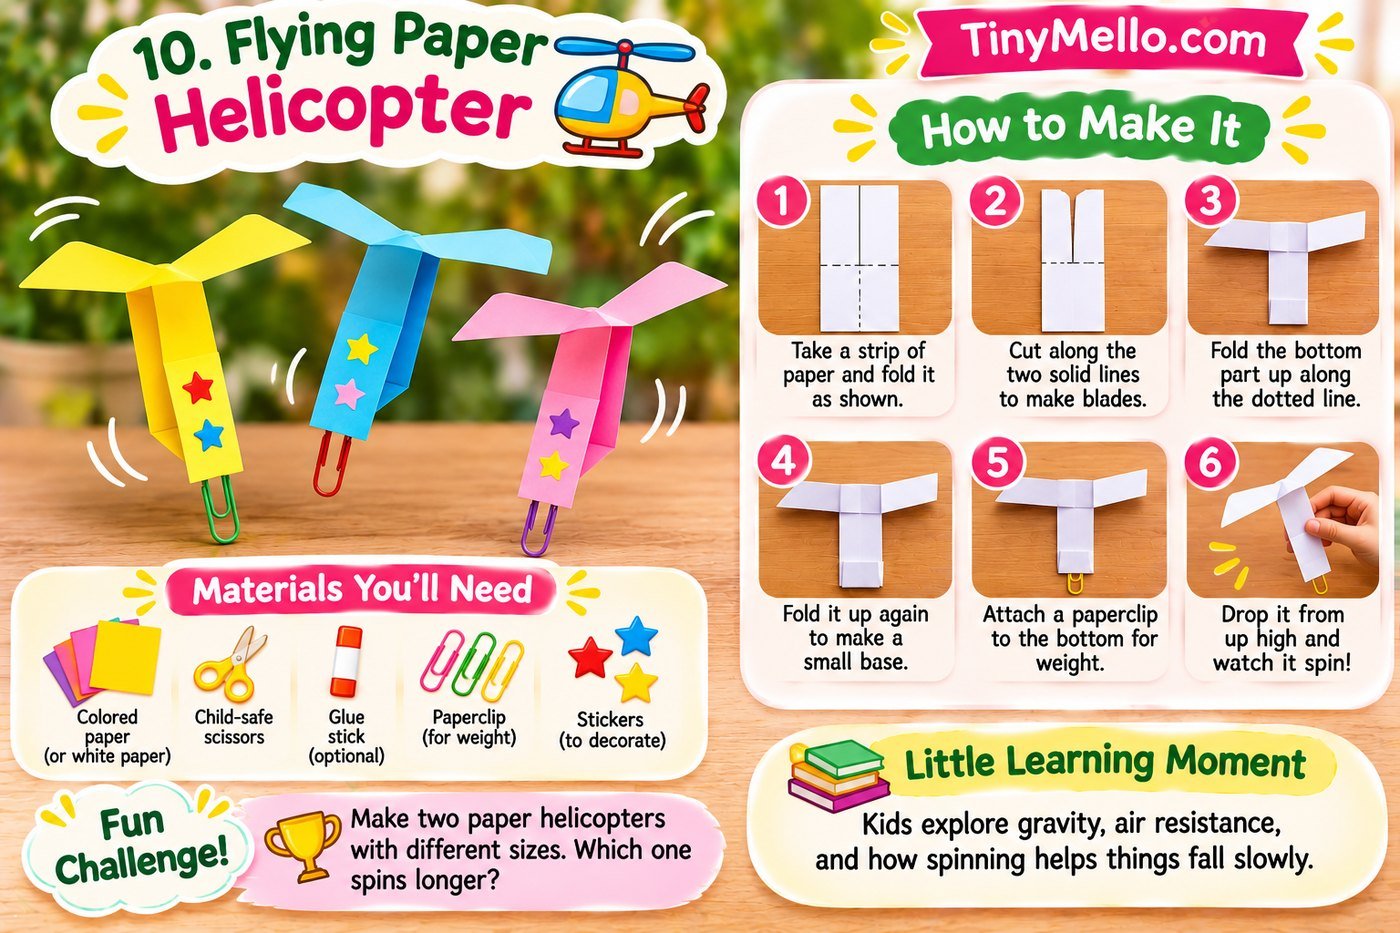
Materials You’ll Need
- One sheet of printer paper
- Child-safe scissors
- Ruler
How to Make It
- Cut a rectangular strip of paper.
- Cut two vertical slits at the top to create two blades.
- Fold the blades in opposite directions.
- Fold the lower part into a narrow body.
- Fold the bottom to keep the body together.
- Release it from a low, safe height and watch it spin.
🚁 Little Helicopter Science
Help the helicopter spin.
Pulls it toward the ground.
Try changing the blade length and observe what happens.
Make It More Fun!
Make two helicopters with different blade lengths and compare how they spin.
11. Easy Paper Popper
Looking for a paper toy with a little surprise? This simple folded paper popper makes a popping sound when used correctly.
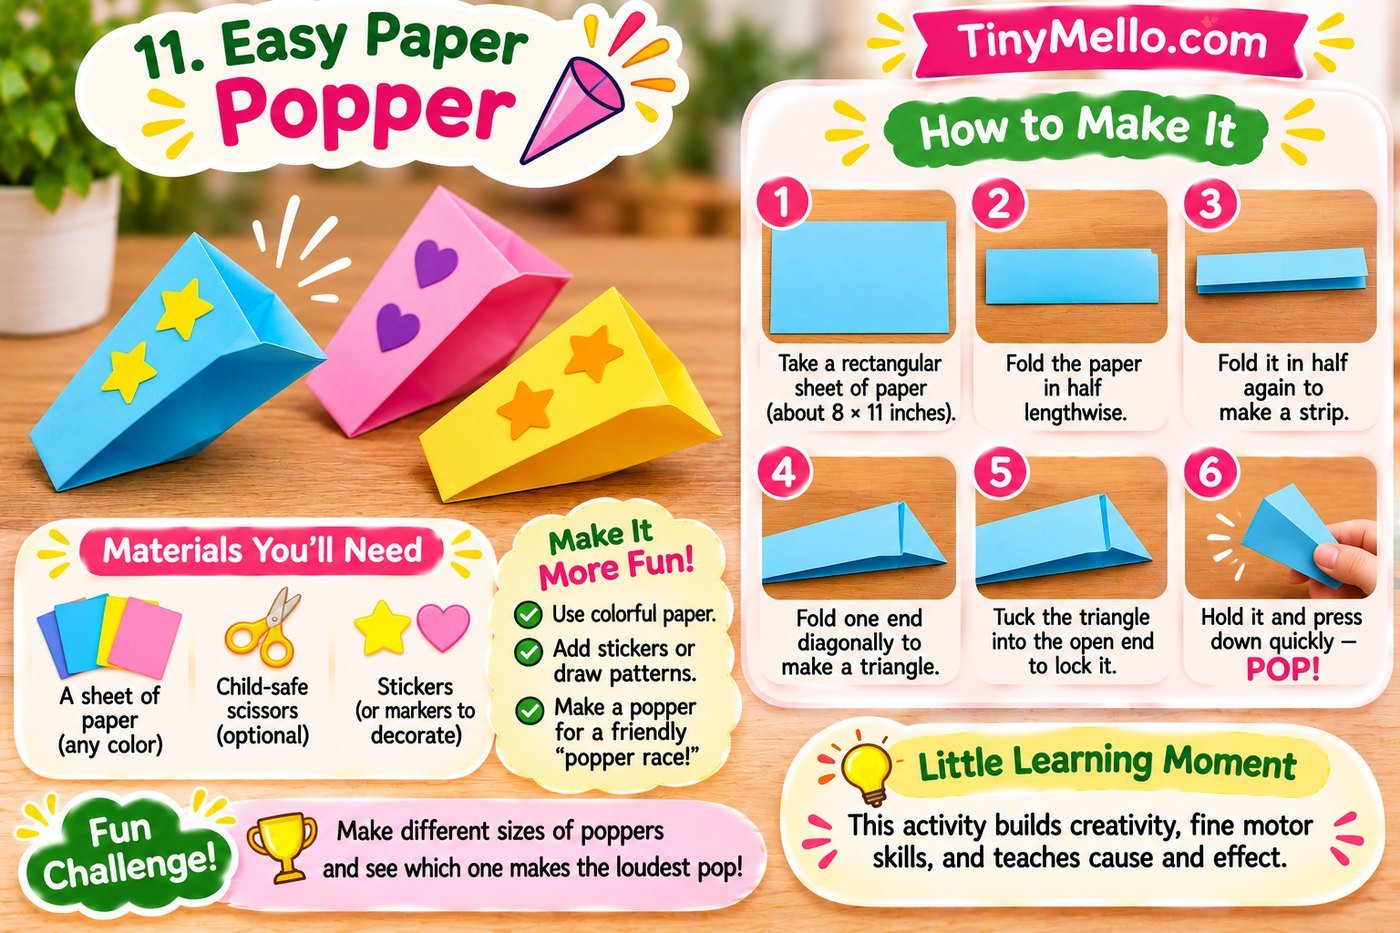
Materials You’ll Need
- One rectangular sheet of printer paper
- Markers for decorating
How to Make It
- Fold the paper in half lengthwise and open it.
- Fold the top corners toward the center.
- Fold the paper in half along the center crease.
- Fold the upper corners down toward the bottom edge.
- Hold the folded paper by its lower corners.
- Move your hand downward in an open space to make the paper pop.
⚠️ A Quick Parent Reminder
Use paper poppers only in a suitable play area. Never pop them near anyone’s ears or face. Avoid this activity if your child is sensitive to sudden sounds.
Make It More Fun!
Decorate the popper with stars, stripes, or colorful patterns. Give it a silly name!
12. DIY Paper Straw Rocket
Ready for a little space adventure? Make a paper rocket that moves with a gentle puff of air!
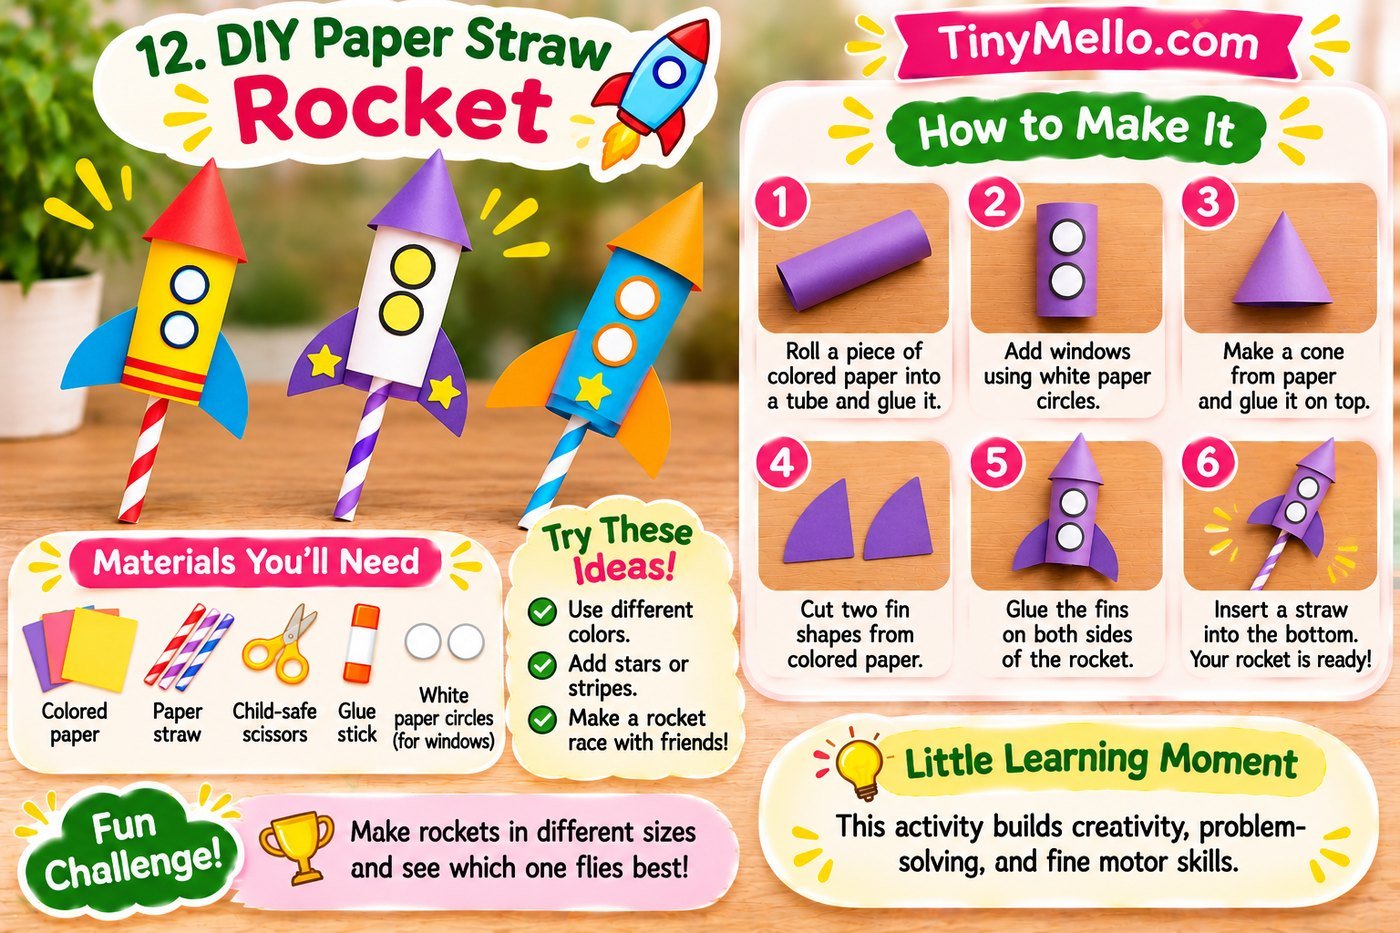
Materials You’ll Need
- Colored construction paper
- One clean drinking straw
- Clear tape
- Child-safe scissors
- Markers
How to Make It
- Cut a small rectangle of colored paper.
- Wrap it loosely around the end of a straw to make a tube.
- Tape the paper tube along its side.
- Fold and tape the top end closed to create a rocket nose.
- Add small paper fins.
- Decorate with stars, windows, and colorful designs.
- Remove the rocket from the straw.
- Place the open bottom over the straw and blow gently toward an empty, safe space.
🚀 Ready for a Space Adventure?
Give your rocket a name and imagine its next destination!
Make It More Fun!
Create a pretend launch station using a cardboard box. Let every child name their rocket and choose a destination.
Tips for Making Paper Toys More Fun
Here are a few simple ways to make craft time even more exciting.
[INSERT HTML BLOCK – FIVE PARENT TIPS]
🌟 Five Ways to Make Craft Time Special
Allow children to choose their favorite colors and decorations.
Use clean paper scraps and leftover wrapping paper.
Try airplane races or frog-jumping competitions.
Turn finished paper toys into characters and stories.
Create a little shelf for homemade creations.
Frequently Asked Questions
1. What are the easiest paper toys for young kids?
Paper chain snakes, paper bag puppets, finger puppets, and simple paper boats are great starting points. Younger children may need help with cutting and folding.
2. What kind of paper is best for making paper toys?
Regular printer paper is ideal for folding toys, construction paper works well for puppets, and cardstock is useful for sturdier crafts.
3. Can preschoolers make paper toys?
Absolutely! Choose easy projects that involve coloring, gluing, and simple folds. Adults can help with difficult cutting and assembly.
4. Are paper toys educational?
Yes! Paper toys can encourage creativity, fine motor skills, counting, color recognition, problem-solving, and early STEM exploration.
5. How can I make paper toys last longer?
Use cardstock for sturdier creations, allow glue to dry completely, and store finished toys in a small craft box.
6. Can I use recycled paper to make DIY paper toys?
Yes! Clean paper scraps, old magazines, and leftover wrapping paper can be used for many creative projects.
Final Thoughts
You don’t need expensive toys or fancy supplies to create wonderful childhood memories. Sometimes, all it takes is a few sheets of paper and a little imagination!
These 12 DIY paper toys offer a fun way for kids to fold, create, experiment, and enjoy hands-on play. From flying airplanes to adorable animal puppets, every little creation brings something special to craft time.
So, the next time your kids say they’re bored, bring out the paper, crayons, and glue. Choose a favorite project and enjoy a creative afternoon together.
Happy Crafting from Tiny Mello!