Planning Thanksgiving activities for young children can get a little tricky. You want something fun for the kids, but you probably don’t want to spend hours cutting paper, buying craft supplies, or cleaning up a big mess afterward. Finding activities that are both fun and suitable for little hands can take some planning.
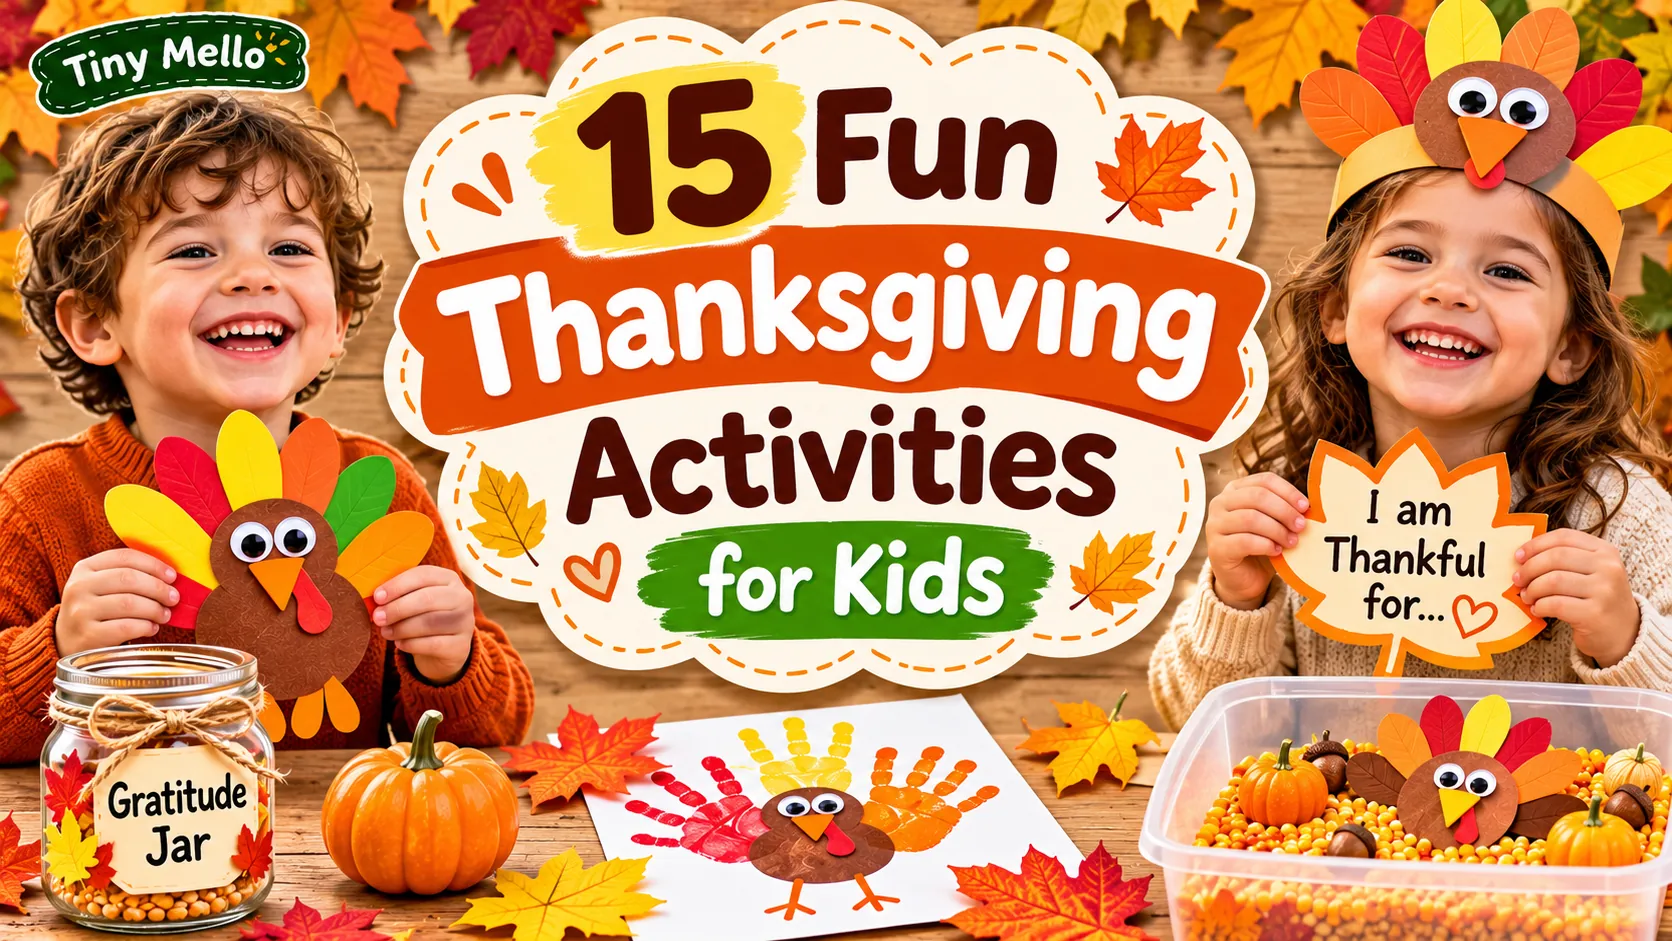
That’s why I’ve put together these 15 Thanksgiving activities for kids and kindergarteners using common supplies you can find at home, in a classroom, or at a local craft store. You’ll find colorful turkey crafts, autumn-themed art, sensory play, counting games, and gratitude activities that children can enjoy at their own pace.
Each activity includes a materials list, clear step-by-step instructions, and a learning idea to help you get more out of playtime. Most projects are suitable for children ages 3–6, with small changes for younger preschoolers and older kindergarteners.
1. Make a Paper Plate Turkey Craft
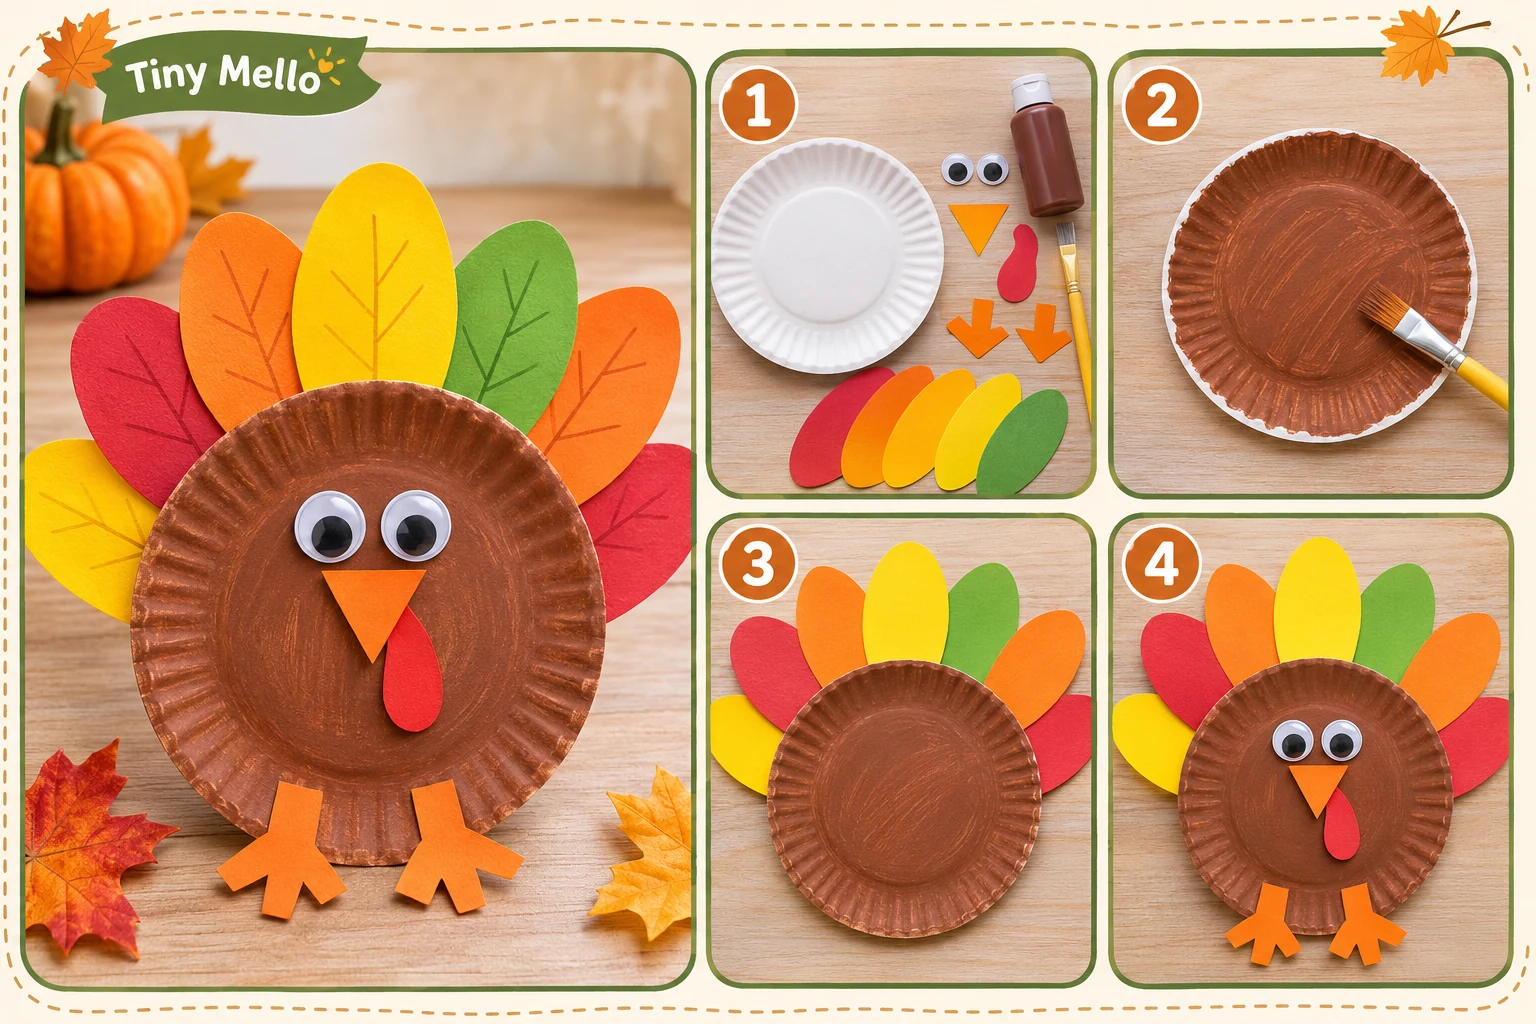
A paper plate turkey is a classic Thanksgiving craft that preschoolers and kindergarteners can enjoy making at home or in the classroom. Children can decorate their turkey with colorful paper feathers, a funny face, and little feet. It’s a fun way to introduce autumn colors while giving little hands some practice with cutting, arranging, and gluing.
What You Need
- 1 white paper plate (9 inches)
- Brown construction paper or brown washable paint
- Red, orange, yellow, and green construction paper
- 2 large googly eyes
- Orange construction paper for the beak and feet
- Glue stick
- Child-safe scissors
- Pencil
Step 1: Cut Out Colorful Turkey Feathers
Draw 5–7 long feather shapes on red, orange, yellow, and green construction paper. Make each feather approximately 2 inches wide and 5 inches long. Cut out the shapes with child-safe scissors. You can prepare the feathers in advance for younger children who need help cutting.
Step 2: Prepare the Paper Plate
Cover the front of the paper plate with brown construction paper or paint it brown using washable paint. If you’re using paint, spread it in a thin, even layer and allow the plate to dry completely before adding decorations. This brown surface will become the turkey’s body.
Step 3: Arrange and Attach the Feathers
Turn the plate over and arrange the colorful feathers along its upper back edge so they spread out like a fan. Overlap the bottom ends slightly, then glue them in place. Press each feather gently against the plate and give the glue a few moments to become tacky before moving the craft.
Step 4: Add the Turkey’s Face and Feet
Glue two large googly eyes near the top of the plate. Cut a small orange triangle for the beak and a curved red shape for the wattle. Attach them below the eyes. Finally, cut two orange feet and glue them to the bottom edge of the plate.
Step 5: Let Your Turkey Dry
Place the finished turkey on a flat surface and allow the glue to dry completely. Once it is ready, children can display it on a classroom bulletin board, attach it to a wall, or use it as part of a Thanksgiving decoration.
Pro Tip: Arrange all the feathers before applying glue. This helps children decide on their color pattern and prevents them from having to pull off glued pieces and rearrange them.
2. Create a Handprint Turkey Keepsake
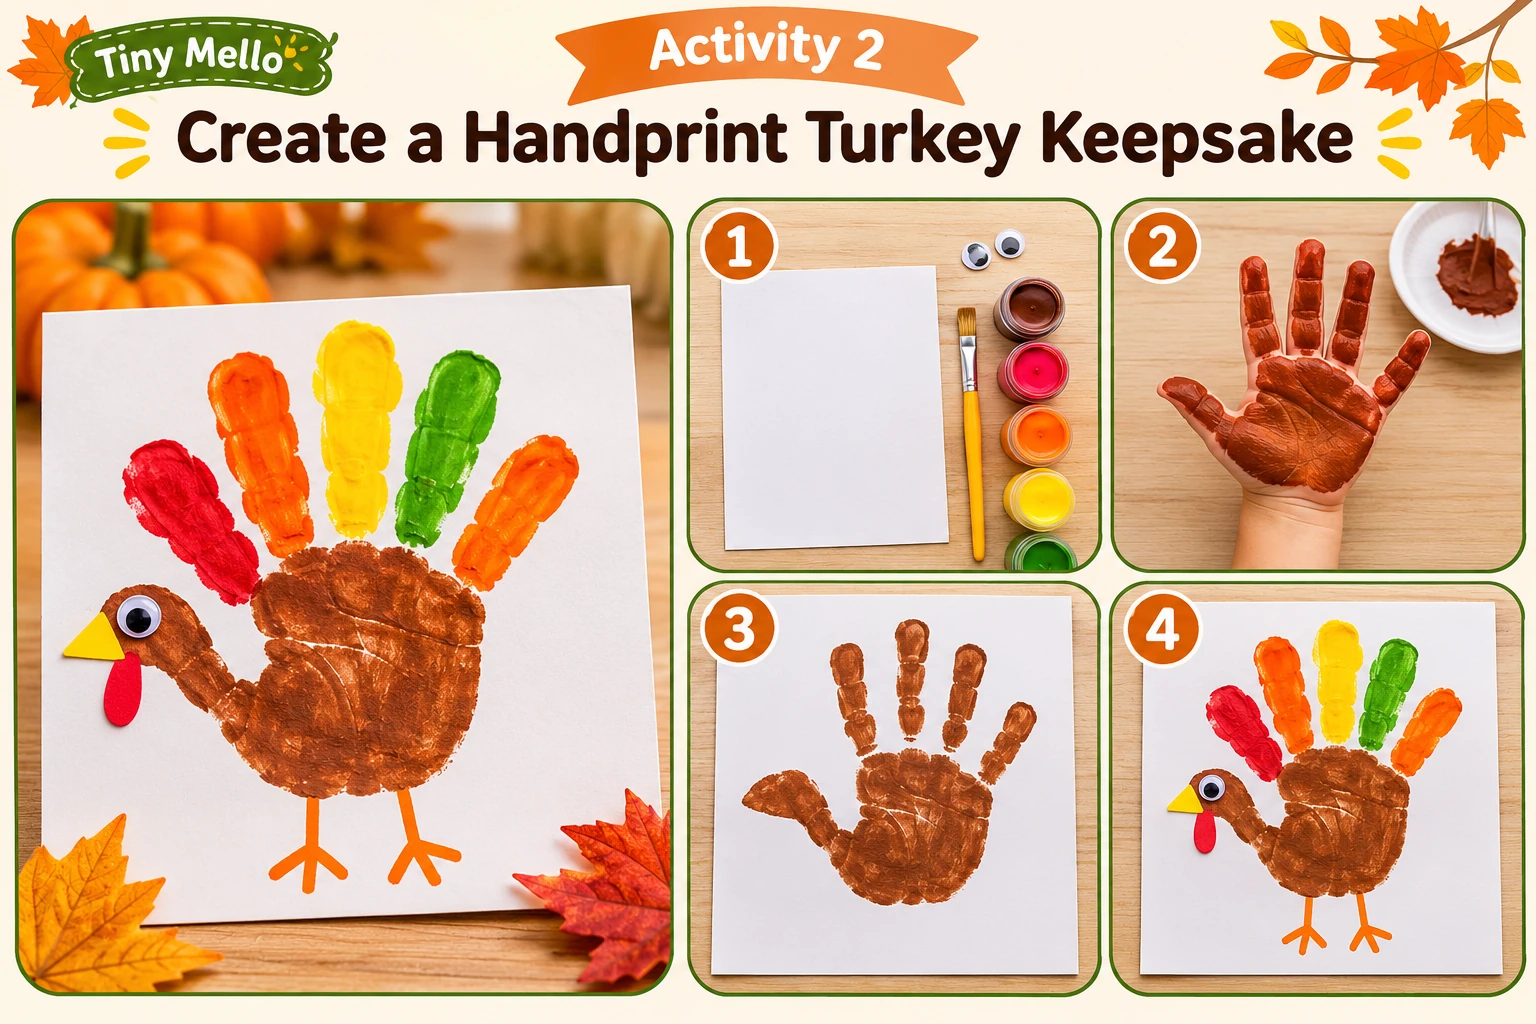
A handprint turkey is a sweet Thanksgiving keepsake that parents can save and look back on as their children grow. The child’s hand becomes the turkey’s body and feathers, making every finished picture personal. This activity works well for preschool classrooms, family craft time, or a Thanksgiving art project to take home.
What You Need
- 1 sheet of white cardstock
- Washable, child-safe paint in brown, red, orange, and yellow
- Paintbrush
- Black marker
- Orange marker
- Paper towels or baby wipes
- Shallow paint trays
- Child-safe smock or old shirt
Step 1: Prepare the Craft Area
Cover the table with newspaper or a washable tablecloth. Place the cardstock in front of the child and pour a small amount of each paint color into separate shallow trays. Keep paper towels and wipes nearby so you can clean the child’s hand immediately after making the print.
Step 2: Paint the Child’s Hand
Use a paintbrush to spread a thin layer of washable paint over the child’s palm and fingers. You can use brown for the palm and different autumn colors for the fingers. Make sure the paint covers the skin evenly without forming thick, dripping patches.
Step 3: Press the Hand onto the Paper
Ask the child to spread their fingers slightly and place their painted hand firmly on the cardstock. Press gently over the palm and fingers to transfer the paint onto the paper. Lift the hand straight up instead of sliding it across the surface to prevent smudging.
Step 4: Add the Turkey’s Details
Allow the handprint to dry for approximately 15–30 minutes, depending on how much paint was used. Once dry, use a marker to draw two eyes, an orange beak, and little feet. You can also add a small red wattle near the beak to complete the turkey’s face.
Step 5: Add the Child’s Name and Date
Write the child’s name and the year along the bottom of the cardstock. Older children can write their own names, while an adult can help younger preschoolers. Let the finished artwork dry completely before placing it in a frame or storing it in a keepsake folder.
Heads Up: Use only washable, child-safe paint, and check the product label before use. Keep paint away from children’s eyes and mouths, and wash hands thoroughly after the activity.
3. Build a Thankful Tree
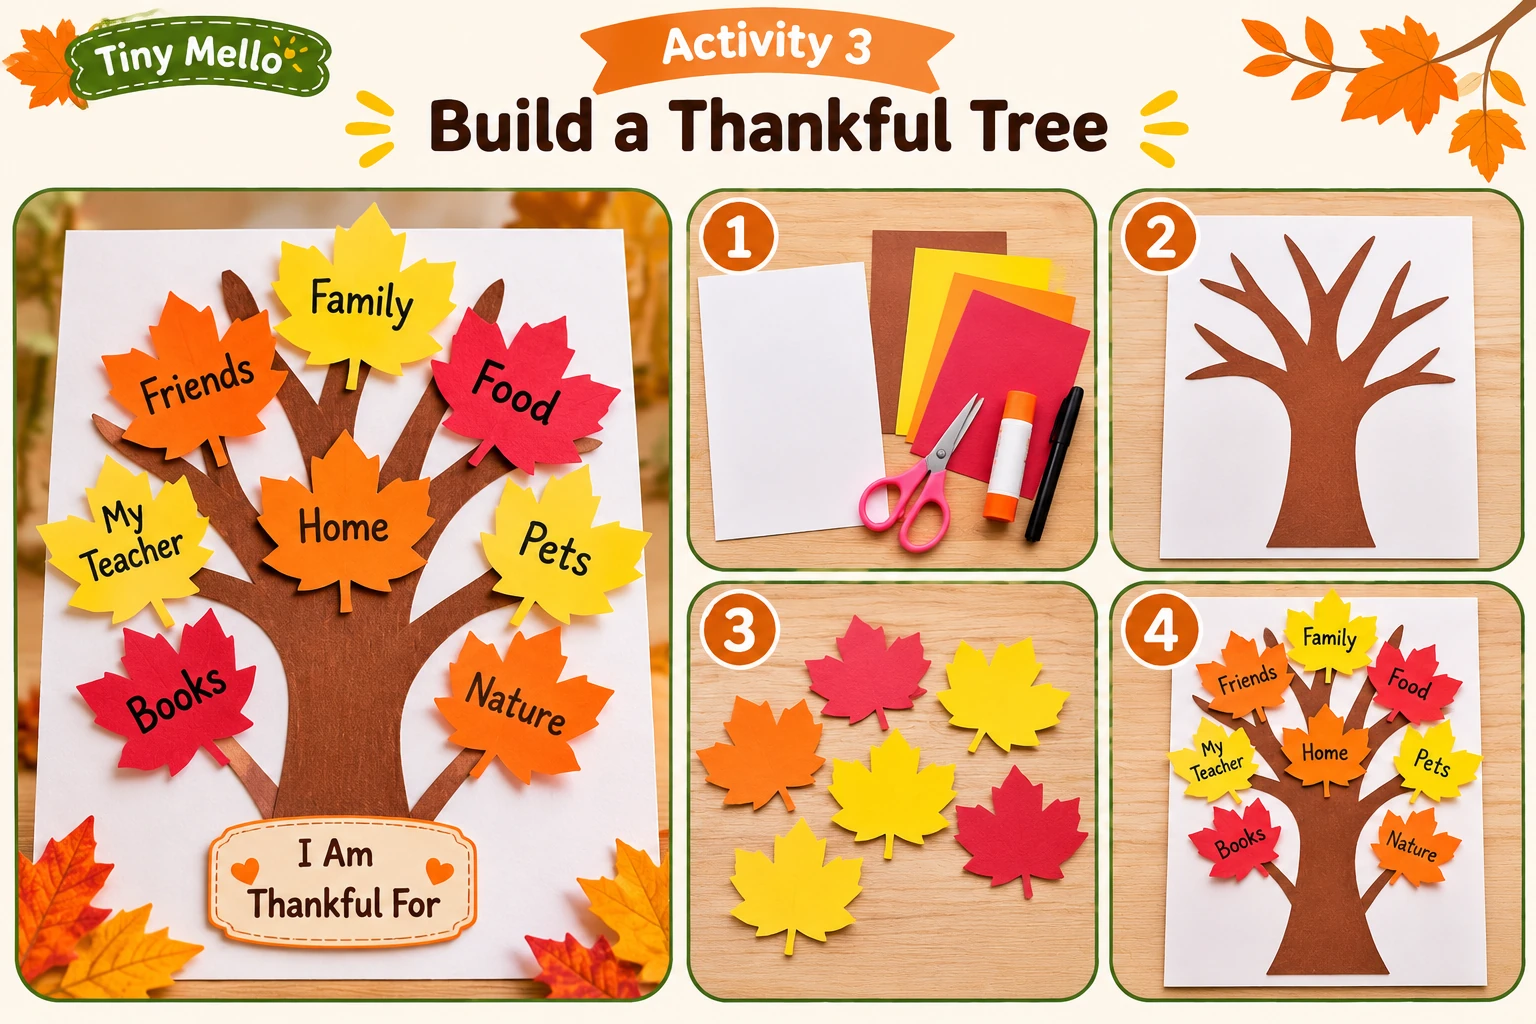
A Thankful Tree is a meaningful Thanksgiving activity that helps children think about the people, places, and little things they appreciate. Children create a tree from paper and decorate its branches with colorful leaves. Each leaf can hold a drawing, a word, or a short message about something they are thankful for.
This activity is a lovely addition to a preschool classroom Thanksgiving celebration or a family activity at home.
What You Need
- 1 large sheet of poster paper or cardstock
- Brown construction paper
- Red, orange, yellow, and sage-green construction paper
- Glue stick or child-safe tape
- Child-safe scissors
- Pencil
- Crayons or washable markers
Step 1: Create the Tree Trunk and Branches
Draw a large tree trunk with several branches on brown construction paper. Aim for a trunk approximately 18 inches tall, with enough branches to hold several paper leaves. Cut out the tree shape and attach it to a large poster sheet using glue or tape.
Step 2: Cut Out Colorful Paper Leaves
Draw leaf shapes on red, orange, yellow, and sage-green construction paper. Make each leaf approximately 3–4 inches long so children have enough room to draw or write. Cut out plenty of leaves to give everyone a chance to contribute.
Step 3: Talk About Things to Be Thankful For
Gather the children and ask simple questions such as, “What makes you happy?” or “Who helps you every day?” Encourage answers about family members, friends, pets, favorite toys, teachers, or activities they enjoy. Give children time to think and share their ideas.
Step 4: Write or Draw on the Leaves
Give each child a few paper leaves. Ask them to draw something they appreciate or tell you their answer so you can write it on the leaf. Older kindergarteners can write a word or a short sentence themselves. This makes the activity suitable for different learning levels.
Step 5: Add the Leaves to the Tree
Help children glue or tape their finished leaves onto the branches. Spread the leaves around the tree so the branches look full and colorful. Continue adding leaves until everyone has contributed. Display the finished Thankful Tree in the classroom or at home where children and family members can see it.
Pro Tip: Keep a small basket of extra paper leaves nearby. Family members, teachers, and visitors can add their own thankful messages to the tree throughout Thanksgiving week.
4. Make a Pumpkin Pie Paper Craft
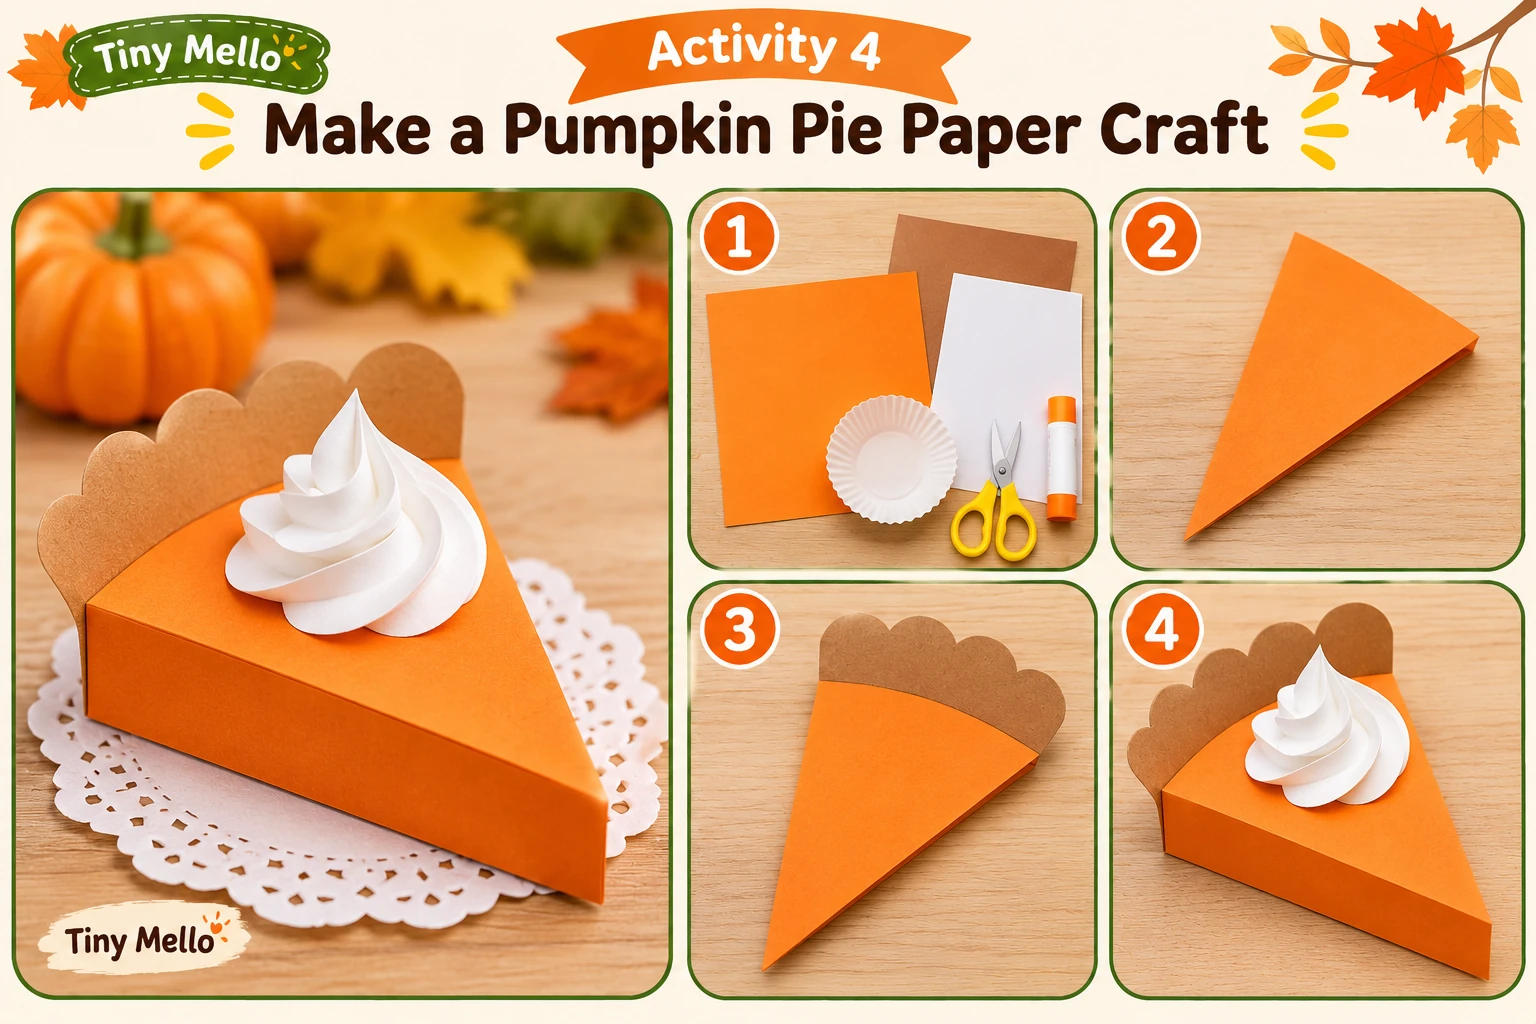
Thanksgiving wouldn’t feel complete without pumpkin pie! This paper craft lets preschoolers and kindergarteners create their own pretend slice of pumpkin pie using colorful construction paper. It’s a fun autumn art project that also gives children a chance to practice recognizing shapes, using scissors, and arranging different craft materials.
What You Need
- Orange construction paper
- Brown construction paper
- 1 small cotton ball
- 1 sheet of white cardstock
- Glue stick
- Child-safe scissors
- Pencil
Step 1: Draw a Pumpkin Pie Slice
Draw a large pie-slice shape on orange construction paper. Make the triangle approximately 6 inches wide and 5 inches tall, with a slightly rounded back edge. This will represent the pumpkin filling. You can draw the shape for younger children before starting.
Step 2: Cut Out the Pumpkin Filling
Help children cut along the outline of the orange pie slice using child-safe scissors. Keep the edges smooth and place the finished shape on the white cardstock. This orange triangle will form the main part of the craft.
Step 3: Make the Pie Crust
Cut a strip of brown construction paper approximately 1 inch wide and 6 inches long. Place it along the wider back edge of the orange triangle to create the pie crust. Trim any extra paper so the crust follows the shape neatly, then glue it in place.
Step 4: Add the Whipped Cream
Take one small cotton ball and gently pull it apart to make a fluffy mound. Place a small amount of glue near the top of the pie slice and attach the cotton ball. Avoid using too much glue, as it can flatten the cotton and make the paper wet.
Step 5: Display the Finished Pie Craft
Press the paper pieces gently and allow the craft to dry for about 10–15 minutes, or until the glue has set. Children can make several pie slices in different sizes and arrange them on a pretend Thanksgiving dessert table.
5. Create a Paper Bag Turkey Puppet
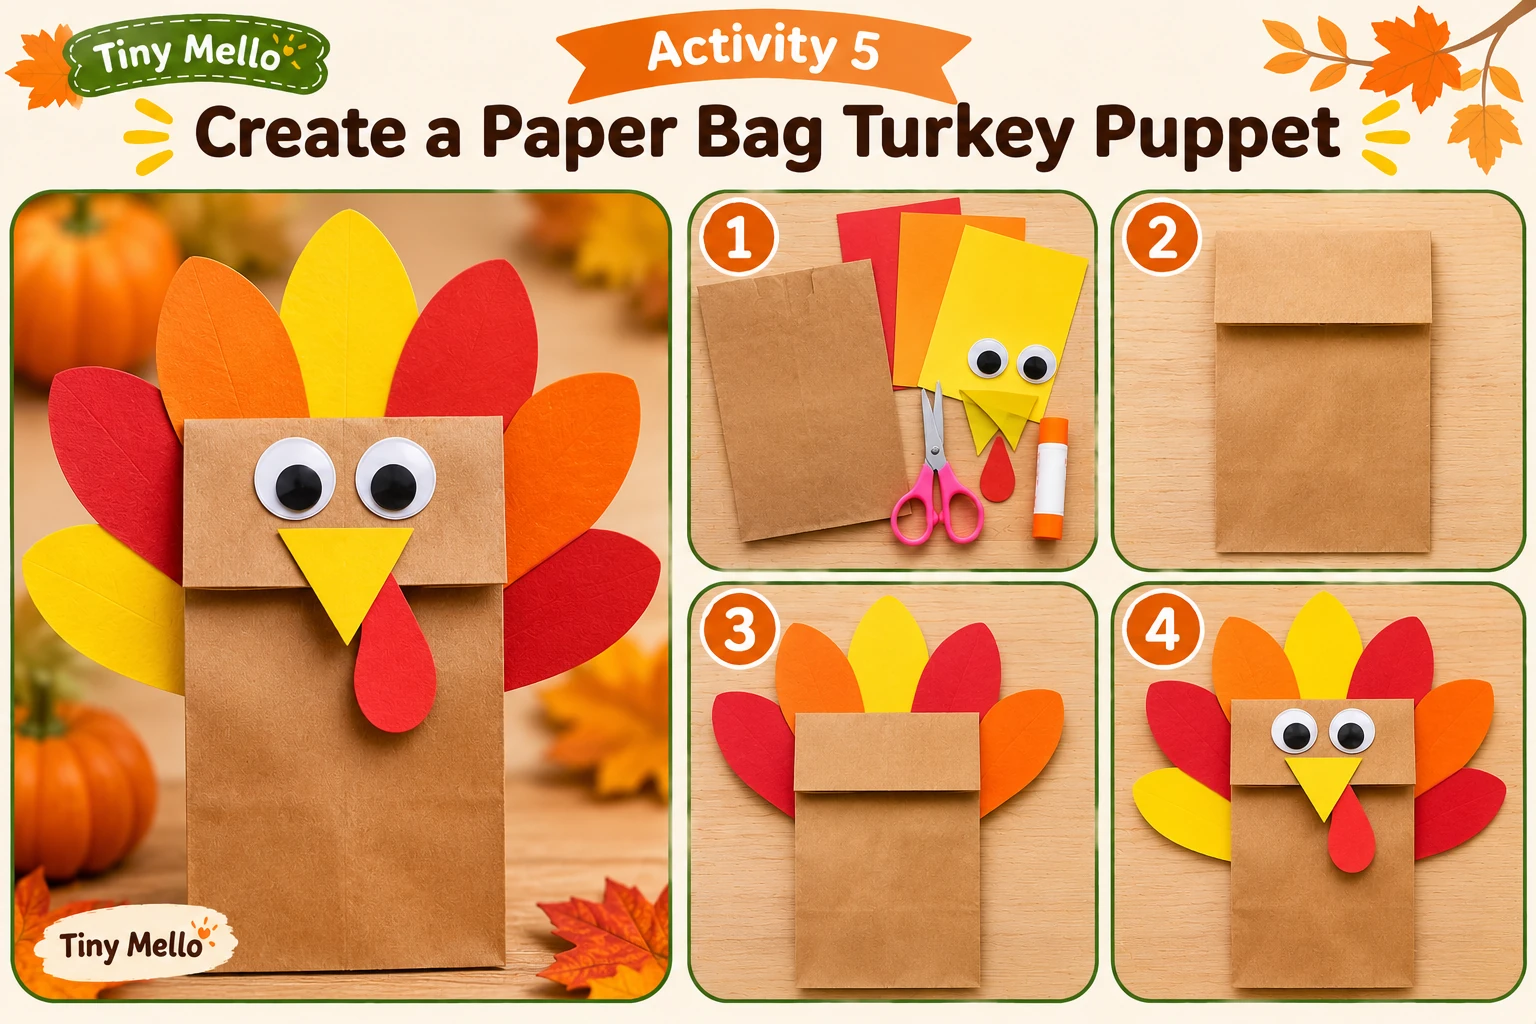
Turn an ordinary brown lunch bag into a playful Thanksgiving turkey puppet! Children can decorate the bag with colorful feathers, googly eyes, and a bright beak before using it to act out little stories. This craft is a fun choice for preschool classrooms because children can enjoy making their puppets and playing with them afterward.
What You Need
- 1 small brown paper lunch bag
- Red, orange, yellow, and green construction paper
- 2 large googly eyes
- Orange construction paper for the beak
- Red construction paper for the wattle
- Glue stick
- Child-safe scissors
- Pencil
Step 1: Position the Paper Bag
Lay the brown paper bag flat on the table with its folded bottom facing up. The folded section will become the turkey’s face, so make sure it is clearly visible. Keep the open end of the bag free so children can slide their hands inside later.
Step 2: Cut Colorful Feathers
Draw 5–7 feather shapes, each approximately 2 inches long, on red, orange, yellow, and green construction paper. Cut out the shapes with child-safe scissors. Younger preschoolers can use feathers prepared by an adult before the activity begins.
Step 3: Attach the Feathers
Turn the bag over and arrange the colorful feathers along the back edge of the folded bottom. Spread them out like a fan so the colors show above the turkey’s head. Glue the feathers in place and press them gently to help them stick.
Step 4: Make the Turkey’s Face
Glue two large googly eyes onto the folded bottom section. Cut a small orange triangle for the beak and a curved red shape for the wattle. Attach both pieces below the eyes. Keep all the decorations on the folded section so the puppet can open and close properly.
Step 5: Let the Puppet Dry
Leave the puppet flat for approximately 10 minutes, or until the glue has set. Once dry, slide a hand into the open end of the bag and move the folded bottom to make the turkey talk. Children can give their turkey a name and create a short Thanksgiving story.
Learning Benefits: This activity supports imaginative play, storytelling, communication, and fine motor development. Children can also practice speaking in different voices and expressing their ideas.
For Younger Preschoolers: Prepare the feather and face shapes in advance. Let children choose where to place each piece and help them glue the decorations onto the bag.
6. Set Up a Thanksgiving Sensory Bin
A Thanksgiving sensory bin gives young children an opportunity to explore autumn colors, textures, and objects through hands-on play. Fill a shallow container with artificial fall leaves, soft fabric pumpkins, scoops, and cups. Children can sort, collect, scoop, and move the materials while enjoying an autumn-themed play activity.
This is a good option for preschool classrooms, play corners, or a quiet afternoon at home.
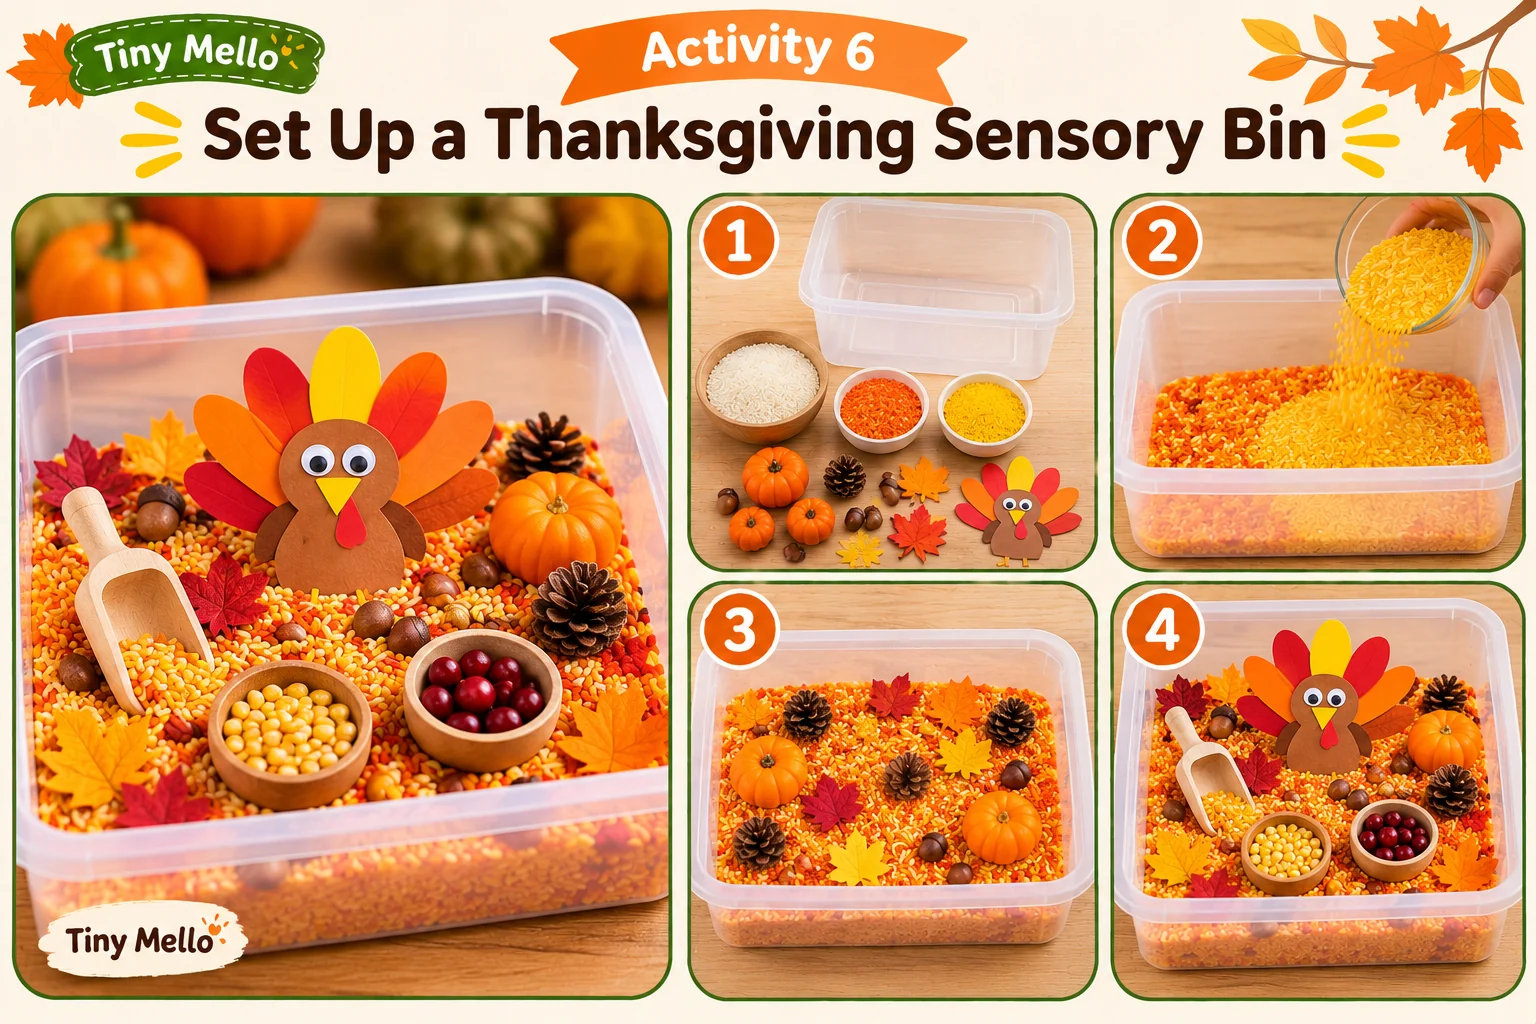
What You Need
- 1 shallow plastic bin (approximately 12 × 9 inches)
- 10–15 large artificial autumn leaves
- 4–6 large fabric or felt pumpkin shapes
- 2 child-sized plastic scoops
- 3 small plastic cups
- 2 small plastic bowls
- A tray or washable mat to place underneath the bin
Step 1: Choose a Suitable Sensory Bin
Select a shallow plastic container with low sides so children can reach the materials comfortably. A clean dish tub or storage tray can work well. Place it on a sturdy table or on the floor over a washable mat to catch any materials that fall out.
Step 2: Prepare the Sensory Materials
Check every artificial leaf and pumpkin for loose parts, sharp edges, or pieces that could break off. Choose large, soft materials that are appropriate for the children’s ages. Avoid tiny decorations and anything that could become a choking hazard.
Step 3: Arrange the Materials in the Bin
Spread the artificial leaves across the bottom of the container. Add the fabric pumpkins, scoops, cups, and bowls. Leave enough room for children to move the materials around without overcrowding the bin.
Step 4: Introduce a Color-Sorting Challenge
Invite children to find leaves or pumpkins of different colors. Ask them to place the orange objects in one cup, yellow objects in another, and red objects in a third. You can also ask questions such as, “Can you find three orange leaves?” to introduce early counting.
Step 5: Encourage Scooping and Pretend Play
Give children time to scoop the leaves into bowls, fill the cups, and move the pumpkins around. Encourage them to pretend they are collecting autumn leaves, preparing a fall garden, or filling baskets for Thanksgiving. Let them explore at their own pace.
7. Make Autumn Playdough Creations
Let children explore autumn colors and shapes with this fun Thanksgiving playdough activity. They can make pumpkins, leaves, and other fall-inspired creations while practicing their fine motor skills.
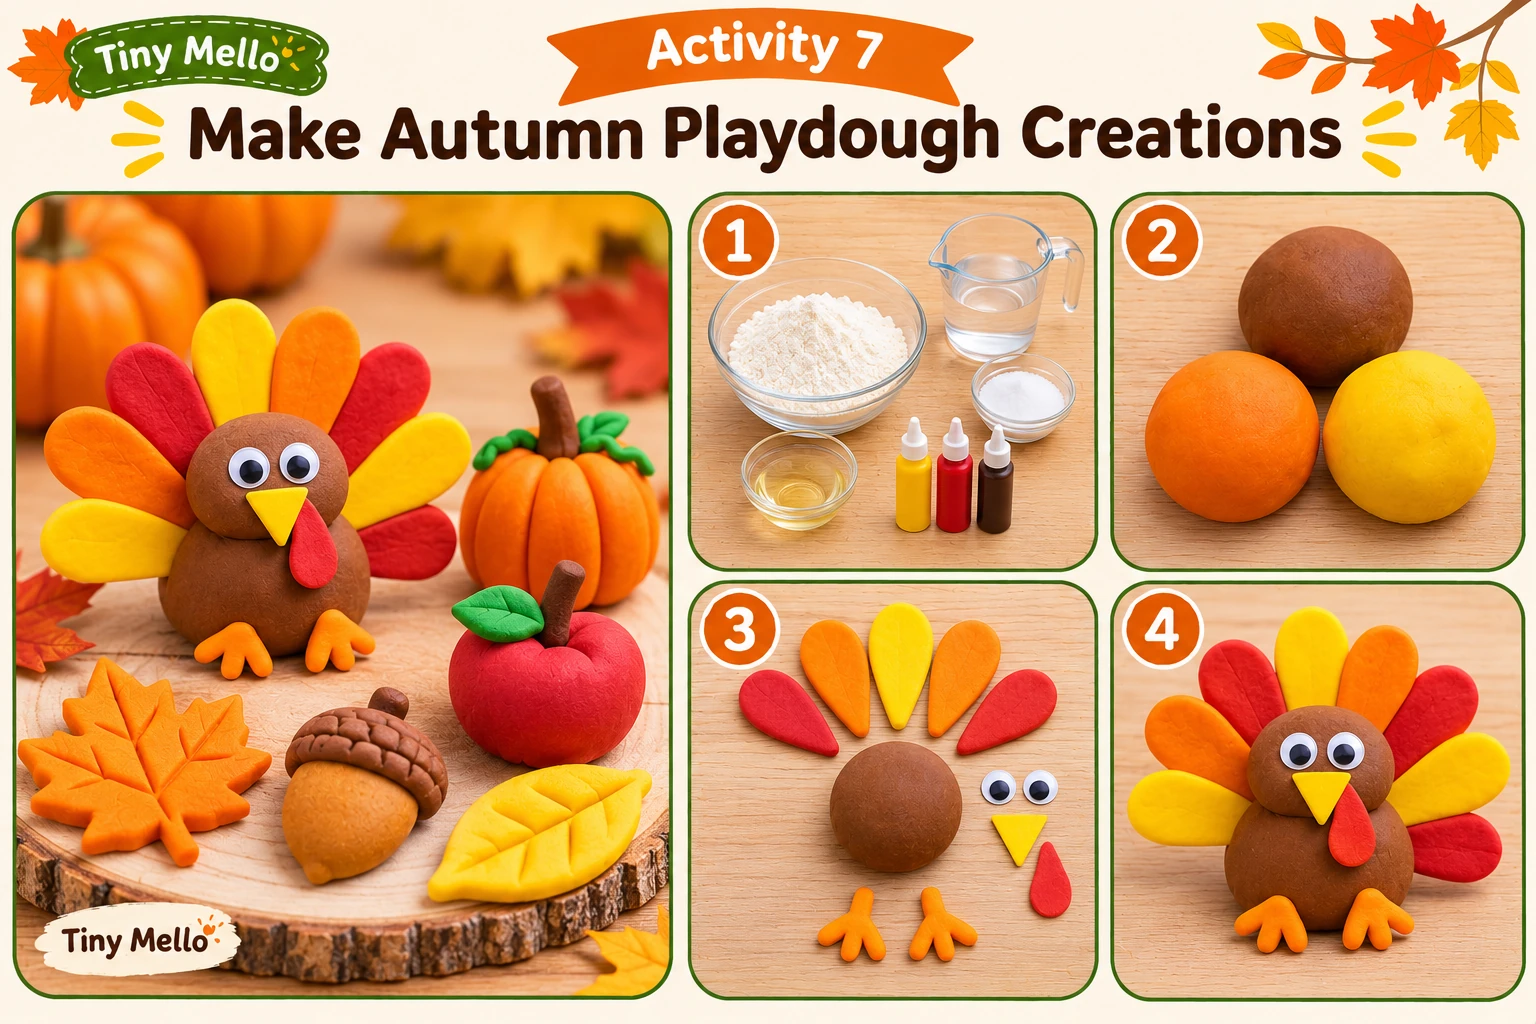
What You Need
- Non-toxic playdough in orange, brown, yellow, and green
- Child-safe rolling pins
- Large leaf and pumpkin cookie cutters
- Plastic playdough tools
- Trays or placemats
Step 1: Prepare the Playdough
Divide the playdough into small portions and place each color on a separate tray. Make sure the playdough is suitable for your child’s age.
Step 2: Roll Out the Dough
Give each child a portion of playdough. Show them how to roll it into a flat layer approximately ¼ inch thick using a child-safe rolling pin.
Step 3: Cut Autumn Shapes
Press large leaf- and pumpkin-shaped cookie cutters into the flattened dough. Carefully lift the cutters and remove the extra dough around each shape.
Step 4: Add Details
Use plastic playdough tools to create lines on the leaves and small grooves on the pumpkins. Children can also make stems using small pieces of green playdough.
Step 5: Display the Creations
Arrange the finished playdough shapes on a tray. Encourage children to create an autumn garden or a pretend Thanksgiving feast. Return the playdough to its containers after playtime.
8. Try Corn Cob Painting
Corn cob painting is a fun way to create colorful autumn artwork. Children use a corn cob to make textured patterns with washable paint instead of using an ordinary paintbrush.
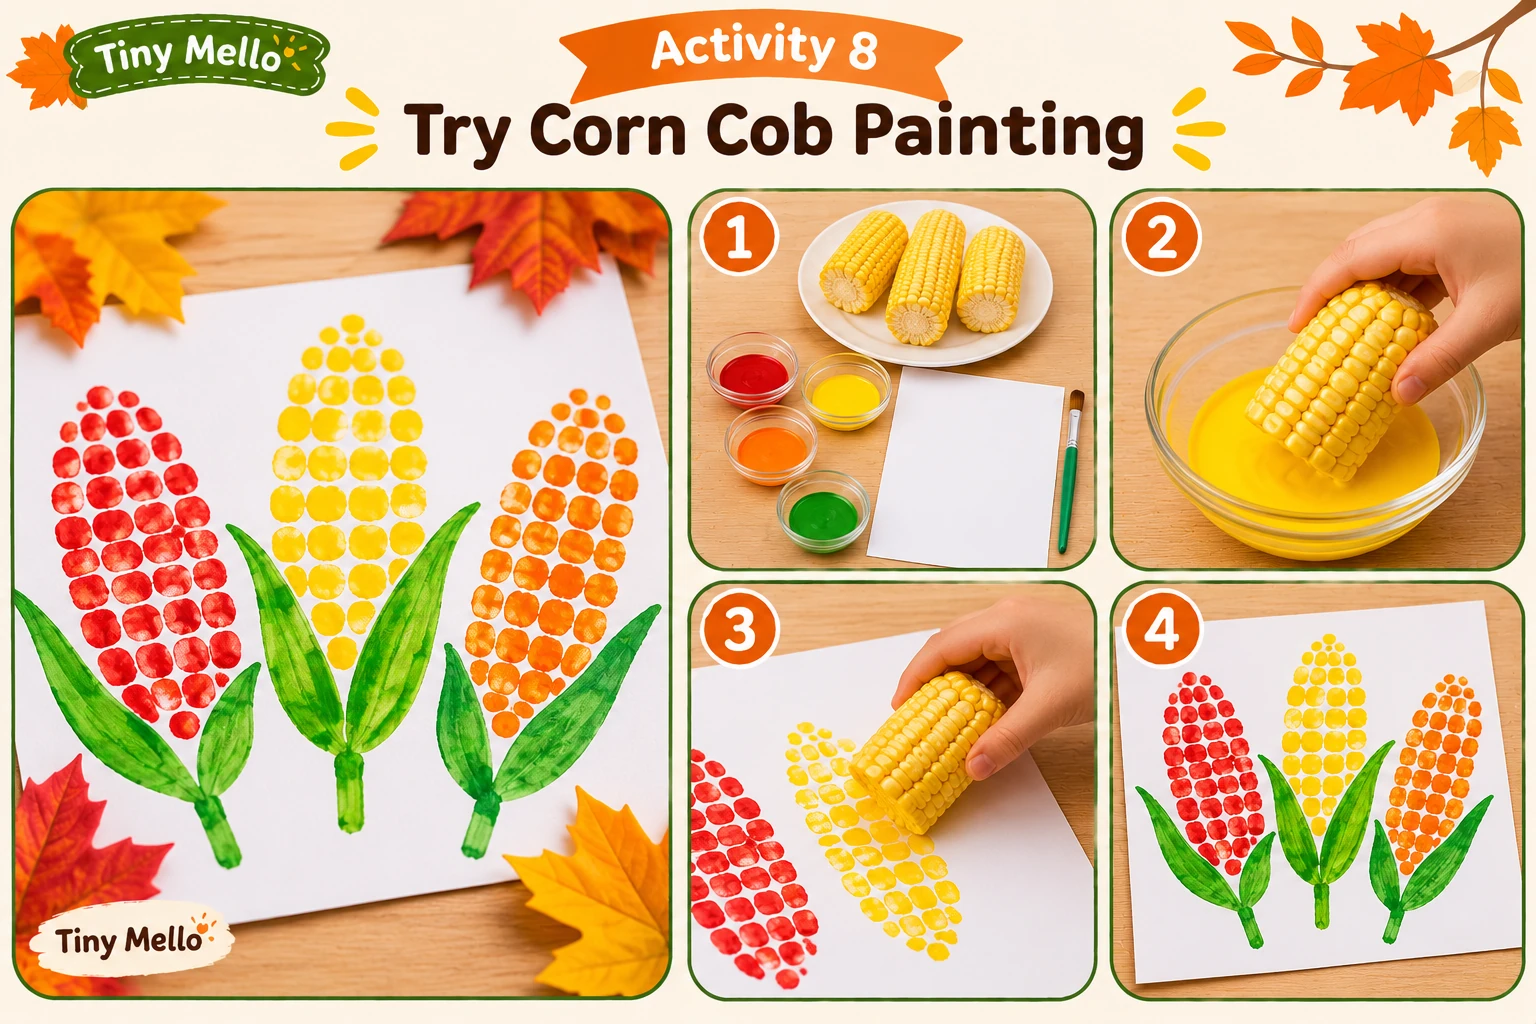
What You Need
- 1 cleaned corn cob with all kernels removed
- Washable, non-toxic paint in yellow, orange, and red
- White or cream construction paper
- Shallow paper plates
- Paintbrush
- Newspaper or washable table cover
- Paper towels
- Child-sized smock or old shirt
Step 1: Prepare the Corn Cob
Ask an adult to prepare a cleaned corn cob with all kernels removed. Check that it has no sharp or loose pieces. Cut it to a manageable length so children can hold it comfortably.
Step 2: Set Up the Painting Area
Cover the table with newspaper or a washable tablecloth. Pour a small amount of each paint color onto separate paper plates. Place a sheet of construction paper in front of each child.
Step 3: Apply Paint to the Corn Cob
Roll the corn cob gently through one paint color until its surface has a light coating. Avoid using too much paint, as excess paint can hide the natural texture.
Step 4: Make Patterns on the Paper
Show children how to roll the painted corn cob across the paper. They can make straight lines, curved patterns, or repeated marks. Lift the cob gently to see the textured design.
Step 5: Add More Autumn Colors
Clean or replace the corn cob before using another color. Repeat the painting process with orange, red, or yellow paint. Leave the artwork flat until it is completely dry.
9. Decorate Thanksgiving Placemats
Let children create their own Thanksgiving placemats with colorful autumn decorations. They can draw turkeys, pumpkins, and leaves or add a message about something they are thankful for. These handmade placemats can be used at the family Thanksgiving table or in the classroom.
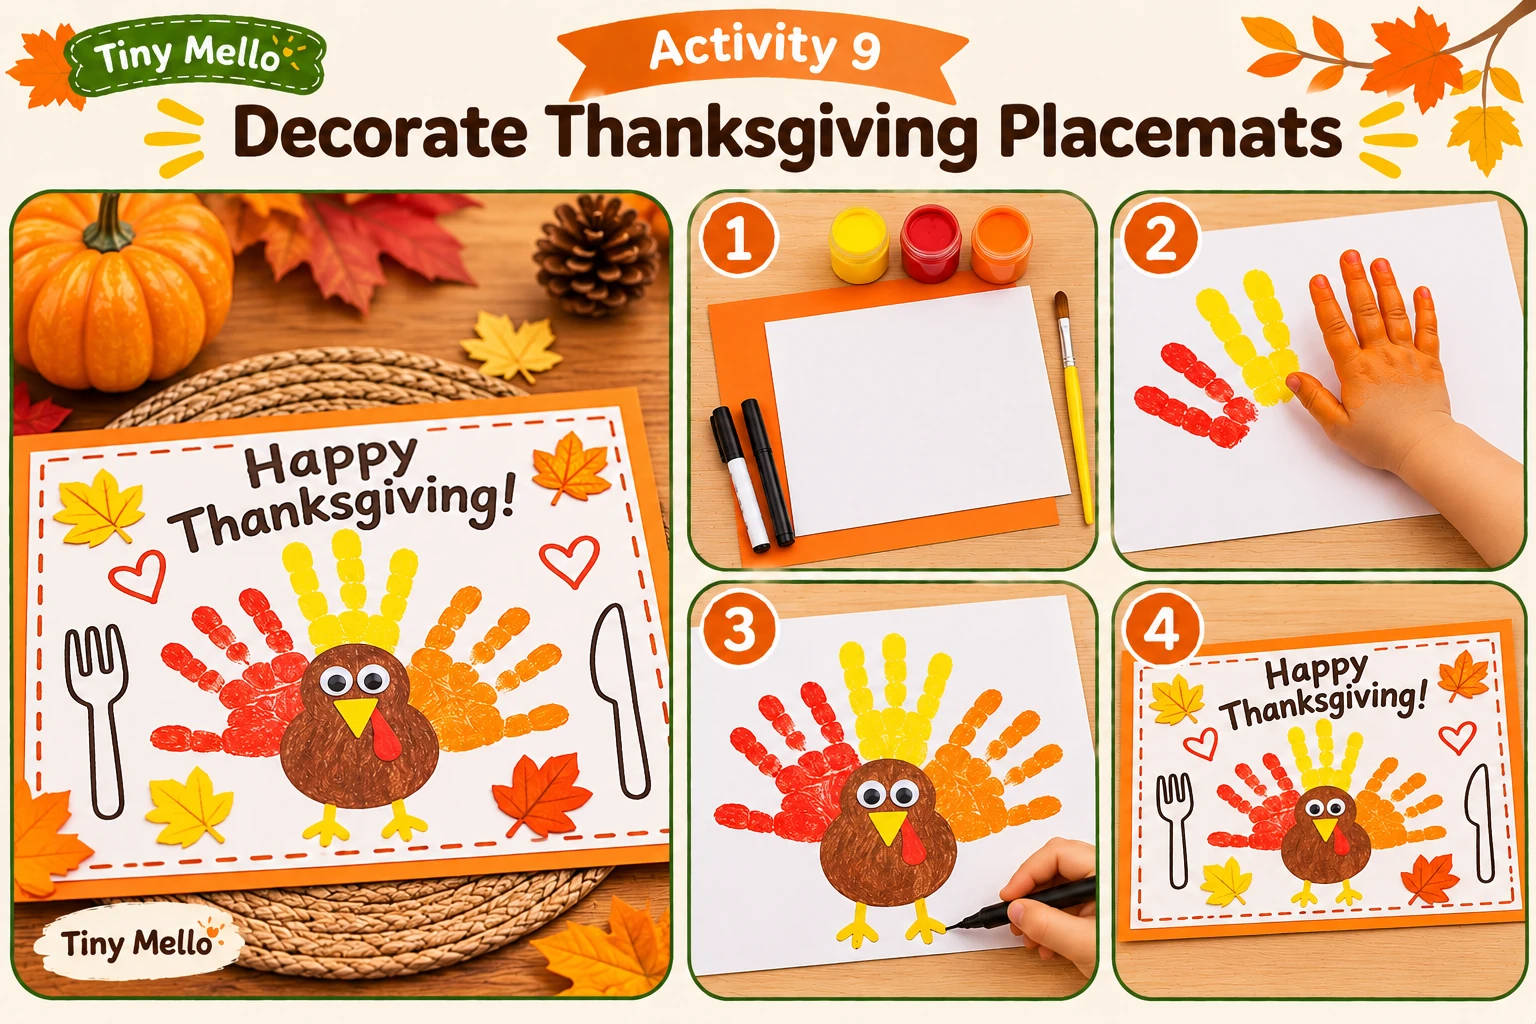
What You Need
- 1 sheet of white or cream cardstock per child
- Crayons or washable markers
- Autumn-themed stickers
- Construction paper in fall colors
- Glue stick
- Child-safe scissors
- Clear adhesive shelf liner or laminating sheets (optional)
Step 1: Prepare the Cardstock
Give each child one sheet of cardstock measuring approximately 11 × 8½ inches. Place it horizontally on the table to create a placemat shape.
Step 2: Draw a Thanksgiving Border
Ask children to draw a border around the edges using crayons or washable markers. They can add leaves, pumpkins, small turkeys, or colorful patterns.
Step 3: Add Autumn Decorations
Provide construction paper and autumn-themed stickers. Children can cut out large leaf and pumpkin shapes and glue them around the border. Younger children can use pre-cut shapes.
Step 4: Write a Thankful Message
Ask each child to draw or write something they are thankful for in the center of the placemat. Younger children can tell an adult their answer, while older kindergarteners can write a short sentence.
Step 5: Protect the Placemats
Allow the glue and decorations to dry completely. An adult can cover both sides with clear adhesive shelf liner or laminating sheets to make the placemats more durable. Trim the edges carefully.
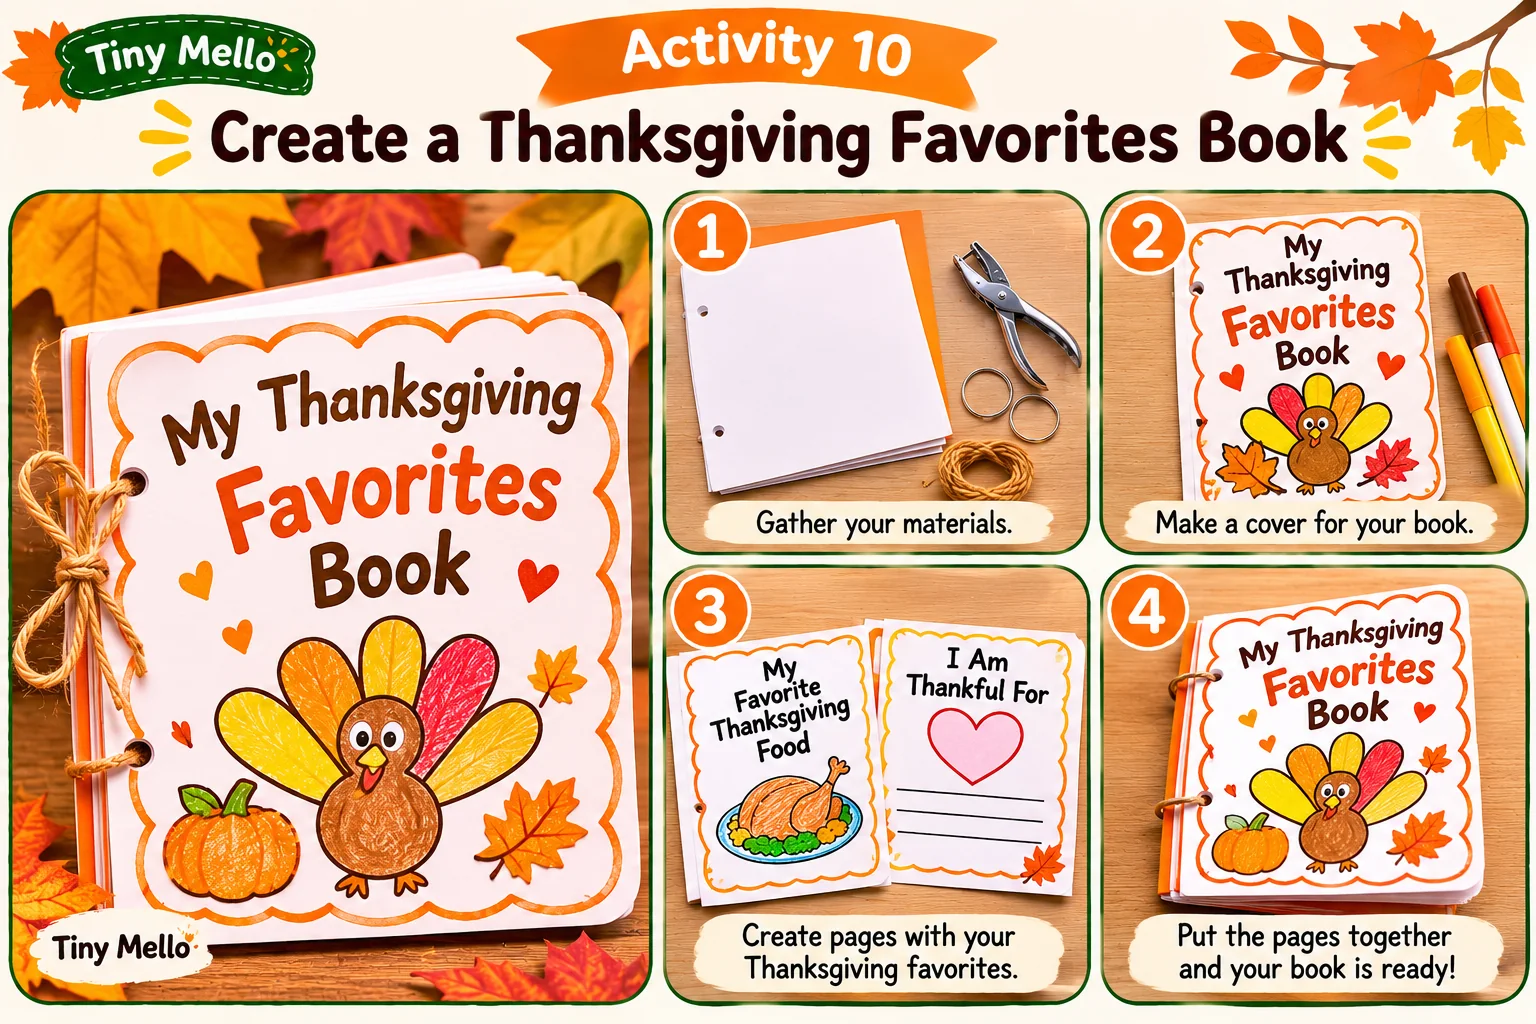
10. Create a Thanksgiving Favorites Book
Help children make a little Thanksgiving book filled with their favorite things about the holiday. They can draw pictures of family, food, decorations, and activities they enjoy. This is a lovely way to encourage creativity, early writing, and family conversations.
What You Need
- 4–5 sheets of white paper
- 1 sheet of colored construction paper for the cover
- Crayons or washable markers
- Child-safe scissors
- Stapler (adult use)
- Stickers (optional)
Step 1: Prepare the Book Pages
Take 4–5 sheets of white paper and stack them together. Fold the sheets in half to create a small booklet. Use the folded pages as the inside of the Thanksgiving favorites book.
Step 2: Make the Front Cover
Cut a piece of colored construction paper slightly larger than the folded pages. Write “My Thanksgiving Favorites” on the front and let children decorate it with drawings, stickers, or autumn shapes.
Step 3: Choose Favorite Thanksgiving Things
Talk with children about their favorite parts of Thanksgiving. Ask questions about their favorite foods, family traditions, games, or decorations. Let them choose a different topic for each page.
Step 4: Draw and Write
Give children crayons or markers to draw their answers on the pages. Older kindergarteners can write simple words or sentences, while younger preschoolers can explain their pictures to an adult who writes their answers underneath.
Step 5: Put the Book Together
Place the decorated cover around the folded pages. Ask an adult to staple along the folded edge to secure the booklet. Let children share their finished books with family members or classmates.
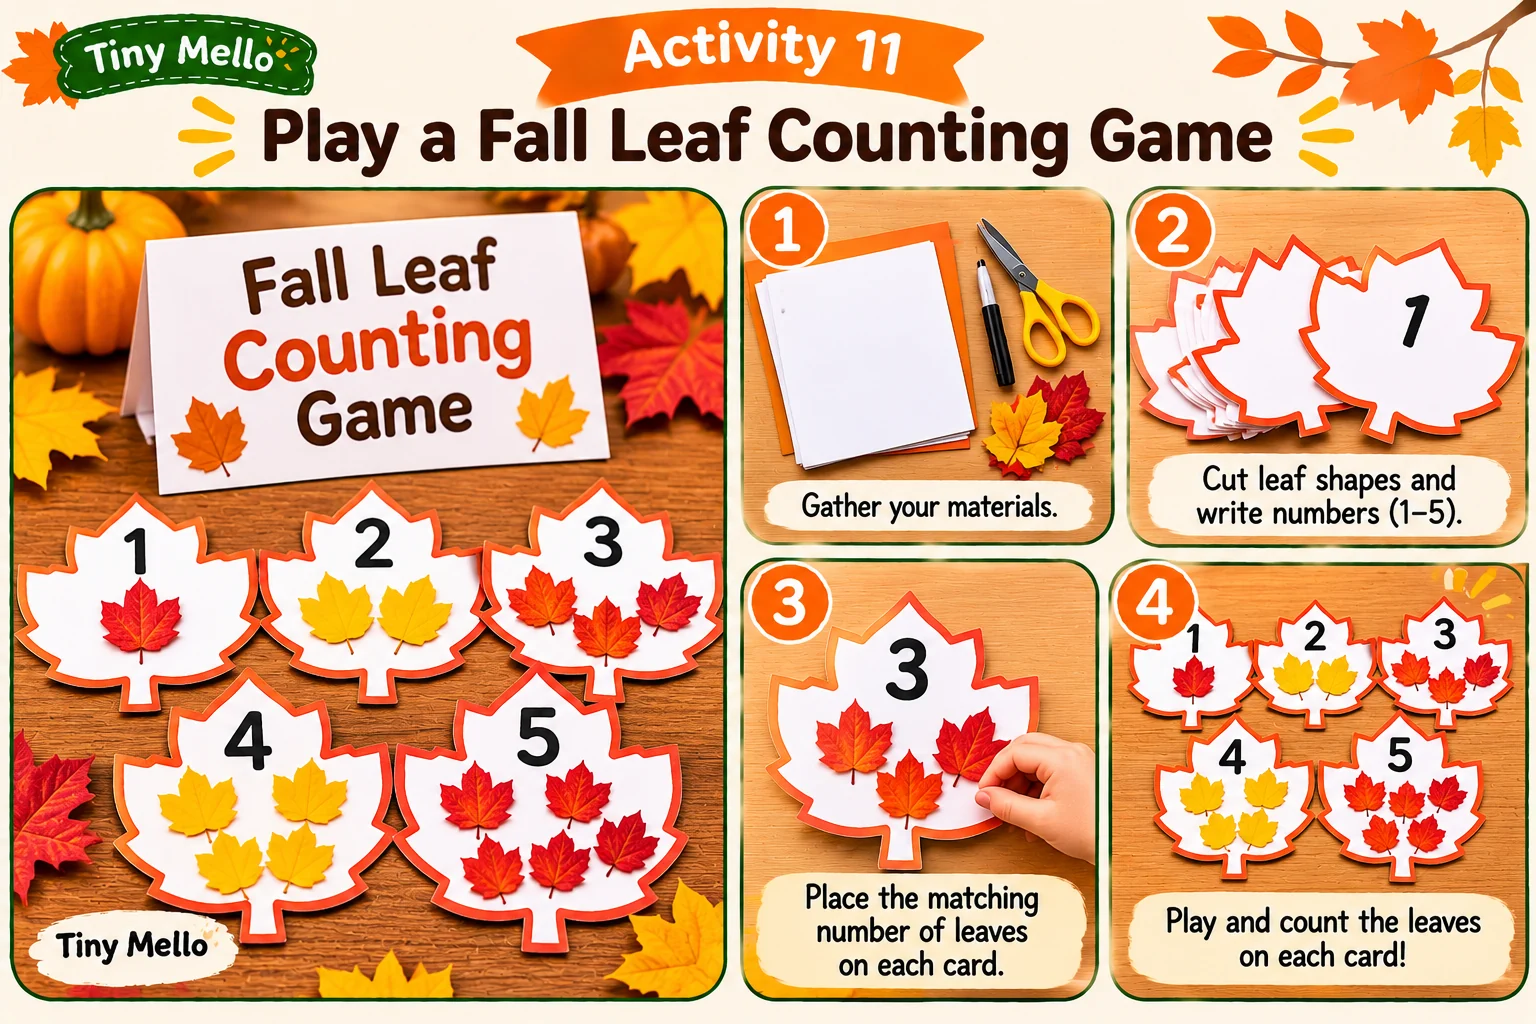
11. Play a Fall Leaf Counting Game
Turn colorful autumn leaves into a simple counting activity for preschoolers and kindergarteners. Children can collect, sort, and count leaves while practicing number recognition and basic math skills.
What You Need
- 15–20 large artificial or real autumn leaves
- Number cards from 1 to 10
- 3 small bowls or baskets
- A flat tray or table
- Crayons or markers (optional)
Step 1: Prepare the Leaves
Collect 15–20 large leaves for the activity. You can use artificial leaves or clean, dry real leaves. Check real leaves for dirt, insects, or sharp stems before giving them to children.
Step 2: Arrange the Number Cards
Place number cards from 1 to 10 in a row on the table or floor. Make sure the numbers are large and easy to recognize. If you don’t have number cards, write the numbers on small pieces of paper.
Step 3: Match Leaves to Numbers
Ask children to choose a number card and place the matching number of leaves beside it. For example, a card showing the number 3 should have three leaves next to it.
Step 4: Sort the Leaves by Color
Invite children to separate the leaves into different groups, such as red, yellow, orange, and brown. Ask them to count how many leaves are in each group and compare which color has more or fewer leaves.
Step 5: Try a Simple Counting Challenge
Give children a few fun questions: “Can you find five yellow leaves?” or “How many leaves do you need to make a group of eight?” Let them move the leaves around as they count.
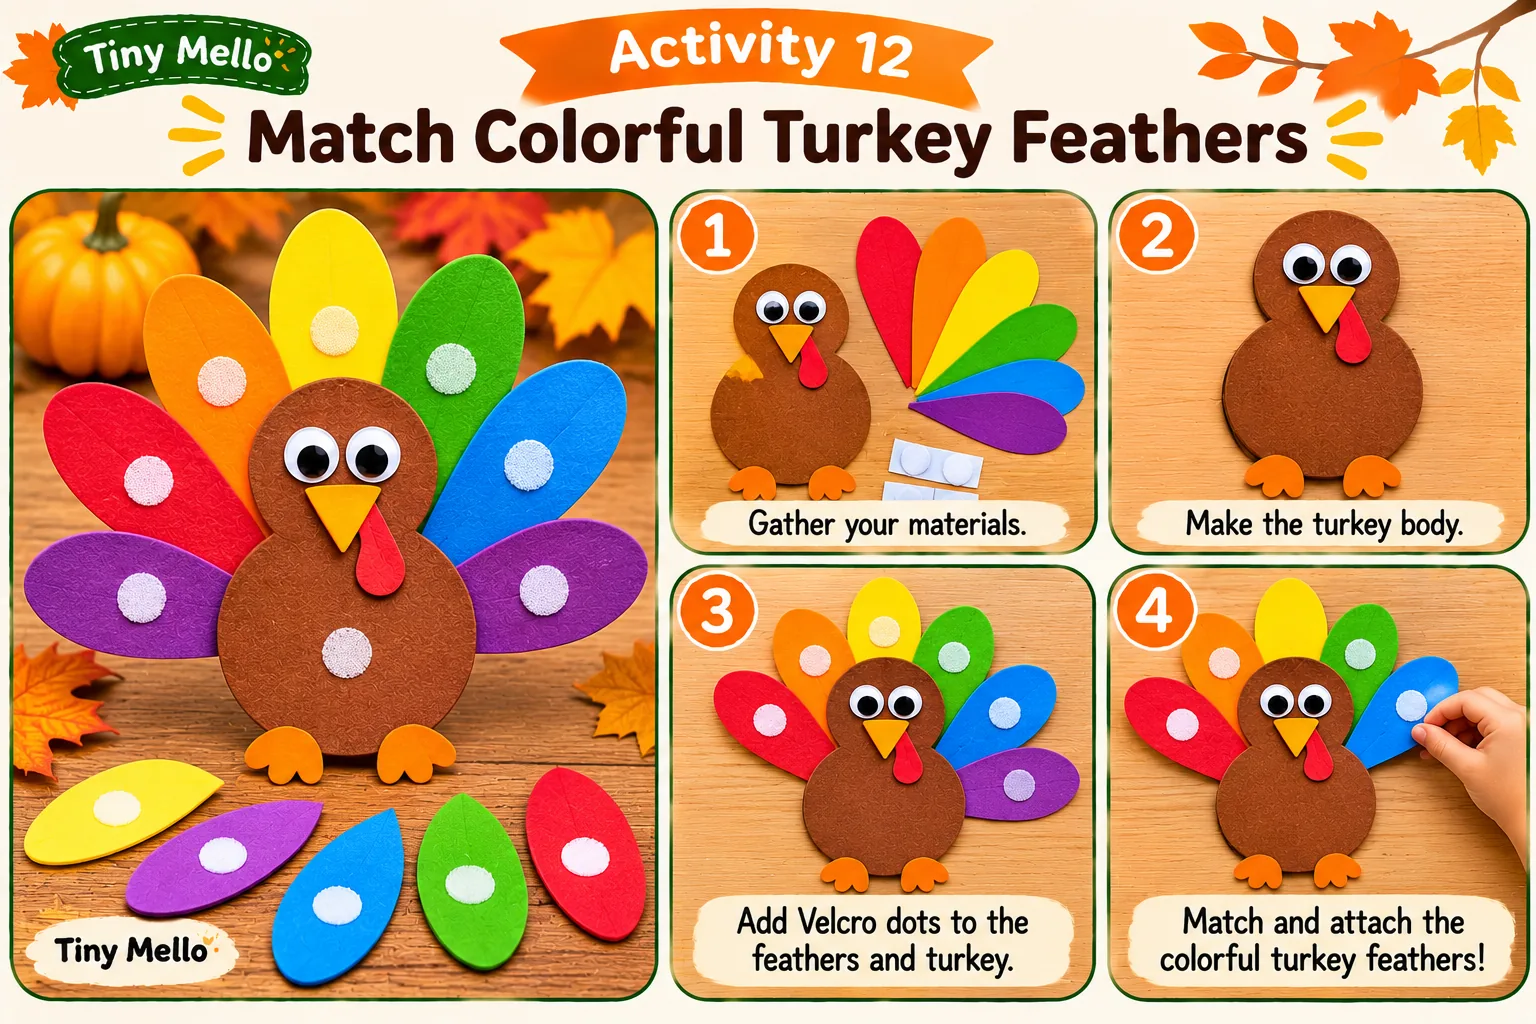
12. Match Colorful Turkey Feathers
This Thanksgiving matching game helps children recognize colors while creating a colorful paper turkey. Children match paper feathers to the correct colors on a turkey template. It is a fun learning activity for preschool classrooms and at-home play.
What You Need
- 1 sheet of white cardstock
- Brown construction paper
- Red, orange, yellow, green, and blue construction paper
- Child-safe scissors
- Glue stick or reusable adhesive
- Crayons or markers
Step 1: Make a Turkey Template
Draw a large turkey body on brown construction paper and cut it out. Glue it onto the center of a sheet of white cardstock. Draw a simple face with eyes and an orange beak.
Step 2: Prepare the Colorful Feathers
Cut out feather shapes from red, orange, yellow, green, and blue construction paper. Make each feather approximately 2 inches long. Prepare several feathers in each color so children have enough pieces to match.
Step 3: Arrange the Color Groups
Place the paper feathers in a small pile beside the turkey template. Point to each color and say its name. Let children look at the different colors before starting the matching game.
Step 4: Match the Feathers
Ask children to pick one feather and match it to the same color on a color guide or matching card. They can place each feather around the turkey’s body to create a colorful tail. Use reusable adhesive if you want children to repeat the activity.
Step 5: Count the Matching Feathers
After matching all the colors, ask children to count the feathers in each group. Try questions such as, “How many red feathers do we have?” or “Which color has the most feathers?”
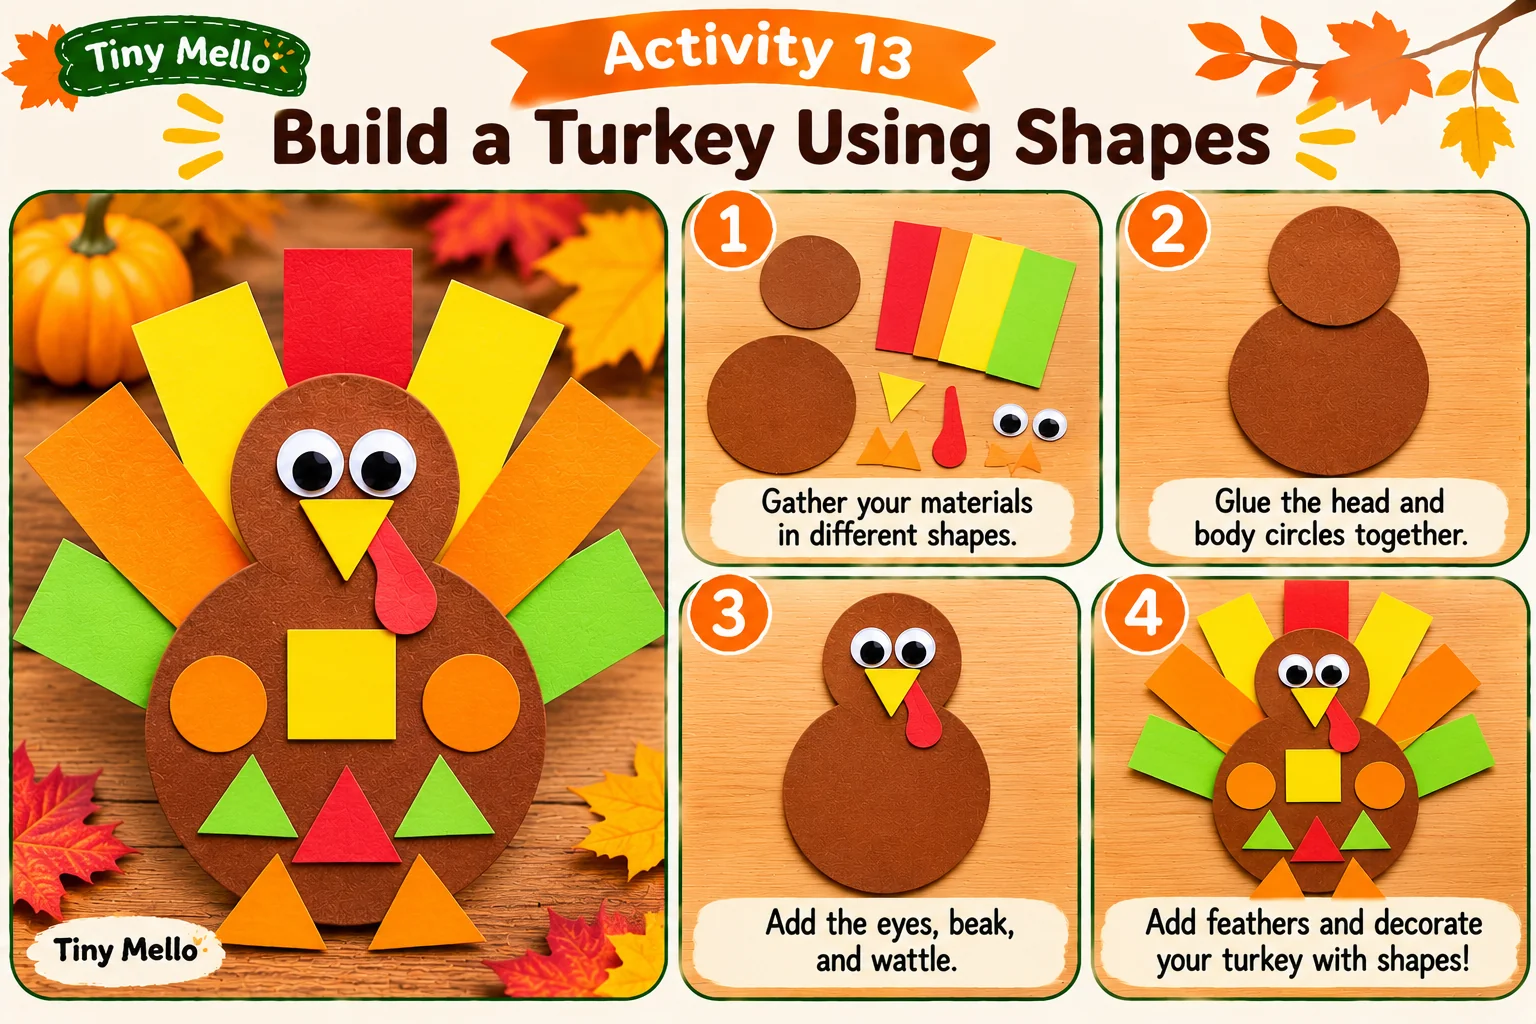
13. Build a Turkey Using Shapes
This Thanksgiving activity helps preschoolers and kindergarteners learn basic shapes while creating a colorful turkey. Children use circles, triangles, and ovals to build their own turkey picture. It’s a fun way to combine art with early math learning.
What You Need
- White cardstock or construction paper
- Brown, red, orange, yellow, and green construction paper
- Child-safe scissors
- Glue stick
- Pencil
- Googly eyes or black marker
Step 1: Prepare the Turkey Shapes
Draw a large brown oval for the turkey’s body, a smaller brown circle for its head, and several colorful ovals for the feathers. Cut out orange triangles for the beak and feet. You can prepare all the shapes before the activity for younger children.
Step 2: Arrange the Turkey’s Body
Place the large brown oval in the center of the cardstock. Position the smaller circle above it to create the turkey’s head. Let children arrange the pieces before gluing them in place.
Step 3: Add the Colorful Feathers
Arrange the red, yellow, orange, and green ovals behind the turkey’s body in a fan shape. Overlap the bottom edges slightly so the feathers look connected. Glue each shape onto the cardstock.
Step 4: Make the Turkey’s Face
Glue two googly eyes onto the head or draw them with a black marker. Add the orange triangle beak below the eyes and attach the small feet near the bottom of the body.
Step 5: Talk About the Shapes
Ask children to identify the shapes they used to make their turkey. Count the feathers together and ask questions such as, “Can you find the triangle?” or “How many oval feathers did you use?”
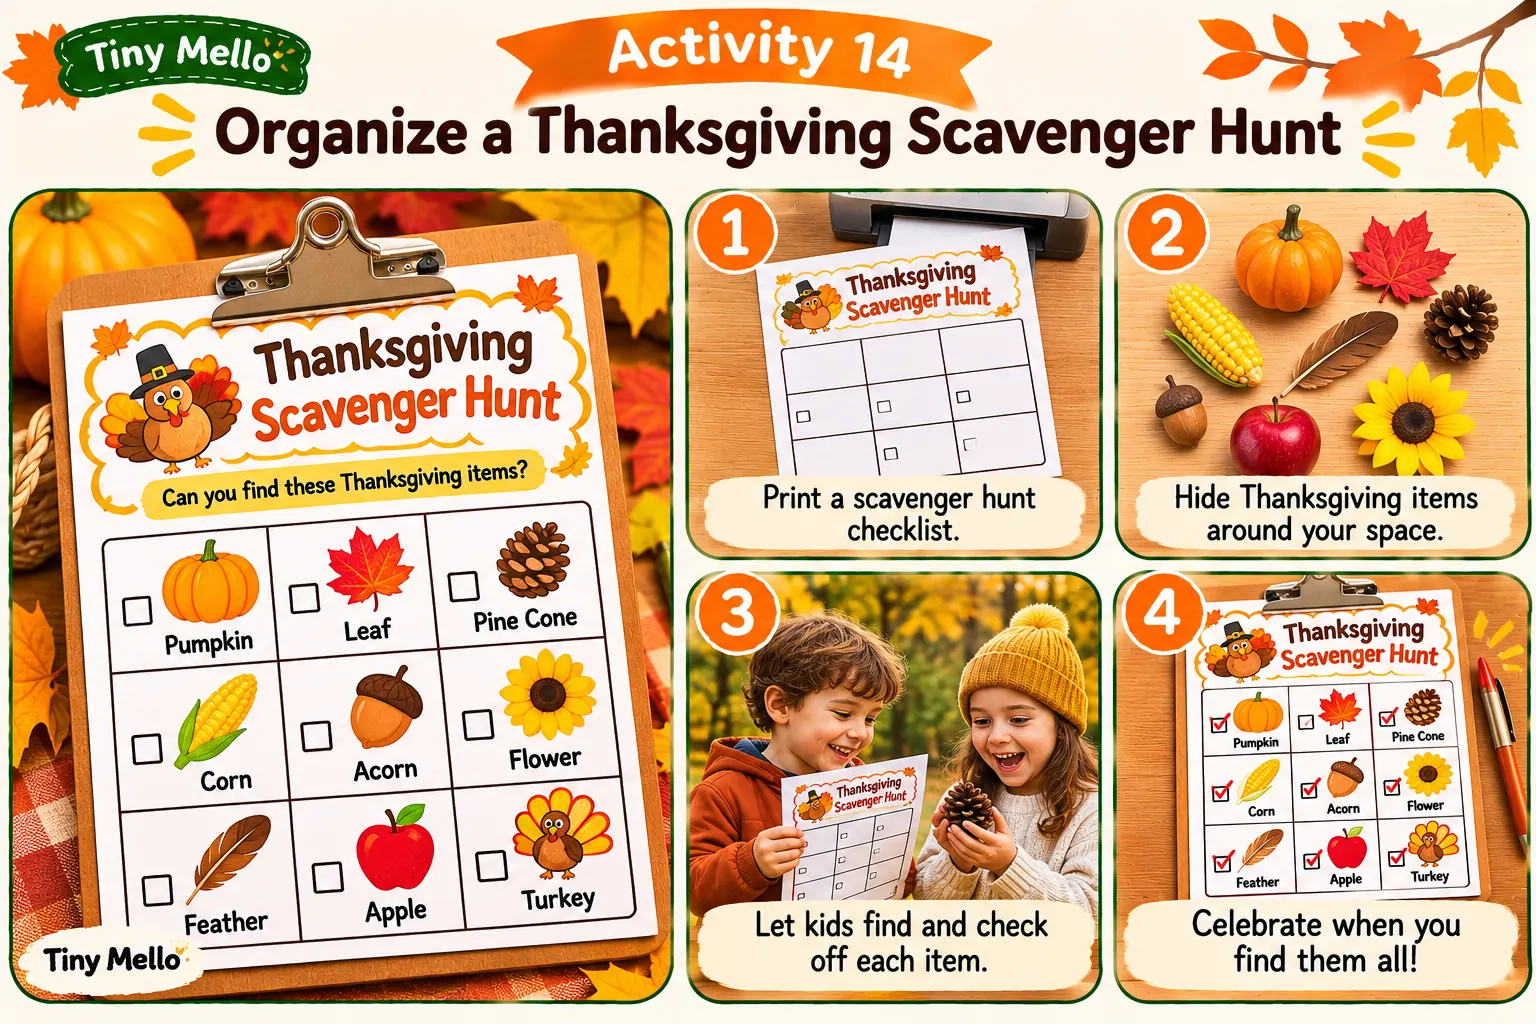
14. Organize a Thanksgiving Scavenger Hunt
A Thanksgiving scavenger hunt is a fun way to keep children active while exploring autumn objects around the home or classroom. Give them a simple picture checklist and encourage them to find each item. This activity combines movement, observation, and early learning.
What You Need
- A Thanksgiving scavenger hunt checklist
- Pencils or crayons
- Small basket or collection bag
- Autumn-themed picture cards (optional)
- Large artificial leaves or other safe objects to hide
Step 1: Prepare the Scavenger Hunt List
Create a checklist with simple items for children to find. Include objects such as a red leaf, an orange pumpkin, a brown pinecone, a yellow decoration, and something shaped like a turkey. Use pictures alongside the words for younger children.
Step 2: Choose a Safe Search Area
Select a suitable area in your home, classroom, or outdoor space. Check the area before the activity and remove anything sharp, breakable, or unsafe. Set clear boundaries so children know where they can search.
Step 3: Hide the Autumn Items
Place large, safe autumn decorations around the selected area. Hide them in easy-to-find places, such as on a shelf, beside a chair, or near a table. Avoid placing objects in high or difficult-to-reach spots.
Step 4: Give Children Their Checklists
Hand each child a checklist and a pencil or crayon. Read the items aloud and show the picture clues. Encourage children to look around carefully and mark each item when they find it.
Step 5: Count the Collected Items
Once children finish searching, gather everyone together and count the items they found. Ask questions such as, “Which color did you find the most?” or “How many leaves did you collect?”
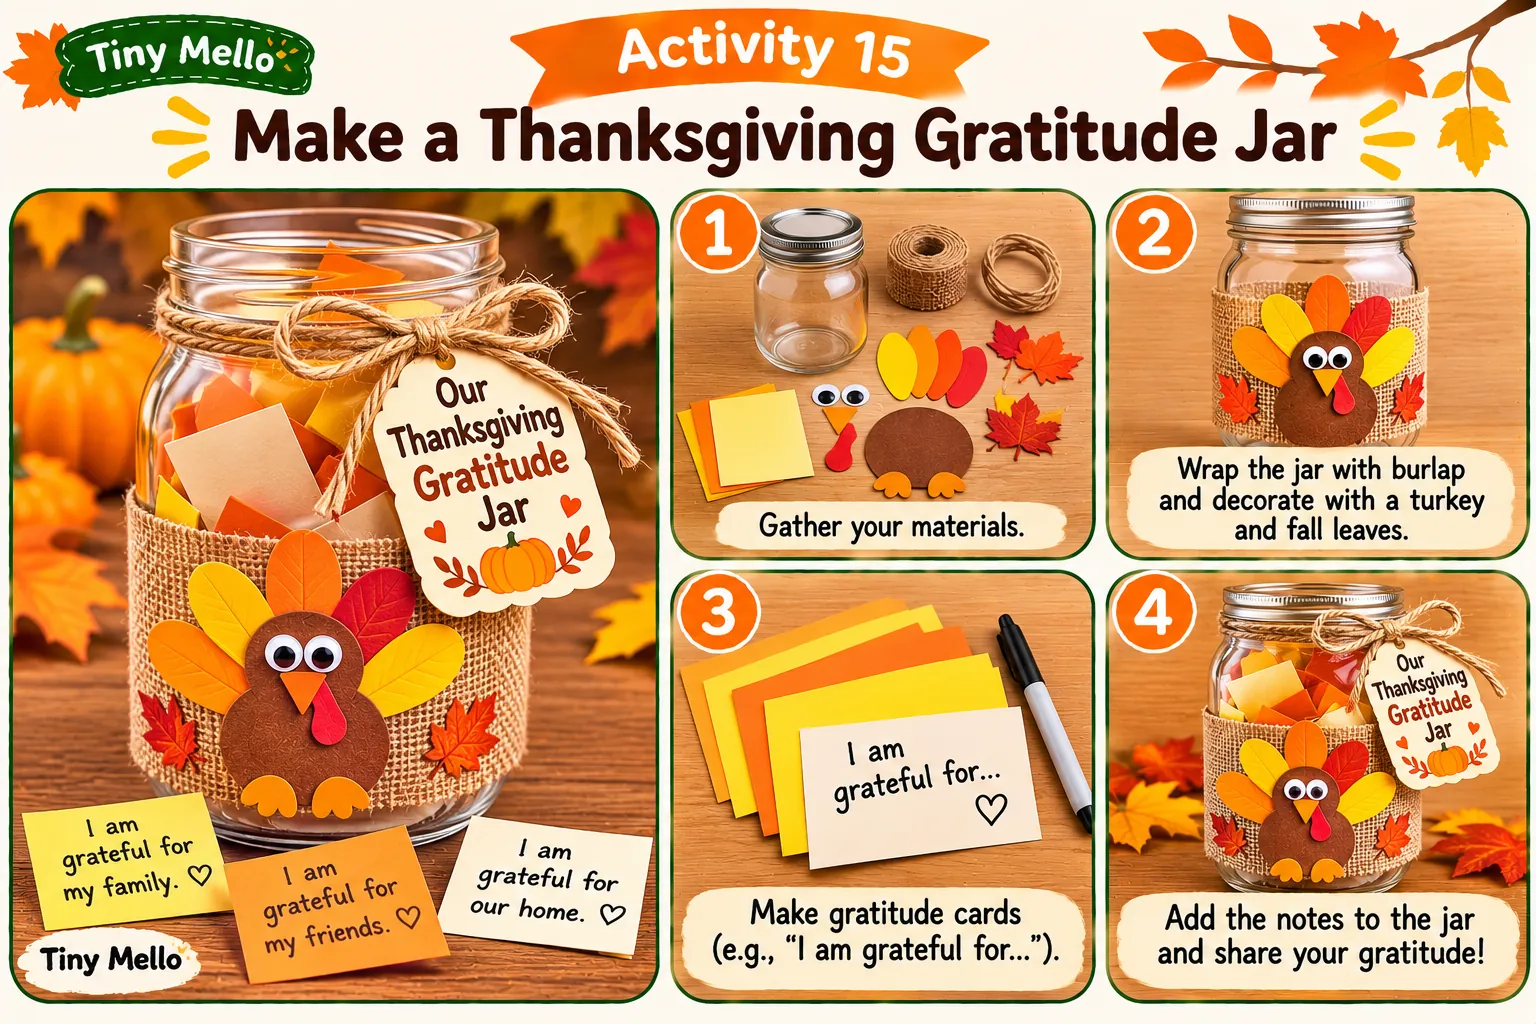
15. Make a Thanksgiving Gratitude Jar
A Thanksgiving Gratitude Jar gives children a chance to think about the people and things they appreciate. They can add little notes or drawings to the jar throughout the week. At Thanksgiving, open the jar together and read the messages as a family or classroom.
What You Need
- 1 clean, wide-mouth plastic jar with a lid
- Small pieces of paper
- Crayons or washable markers
- Pencil
- Stickers or ribbon for decoration
- Glue (optional)
Step 1: Prepare the Jar
Choose a clean, wide-mouth plastic jar with a secure lid. Remove any labels and make sure the inside is completely dry. A plastic jar is a safer choice than glass for young children.
Step 2: Decorate the Jar
Give children stickers, ribbon, and markers to decorate the outside of the jar. Add a label that says “My Gratitude Jar” or “Things I Am Thankful For.” Keep the opening clear so children can easily add their notes.
Step 3: Prepare the Gratitude Notes
Cut small pieces of paper approximately 3 × 3 inches. Place the notes and crayons near the jar so children can reach them easily.
Step 4: Write or Draw Thankful Thoughts
Ask children to think about something they appreciate, such as family, friends, pets, favorite toys, or their teachers. They can draw a picture or tell an adult what they are thankful for so the adult can write it down.
Step 5: Add the Notes to the Jar
Fold each completed note and place it inside the jar. Encourage children to add a new note whenever they think of something they appreciate. On Thanksgiving Day, open the jar and read the messages together.
Tips for Planning Thanksgiving Activities for Young Kids
A little preparation can make Thanksgiving activities easier to manage, especially with preschoolers and kindergarteners. Keep these tips in mind before getting started:
- Choose age-appropriate activities: Pick crafts and games that match children’s abilities. Younger preschoolers may need pre-cut shapes and extra help.
- Prepare materials in advance: Gather paper, glue, scissors, paint, and other supplies before children begin.
- Keep activities short: Most young children enjoy activities that take around 10–30 minutes. Allow extra time if they want to explore or decorate.
- Protect your workspace: Use newspaper, washable mats, or old tablecloths to make cleanup easier.
- Encourage creativity: Let children choose their own colors and decorations. Their finished projects don’t need to look exactly like the examples.
- Include learning through play: Add simple counting, color matching, storytelling, and gratitude questions to make activities more meaningful.
- Supervise children: Choose child-safe supplies and provide adult help when using scissors, paint, or other craft materials.